See how easy it is to make earrings with materials from BeebeeCraft. #beebeexraft #affiliate #jewelry
I made these rhinestone earrings using materials from BeebeeCraft. They were quick and easy to make even though I changed my plans as I was making them. I love the result and I plan to make more in different colors.
The links provided are for your use and may contain affiliate links. They cost nothing for you to use. Thank you in advance for supporting this site with its use.
Make a lovely jewelry dish gift for Mother’s Day by up-cycling a glass dish and etching it with etchall. #etchallcreme #upcycle #tutorial
with etchall
I found this glass piece at my local Goodwill store. It might have been a coaster but there was only one. I thought it would make for a nice jewelry dish after I enhanced it with etchall etching creme.
The links provided are for your use and may contain affiliate links. They cost nothing for you to use. Thank you in advance for supporting this site with its use.
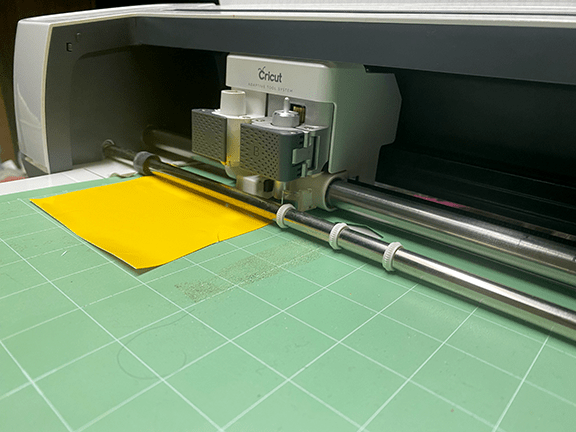
The first step is to remove the price label and clean the glass with rubbing alcohol.
After measuring the piece and adjusting the size of my design, I cut vinyl on a Cricut Maker.
I weeded the design and centered it on the back of the dish. It would work on the inside as well.
After I made sure the design was well attached, I covered the design with etchall etching creme. It only takes 15 minutes to etch the glass and the creme is reusable.
After removing the used etching creme, wash the glass and discard the vinyl.
Video Tutorial:
In the close-up image, check out the clarity of the smallest lines in the design.
Suggested Materials:
Links are Affiliates AZ – Amazon, C – Cricut, O – Other
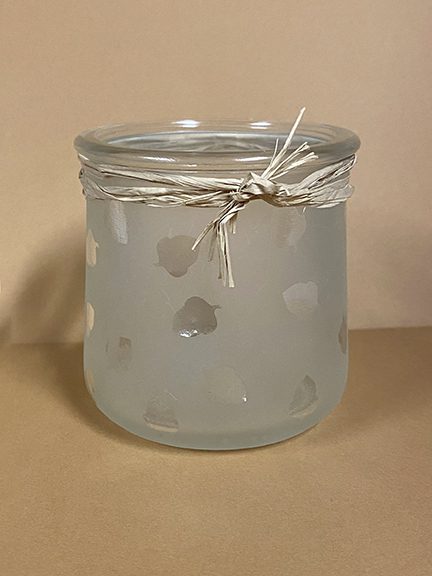
How to etch a votive with dip n’ etch for a nice upcycle project.
with etchall
Today I am making a votive for fall using Etchall Dip. The glass is a recycled Oui yogurt container. Instead of applying a cream to the glass you actually submerge the glass into the etching liquid. The etching results are the same, just the process is different.
The links provided are for your use and may contain affiliate links. They cost nothing for you to use. Thank you in advance for supporting this site with its use.
To begin, you’ll want to clean your glass with rubbing alcohol. Using hand sanitizer with a high alcohol content will also work well. I cut a small acorn shape on my Cricut Maker.
Then I applied the vinyl to the glass like you would stickers in a random pattern. The acorn SVG is free and can be found in the store at the following link [acorn SVG]
Use a plastic container for the dip n’ etch liquid. Measure how much liquid is needed by testing with water first. Details for this technique can be found in the video tutorial below. You will also want something to weigh down the project so the glass doesn’t float.
The time to etch is the same as the etchall cream, 15 minutes. The liquid is reusable so make sure to put it back into the etchall container when finished.
Video Tutorial:
I chose to finish off the votive with a wrap of raffia tied in a knot. The votive can be used in a variety of different ways. The image above uses an electric tea light. It also makes for a cute pencil cup. What a nice way to upcycle!
It’s the season, whether it is Halloween or Fall, this DIY Decorative Pumpkin works. I started with a plan to add flowers and a bow at the top, but after finishing the pumpkin, it was grand enough on its own. Nothing more is needed.
I found the pumpkin and napkins at Hobby Lobby. To apply the napkin, I made a mixture of white glue and water that got applied with a foam brush. Before applying the napkin, separate the layers and tear it into pieces.
A handmade round box with a ribbon flower topper made with ribbon from Gwen Studios. The round box represents a pumpkin. I originally was collaging a napkin onto a pumpkin with the intent to add the flower near the stem. The pumpkin turned out nice but it was too busy to show off the ribbon flower.
The links provided are for your use and may contain affiliate links. They cost nothing for you to use. Thank you in advance for supporting this site with its use.
Gwen Studios ribbon is available at Walmart and Michaels. For this project, I used Green and Orange satin ribbons in 7/8th inch.
Cricut Maker
I cut the round box on my Cricut Maker using two pieces of Solar Yellow cardstock from CutCardStock. The free box SVG file is available in the shop. [round box]
Before putting the box together, I used Distress Oxide in Spiced Marmalade to add color and visual texture to the cardstock. Doing so was to help the round box have similarities to a pumpkin.
Putting the box together and making the ribbon flower and leaves are explained in the video tutorial below.
Video Tutorial:
With the box open, you can better see the ribbon flower and leaves. The center of the flower is a button from an outfit my mom wore probably in the 70s.
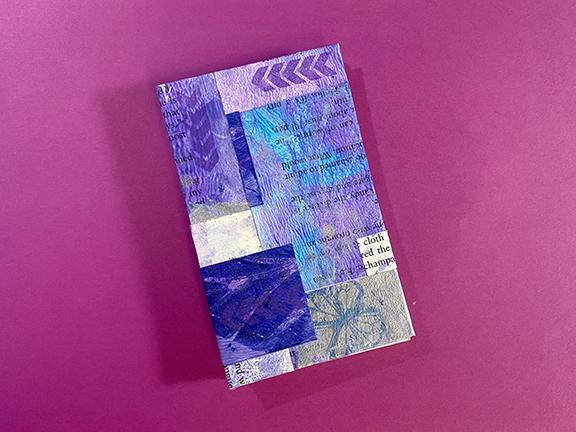
A few years ago I attended a bookbinding retreat at Penland. To this day, I still rely on the techniques I learned. This sweet little journal has a tab binding. The nice thing about a tab binding is that you can make the book as many pages as desired. I began making the cover papers using book pages and collaged them together.
You might be surprised to learn that I used children’s tempera and liquid watercolor. Applying the paints in a similar fashion to working on a Gelli plate. After the first layer of paint, different paint was applied with a stencil. Finally, stamped images were added.
After the paint dried, I cut the pages into different sizes. They were then used to collage onto chipboard for the covers. The entire process from painting pages to bookbinding is better viewed in the video tutorial.
Make a beautiful paper pocket with products from Gina K.
with Gina K
This paper pocket was fun to make using stamps and ephemera from Gina K. The pocket can be added to a journal, used for a gift card, or a special note. I personally like it as a stand-alone piece to be used for a special inclusion.
The links provided are for your use and may contain affiliate links. They cost nothing for you to use. Thank you in advance for supporting this site with its use.
Such a well-known name in paper crafting, I feel honored to have Gina K sponsor a blog promotion with Designer Craft Connection. Visit the DCC website to see all the projects that were made with Gina K.
Gina K sent these beautiful products for this post. The stamp set Never Loose Hope, and the Ephemera Pack, Watercolor Florals coordinate well together.
I began with the butterfly stamp and embossed it in gold with embossing powder from Emerald Creek.
After fussy cutting the butterfly out, I painted it using stamp pad ink.
I made a pocket out of cardstock and used another stamp from Gina K in the corner. Measurements for cutting and folding the pocket along with the complete tutorial are in the video tutorial below.
Video Tutorial:
A close-up image of the final pocket. You can see the details of the pocket and the dimension of the butterfly.
Suggested Materials:
Links are Affiliates AZ – Amazon, SSS – Simon Says Stamps, SB – Scrapbook, O – Other
Cutcardstock’s featured theme this month is white and ivory. Anytime I can create with the Stardream line, I jump at the chance. It is my favorite cardstock, the shine is just beautiful. This month I created an SVG file to make a DIY paper bowl.
The links provided are for your use and may contain affiliate links. They cost nothing for you to use. Thank you in advance for supporting this site with its use.
Cutting this file on a Cricut Maker, I set it to cut 100# cardstock with a pressure setting of more.
Here are the cut and scored shapes from the free SVG file. The file will make for a small container about 3″ wide when cut from an 8.5 x 11″ sheet.
I used a smush technique to paint one side of the cardstock with metallic paint from Deco Art. Paint and water were placed on my glass mat and the cardstock was then smushed into the colors. It made a fantastic dendrite pattern.
Video Tutorial:
To Grab the free SVG file, visit the store [paper bowl svg]
There are many creative ways to make ornaments. You can use paint, alcohol ink, or fabric. Why not use origami paper? I cut mine into squares but tearing the paper would also make a beautiful ornament. I am working with papers from Yatsutomo. The ornament is plastic but this technique will also work on glass.
Many of the items I use in posts are provided by the manufacturers to promote their products. A special thanks to those brands who sponsor this site. Some links are affiliates, thank you for using them.
Materials:
plastic ornament
mod podge
Origami paper
paper trimmer
scissor
ribbon
foam paintbrush
Scotch tacky glue
The iridescent paper didn’t want to stay put. I found overlapping it with the other patterned papers helped to hold it in place. After covering the ornament with origami paper, I used a color-coordinating ribbon to finish off the look.
Video Tutorial:
Suggested Materials:
Links are Affiliates AZ – Amazon, SSS – Simon Says Stamps, SB – Scrapbook, C – Cricut
Make a magical fairy wand with materials from Gwen Studios.
with Gwen Studios
fairy wand
This fairy wand was so fun to make, I love the color combination. I’ve never curled this kind of ribbon and it was fun watching it go from straight to curly after heating. I am sure your little girls would love to have one to play with.
Many of the items I use in posts are provided by the manufacturers to promote their products. A special thanks to those brands who sponsor this site. Some links are affiliates, thank you for using them.
ribbons
Solid and Polka Dot Grosgrain Ribbon Pack, 24 Bright Colors, 3/8″ x 48 Yards by Gwen Studios are available at Walmart. [ribbons]
parts
Many of the items I used to make the fairy wand can be found at Walmart.
Materials:
Gwen Studios ribbon
1/4″ dowel rods
fray check
scissors
binder clips
adhesive
Fabri-tac
Gwen Studio star patches
oven
The ribbons in the photo above are wrapped around 1/4″ dowel rods. The bottom one is glued in place while the others were placed in the oven at 250 degrees for 20 minutes to curl them.
Video Tutorial:
The wand is finished and so fun to play with and so pretty to look at. Who would you make a fairy wand for?
Suggested Materials:
Links are Affiliates AZ – Amazon, SSS – Simon Says Stamps, O – Other