Black Cat Mobile

Let’s make a black cat mobile to decorate your home for Halloween. It is so cute you can really use it year round!

with Gwen Studios

black cat mobile

I can’t believe it is time to craft for Halloween! In this house we love cats and we aren’t afraid of black ones. In fact, we used to have a black cat. As a member of the Gwen Studios design team, I was asked to craft for Halloween or Fall. I chose to make this black cat mobile. While everything I used is black, it turned out rather cute and not scary at all!

The links provided are for your use and may contain affiliate links.
They cost nothing for you to use.
Thank you in advance for supporting this site with its use.

Gwen Studios ribbons can be found at Walmart and Michaels. To see all the projects made with Gwen Studios ribbons, make sure to visit the Designer Crafts Connection website.

paint materials

Materials:

comparison of painted cats

At first, I thought all I needed was to paint the cats black – which I did. I painted them front and back and made sure to cover the edges as well. Then I decided to try the Dragonfly Glaze Paint on top of the black paint and that really finished off the look taking the flat black surface to something magical! I painted the embroidery hoop exactly the same way.

cats and bows

While the painting of the cats dried, I tied eight small bows from the Gwen Studios black satin ribbon. I used a lighter to finish off the ends of each bow so the ribbon doesn’t fray.

top knot

To begin the construction of the mobile, I took four very long strands of the black satin ribbon, folded them in half, and tied a knot leaving a loop at the top for hanging. At the very top of the loop where the ribbons are layered on top of each other, I used the Quick Grip glue between each layer to keep the ribbons in place.

knots on hoop

Evenly separating the ribbon strands around the embroidery hoop, I tied and knotted, and balanced the hoop. Once I was happy with the arrangement, I secured each knot to the hoop using the Quick Grip glue.

single cat

Each ribbon strand has a cat and bow attached at random lengths. I altered the direction each cat is facing. Looping the ribbon through the hole in the cat and tied a knot. Before making the knot tight, I slipped a bow into the knot loop. To finish off the ribbon, I cut the excess ribbon off, used a lighter to seal the end, and then glued the ribbon tail up onto the long strand of ribbon.

close up of cats on the mobile

Here is a close-up of the finished mobile cats. You can see how the cats are staggered in different lengths. When they touch each other the wood gives off a clicking sound that is subtle and pleasant.

Inspirational Button Pins

Making fun expressive button pins with free printables.

pins in hand

These inspirational pins were made with two free printables in the store. A few days ago I posted about making earrings using the marbled paper printable. That same printable is used here. What a fun way to express yourself. The pins also make fun little items to share.

printables

For this size of a pin, a 1″ paper punch made cutting the circle easy. Then an appropriate word was chosen and trimmed to fit within the circle. Of course, these printables can be used in various craft projects. These free printables are available through the links below.

Marbled paper printable [Marbled inchies]

Words paper printable [word set]

Video Tutorial:

Suggested Materials:

Links are Affiliates
AZ – Amazon
Glue Bottles
Glue Bottles
Shop at:
AZ
Reptile Glue
Reptile Glue
Shop at:
AZ
Westcott 8
Westcott 8″ Non-Stick Scissors
Shop at:
AZ
Button Maker
Button Maker
Shop at:
AZ
1
1″ Circle Punch
Shop at:
AZ

Wrinkled Sublimation Necklace

Learn how to create a wrinkled technique for sublimation on jewelry.

with Artesprix

necklace

This wrinkle technique creates great results. I first tried it with regular stamp pads and was inspired by not wanting to throw away my used protective paper from sublimation. You can read about that here. [wrinkle technique] Immediately after doing so, I thought why not use the new sublimation ink pads from Artesprix for this technique? So here it is applied to a

Video Tutorial:

side of pendant

To finish off the pendant after sublimating the front, I used permanent black ink on the sides and back of the piece.

Suggested Materials:

Links are Affiliates
AZ – Amazon, C – Cricut, O – Other
Cricut EasyPress
Cricut EasyPress
Shop at:
AZ | O | C
Heat Resistent Tape
Heat Resistent Tape
Shop at:
AZ | O
Jewelry Tool Kit
Jewelry Tool Kit
Shop at:
AZ
Protective Paper
Protective Paper
Shop at:
AZ | O
Sublimation Ink Pad
Sublimation Ink Pad
Shop at:
AZ | O

Curling Ribbon Earrings

Learn how to make earrings using curling ribbon.

with Gwen Studios

This month the Gwen Studios design team is working with curling ribbon. Curling ribbons can be used in a variety of different ways. Quilling paper is very similar to curling ribbon so I thought it would work in a similar way. I chose to roll the ribbons into disks and make earrings.

The links provided are for your use and may contain affiliate links.
They cost nothing for you to use.
Thank you in advance for supporting this site with its use.

ribbons

Curling Ribbon comes in a variety of different colors. Gwen Studios curling ribbon can be found at Walmart.

logos

I would like to thank Gwen Studios for providing me with the ribbon to work with. Designer Crafts Connection will share links to all the projects made for this month’s nautical theme design team projects.

ribbon and quilling paper

The photo above shows the difference in size between the curling ribbon on the left and the quilling paper on the right. The ribbon is just about twice the width but comes in a really long length that you can cut to your desired size.

rolling the ribbon

Using a battery-operated quilling tool, made the rolling of the ribbon quick and easy. The ribbon naturally curls in one direction, following that direction makes the rolling of the ribbon a bit easier to work with. Use tacky glue to add different colors to the rolling.

To secure the ribbon, I added a piece of cardstock onto the back of the curled ribbon in a coordinating color. To see the entire process, watch the video tutorial below:

Video Tutorial:

I made two different pairs of earrings using the same curling technique. The blue pair are stud earrings while the pink version is made using ear wires.

Suggested Materials:

Links are Affiliates
AZ – Amazon, O – Other
Earring Studs
Earring Studs
Shop at:
AZ
Glue Bottles
Glue Bottles
Shop at:
AZ
Gwen Studios at Walmart
Shop at:
O
Jewelry Tool Kit
Jewelry Tool Kit
Shop at:
AZ
Quilling Tool
Quilling Tool
Shop at:
AZ
Reptile Glue
Reptile Glue
Shop at:
AZ
Westcott 8
Westcott 8″ Non-Stick Scissors
Shop at:
AZ

Floral 3D Decor

Make a 3D floral decor with this free SVG file and CutCardStock.

with CutCardStock

final decor piece

This month Pop-Tone is the featured cardstock at CutCardStock. I’ve created a decorative piece that is 3-dimensional but the layers can also be used individually. This would make a beautiful alternative to a bow on a gift. I have a cord attached to mine to hang in a doorway. I like it as is but a tassel might be a nice addition.

The links provided are for your use and may contain affiliate links.
They cost nothing for you to use.
Thank you in advance for supporting this site with its use.

cardstock colors

I used three colors from the Pop-Tone sample pack, Gumdrop Green, Blue Raspberry, and Grape Jelly. These are 100# card stock, a nice thickness for 3D creations. Each Pop-Tone sample pack comes with one sheet of all the colors in the 65 lb cover weight and has one sheet of each of the Pop-Tone 100 lb cover weight. This is a nice way to sample all the colors. Of course, you can purchase the colors separately.

cricut maker

Cutting the file on a Cricut Maker, I set it to 100# cardstock with a pressure setting of more.

cut pieces

I set my file to cut 1 of the centerpieces and then 2 of the other pieces so that the piece would be dimensional.

adding gems

I added these glittered gems to the center on each side and it really finished off the piece. It is amazing how such a small thing can add so much to a design.

Video Tutorial:

Please visit the store to download the free SVG file [Floral Decor]

DIY a Travel Valet Tray

Make your own travel valet tray that can be used for so much more.

finished travel valet

Have you ever seen a travel valet? They are basically a basket or tray if you will that you use to collect all your pocket items when traveling. This is a quick and easy-to-make version using a placemat from the Dollar Tree and a Snap Kit from Gwen Studios.

The links provided are for your use and may contain affiliate links.
They cost nothing for you to use.
Thank you in advance for supporting this site with its use.

snap kit

The Gwen Studios Snap Kit is available at Walmart. On top of it is a cut-down piece of a woven plastic placemat from the Dollar Tree.

parts needed

From the kit, you’ll need the tool with the appropriate parts installed for the snaps you are using and the snaps. An instruction sheet is included in the kit to guide you on the use of the different snaps. You can see 8 stars and 4 of each male and female parts in the above photo.

snaps in place

A close-up image with the snaps in place before using the tool to set them. Watch the video tutorial for detailed instructions on how to make the travel valet.

tool

Place the tool on the snaps and squeeze tight to secure them in place. It really is easy to use.

Video Tutorial:

The finished travel valet is flat on the left and snapped together on the right. It is really handy for so much more than travel. The valet can withstand getting wet, making it work well in the bathroom or kitchen because it is plastic.

Inked Wrinkle Technique

Don’t throw away your waste paper before trying this inked wrinkle technique.

final card

The other day I was working on a sublimation project and I was discarding my protective paper. I hated the idea of throwing away paper and came up with this idea for its use. Using the scrap paper, I Inked it to make an interesting texture. I happened to use Protective Paper from Artesprix. It has a vellum or parchment paper look to it.

The links provided are for your use and may contain affiliate links.
They cost nothing for you to use.
Thank you in advance for supporting this site with its use.

materials

The idea here is to use waste paper. The protective paper I had couldn’t be used again for sublimation because it had some ghosting of the sublimation ink on it which might transfer if used again. I started with a black ink pad and then continued with different colors of ink.

This is the inked wrinkles after I added a few different colors of ink. After finding this successful, I did it again with sublimation ink pads and I will have a tutorial on that outcome posted soon.

Video Tutorial:

close-up of card

I ended up making a card with the wrinkled paper. I think it could be used in a variety of different ways. No more wasted paper for me. I will be keeping a stash of these wrinkled ink papers for crafting. Did you find this useful? Let me know in the comments.

How to Make a Textured Card

How to make a layered and textured card with DIY texture paste.

final enjoy card

The other day I shared about making your own texture paste. What I didn’t share was what to do next, so here is one example of its use. The background leaves are all made with my homemade texture paste.

The links provided are for your use and may contain affiliate links.
They cost nothing for you to use.
Thank you in advance for supporting this site with its use.

card parts

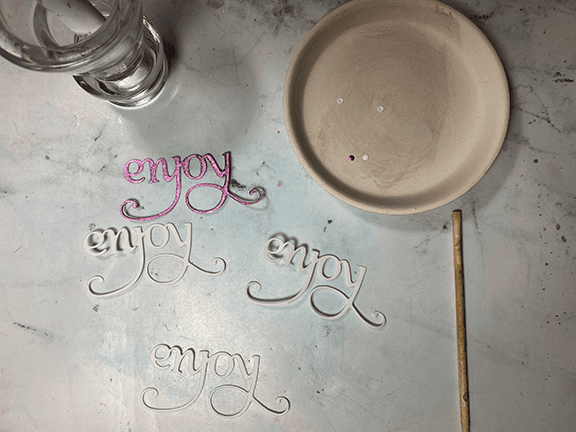
This card has a few layers and textures. The card base is layered with a beautiful metallic Kunzite cardstock from CutCardStock. The next layer is the leaves made with DIY texture paste. Because of the slight depth from the texture paste, I thought the sentiment would need to be elevated from the front of the card.

layering word

The word enjoy was cut from white cardstock three times and once from Rinea foiled paper. I then layered them all together to give the word additional height. If you are interested in Rinea foiled paper use my discount code of “TRYIT” for 10% off your order.

Video Tutorial:

closeup

Finally, a close-up of the card front so you can see the layers and depth of all the parts used. If you look closely, you can see I used a gem to dot the j instead of the layered cardstock, adding one additional texture to the card.

Suggested Materials:

Links are Affiliates
AZ – Amazon, SSS – Simon Says Stamps, O – Other
Cut Cardstock
Cut Cardstock
Shop at:
O
Mini Maker
Mini Maker
Shop at:
O
rhinestones
rhinestones
Shop at:
AZ
Rinea Foiled Paper - jade and gold
Rinea Foiled Paper – jade and gold
Shop at:
O
Scotch Tacky Glue
Scotch Tacky Glue
Shop at:
AZ | SSS

DIY a Gift Bag

Learn how to diy a gift bag from wrapping paper.

gift bag

Have you ever made your own gift bag? It really isn’t difficult. I made this one from wrapping paper. It was actually so easy that I am not sure I will buy gift bags again. I can make them in whatever size I need. The cost savings is another advantage.

The materials needed are very limited. You will need a pair of scissors, double-sided tape, and of course wrapping paper. Depending upon how you embellish it, you will want those materials as well. I used a paper punch and twine. On another version, I folded over the top and used a sticker – so easy.

Follow the easy video tutorial above to make your own gift bag. You can make them as you need or prepare a bunch ahead of time for when you need them. A fun idea would be to choose a certain paper pattern per person for a holiday like Christmas. No name tags would be needed, just let them know their pattern on the special day.

Mini Rainbow Banner

Making a mini ribbon rainbow banner with Gwen Studios.

with Gwen Studios

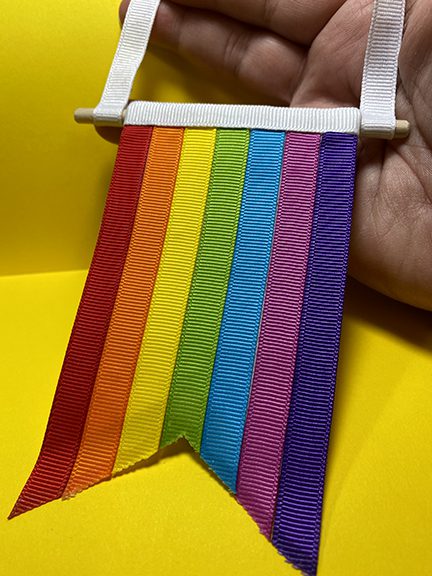
This month for the Gwen Studios design team, we are making projects that are for St. Patrick’s Day, using Green, White, and Rainbow Colored ribbons. I chose to go with the rainbow idea and make a mini banner using the colors of the rainbow. Have you heard of ROYGBIV? This is how my daughters learned the colors of the rainbow, R = red, O = orange, Y = yellow, G = green, B = blue, I = indigo, and V = violet (purple).

Many of the items I use in posts are provided by the manufacturers to promote their products.
A special thanks to those brands who sponsor this site. Some links are affiliates, thank you for using them.

gwen studio

The ribbons I used are solid grosgrain ribbons and are available in a pack of 12 bright colors, 3/8″ x 36 Yards by Gwen Studios available at Walmart.

washi tape

I used washi tape a few times in making the banner. Make sure to watch the video to see the tips for using washi tape, it was so helpful.

burn ends

There are two different ways to seal the ends of ribbons. You can burn them as shown above with a lighter, or use a product called fray check. I used both in this project to show you the differences.

back of banner

I used a variety of different tools to make the banner. The items I found helpful were scissors, a nail file, a craft knife, a cutting mat, and a white ink pen.

The ribbons are glued on top of craft foam. The foam is wrapped around a dowel rod and glued in place using Fabri-Tac. I found sewing clips were a big help in holding the foam in place as the glue dried.

Video Tutorial:

Close-up of the final banner. It really turned out so cute and my daughter has claimed it as hers!

To see all the other projects created by the Gwen Studios design team, visit Designers Craft Connection. [just click the logo below]

Suggested Materials:

Links are Affiliates
AZ – Amazon, C – Cricut, SSS – Simon Says Stamps, SB – Scrapbook, O – Other
1/4
1/4″ dowel rods
Shop at:
AZ | O
Craft Foam
Craft Foam
Shop at:
O
Cricut True Control Knife Blade
Shop at:
AZ | C
Fabri-tac
Fabri-tac
Shop at:
AZ
Fray Check
Fray Check
Shop at:
AZ | O
Gwen Studios at Walmart
Shop at:
O
ribbons
ribbons
Shop at:
O
Sewing Clips
Sewing Clips
Shop at:
AZ | O
Xyron Sticker Maker
Xyron Sticker Maker
Shop at:
AZ | SSS | SB