Inking Tissue Paper Wrinkles

A beautiful layered tag that is enhance by inking wrinkles.

Tag it Tuesday

finished tag

This week’s Tag it Tuesday showcases a tag made with a mix of creative techniques. It begins with inking wrinkled tissue paper, which is then mounted to cardstock for added texture. The tag is then die-cut, and vellum is stamped to bring in a soft, elegant touch. When everything comes together, the result is a beautifully layered and sophisticated design perfect for various crafting projects!

close up of wrinkles

Here’s a close-up look at the inked wrinkles! While the surface remains flat, the inking technique enhances the texture, giving it the illusion of depth and dimension. This effect adds a rich, aged, or distressed look, making it a fantastic technique for mixed media, journaling, and other creative projects.

*To make the DIY rubbing wax I used clear shoe polish and mica powder in equal amounts.

Video Tutorial:

Suggested Materials:

Links are Affiliates
AZ – Amazon, SSS – Simon Says Stamps, SB – Scrapbook, O – Other
Color Hive Ink
Color Hive Ink
Shop at:
SB
Double Sided Tape
Double Sided Tape
Shop at:
AZ
Glassboard
Glassboard
Shop at:
AZ | O
Glue Bottles
Glue Bottles
Shop at:
AZ
HP Paper
HP Paper
Shop at:
AZ
Mini Maker
Mini Maker
Shop at:
O
Ranger Heat Tool
Ranger Heat Tool
Shop at:
AZ
Reptile Glue
Reptile Glue
Shop at:
AZ
Shoe Polish
Shoe Polish
Shop at:
AZ

DIY Fairy Lantern

How to DIY a fairy lantern in a plastic bottle.

​Make a Fairy Jar or Fairy Lantern of your own with this free SVG file.

A DIY Fairy Lantern reminds me of childhood and stories of fantasy. It is really easy to make this fairy lantern. You don’t need a lot of materials and can personalize it as you desire. I made my fairy lantern in a plastic bottle so it is very kid-friendly and will not break. And, you can recycle a plastic bottle or jar to make your own fairy jar.

materials

Links below are affiliates.

Materials:

Instructions:

Download the free fairy SVG file.

bottle
Start with a clean bottle or jar

fairy in jar
Using super glue, adhere the fairy to the inside of the jar. Don’t worry about the glue showing.

align jar and tissue
Cut the tissue paper to fit around the jar.

mod podge
Cover the outside with mod podge 

cover exterior with mod podge
Line up the tissue paper and wrap it around the jar. Align the top edge, don’t worry about the bottom, it get’s tucked under. Wrinkles add to the personality, just be careful not to tear the tissue paper. Then cover it again with mod podge. Allow it to dry.

decorate the lantern
Decorate the rim as you desire. I used ribbon and paper cut out flowers.
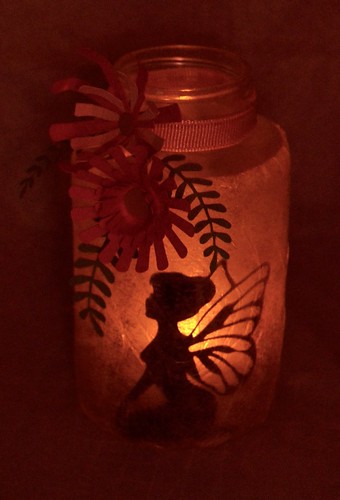
with light
Insert the flickering light and you are done!