This week’s tag is created with materials that were donated to me by DecoArt, TCW, and AALL & Create. I started with a painted piece of cardstock. The cardstock had paint that was left over from another project but I knew I wanted to use it. The colors were too pretty not to do something with them. So I cut the piece into a tag.
Using a stencil from Divinity Designs, I covered the tag with stencil butter from TCW. I knew I wanted a stencil that wouldn’t cover too much of the paint colors and this floral design worked well.
Video Tutorial:
In this close-up image, you can see how well the colors work together.
This cute tag is made with a print and then cut image of a penguin from Vecteezy. It is a fun winter-themed tag with a stenciled background and finished off with an appropriate saying.
I started this tag with Distress Oxide Sprays that I found on clearance, knowing I wanted to stencil on top of them. And then it grew from there. Not really having a set plan in place. A variety of materials were used and I will link them at the bottom of this post.
Video Tutorial:
Suggested Materials:
Links are Affiliates AZ – Amazon, SSS – Simon Says Stamps, SB – Scrapbook, O – Other
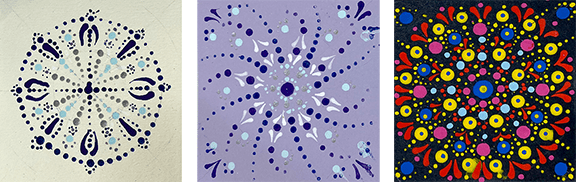
Dot Mandala painting is trendy. It isn’t a difficult craft but it does require practice. You can build on your technique and difficulty of imagery. To start you will want some basic craft paint, a few tools for dot-making (which can be found around your house), a pallet, and paper.
The links provided are for your use and may contain affiliate links. They cost nothing for you to use. Thank you in advance for supporting this site with its use.
Tools you can use to make dots can be made. Here is a tutorial for making your own ball tool [DIY Ball Tool]. Other items you might want to collect and try:
push pin
end of paintbrush
dry pen
pencil eraser
needle
dowel
knitting needle
crochet hook
Next, you will want to get your paint to the right consistency. Adding a bit of water if needed to make a liquid or runny paint. I am using craft paint from Arteza.
If you don’t want to mix water into your paint you may want to buy paint made for pour painting since it will be a good consistency for dot painting. Arteza has a variety of pour paint sets. There are even color sets that coordinate. And if you are truly just getting started and have no materials, you might be interested in the Arteza Dot Tool Kit. It includes everything you will need except paint.
After practicing your dots and you are now ready to paint a mandala, many people start with a stencil. There are many stencils you can use to create mandalas. If you have a personal cutting machine you can use this SVG file and cut one, to begin with. [madala stencil]
Working with products from the Maker’s Movement made this card so bear cute!
with Maker’s Movement
Planning, coloring, and die-cutting this card was so peacefully enjoyable. I knew the moment I saw the bear stamp he was going to be a polar bear. My daughter loves polar bears. What excites me about the card is that I used the leftover cut-out leaves from a past project as the stencil to create the background! What a great way to extend the use of the die and the card stock. I keep all my left-over parts just in case for moments like this.
Many of the items I use in posts are provided by the manufacturers to promote their products. A special thanks to those brands who sponsor this site.
Materials:
card stock – white and patterned
the Works Board
Let’s Get Cozy Die (leaves)
Woodland Friends – die and stamp sets
Distress Oxide
blending brush
Mini Maker
tape runner
Stazon black ink pad
Intense black ink pad
washi tape
Derwent Inktense pencils
Because I video the process, I didn’t get a chance to stop and photograph the ink blending with the DIY stencil on the front of the card. But you can see it all happen in the video tutorial below.
Isn’t that bear just so cute? After stamping and coloring, I taped the die in place then sent it all through the Mini Maker to cut. The only thing left to do is stamp the sentiment and put the card together.
Video Tutorial:
Suggested Materials:
Links are Affiliates AZ – Amazon, SSS – Simon Says Stamps, SB – Scrapbook, O – Other
The minute I saw this decanter advertised on the Dollar Tree website, I knew I had to have it. I wanted to etch it with etchall. I love the iridescent quality of the glass. I had a hard time deciding which color decanter to get but ultimately decided upon the purple version. I originally envisioned etching all four sides of the glass, but I ran into a bit of an issue I will explain in detail below.
This post and photos may contain Amazon or other affiliate links. If you purchase something through any link, I may receive a small commission at no extra charge to you. Any supplies used may be given to me free of charge, however, all projects and opinions are my own.
Here is where I ran into a bit of trouble. The first time I etched the decanter it removed the purple iridescent layer. So I used a craft knife to scratch off all the purple from one side of the decanter.
Clean the glass with rubbing alcohol and then adhere the stencil to the glass.
Cover the stencil with etchall etching creme, be generous.
After 15 minutes has passed, remove the excess creme and return it to the container. I used a scrap of cardstock to remove the creme. etchall creme is reusable.
Here is a close-up of the final result. I am happy I resolved my issue and it turned out well!
I am participating in the Designer Crafts Connection group blog hop that is sponsored by Little Birdie this month. The decoupage trinket box is what I made with the supplies Little Birdie provided.
The Designer Crafts Connection group is hosting a blog hop that is sponsored by Little Birdie this month. The above decoupage trinket box is what I made with the supplies Little Birdie provided. I really enjoyed the creative process of making the trinket box and I added a few parts as I was creating that I had not originally envisioned. These additions were the stenciling and the feet. I am excited to see what the other designers made since I believe we all received different materials to work with.
This is the box I received from Little Birdie.
The box contained two coasters, two packs of the decoupage paper, Deco Magic in matte and glossy, and Varnish.
This post and photos may contain Amazon or other affiliate links. If you purchase something through any link, I may receive a small commission at no extra charge to you. Any supplies used may be given to me free of charge, however, all projects and opinions are my own.
If you shop at Little Birdie and would like to use a discount code(affiliate link), Janet05 will give you a discount of 5%.Use the following affiliate linking discount code JANETTRIESCHMAN at Rinea for a 10% off savings.
Directions:
To begin, I mixed ivory chalk paint and blue together for the inside of the box.
I painted one coat inside.
The outside I covered in one coat of the chalk paint.
I began to decoupage over the outside painted surface, one side at a time.
After each side was decoupaged under and over the paper, and it had dried, I cut the paper for the opening.
I then decoupaged the inside of the box. Note, the edges are messed up but they get fixed before I finish the box.
I stenciled the light blue color on the top of the box. This hints at the inside color.
The focal image was fussy cut from the decoupage paper and added to the top of the box, then the entire box was covered three times with the decoupage glue.
I decided to add feet to the box and painted beads to match with blue paint and then sealed them with the decoupage glue.
Using mixed media glue, I added them to the bottom of the box.
Here is the inside of the finished box. Notice those edges are all cleaned up! This might be my favorite part of the trinket box.
Here is the finished box from the side. I really think those feet are a great addition.
Don’t forget to check out the other designer posts for this blog hop with Little Birdie. Just click the logo above.