Let’s Make a Bracelet for Spring

with Gwen Studios

finished bracelet

Spring is almost here and adding a new accessory to your wardrobe is a great way to update without spending much time or money. I added beads to a fluted ribbon technique. Using Gwen Studios’ pink satin ribbon, I made this lovely bracelet to update my spring wardrobe.

This project was created for Gwen Studios. You can find all the design team projects listed on the Designer Crafts Connection website. Gwen Studios products can be found at Walmart and Michaels.

materials

To make the bracelet I am using a satin ribbon, a pencil, small beads, a sewing needle, thread, scissors, and hardware for jewelry making.

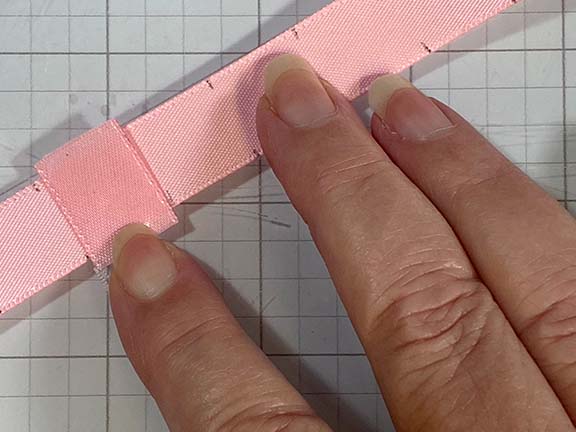
I began by making marks on the ribbon with a pencil. Using a small scrap of ribbon, I marked the width of the ribbon shown in the first photo above. Then I marked the center of the ribbon between those markings. I did not cut any ribbon off the roll, I will do that at the end once I have the length I need.

To understand the sewing process, it is best explained by showing you. Please refer to the video below.

Video Tutorial:

jewelry hardware

Once I had the length needed for the bracelet, I finished the ends off with jewelry hardware.

While this technique makes for a lovely bracelet, you could also use the ribbon for other crafts or as a trim to a sewing project.

Unleash Your Creativity with Ribbon Butterflies!

Add a unique flair to gifts, decor, and more with these DIY ribbon butterflies. @GwenStudios

butterflies

Transform colorful ribbons into stunning butterflies with this step-by-step tutorial! Discover the art of crafting these whimsical wonders and add a touch of magic to your DIY projects.

ribbons

The ribbons I am using are wide satin ribbons from Gwen Studios. These are the perfect ribbons for this project and come in a variety of different sizes.

The links provided are for your use and may contain affiliate links.
They cost nothing for you to use.
Thank you in advance for supporting this site with its use.

logos

This project was created for Gwen Studios. You can find all the design team projects listed on the Designer Crafts Connection website. Gwen Studios products can be found at Walmart and Michaels.

Materials:

materials
templates

Here are the templates I used, although they are not necessary. You can just cut two squares of different sizes and round the corners.

Video Tutorial:

Sublimating Ribbon

Learn how easy it is to create your own ribbon designs using sublimation ink pads and markers. @gwenstudios @artesprix #affiliate

finished gift box

Now you can create your own special designer Gwen Studios ribbon. I love how this sublimated ribbon made this gift box so special. Putting your own design on a ribbon is very easy to do using sublimation ink pads and markers. The ones I am using are from Artesprix.

The links provided are for your use and may contain affiliate links.
They cost nothing for you to use.
Thank you in advance for supporting this site with its use.

coloring

To create the image I am using a layering technique. I stamped the image and with the use of a light table, I can see the image and know where to add the color. Then I stamped the image on top of the colored work. The reason for doing it this way was to illuminate the possibility of the inks bleeding together. You can see how this was done in the video below.

colored image

I actually did the entire process twice. I started with pastel colors as seen in the first image. They did transfer but weren’t visible enough for my taste so I did it again with brighter colors as seen above. Here I am making the sublimation sandwich to transfer the image.

sublimation sandwich

This image show what is referred to as a sublimation sandwich. Working on a heat-resistant surface, I have a layer of protective paper, then the ribbon faces up, the colored and stamped image face down is held in place with heat-resistant tape, and the entire thing will be covered with another piece of protective paper before heating.

iron

Because my project is small I chose to use a craft iron instead of a heat press. With the iron set on high and no steam, I used a bit of pressure and left the iron on for a minute. Before removing the tape and image you will want to do a peek test to make sure everything is transferred.

This post is created for the Gwen Studios design team. Other projects can be found on the Designer Crafts Connection website. Gwen Studios ribbons can be found at Walmart and Michaels.

Video Tutorial:

Suggested Materials:

Links are Affiliates
AZ – Amazon, O – Other
Heat Tape
Artesprix Heat Tape
Shop at:
AZ | O
Artesprix Protective Paper
Shop at:
AZ | O
Artexprix Project Mat
Shop at:
AZ | O
Gwen Studios at Walmart
Shop at:
O
Oliso Mini Iron
Oliso Mini Iron
Shop at:
AZ
Pastel Sublimation Markers
Shop at:
AZ | O
Sewing Clips
Sewing Clips
Shop at:
AZ | O
Sublimation Ink Pad
Sublimation Ink Pad
Shop at:
AZ | O

DIY a Ribbon Keychain

Follow the instruction to make your own ribbon keychain. Made with ribbons from Gwen Studios.

with Gwen Studios

finished keyring

This keyring craft was a reminder of times past. Did you attend summer camp and make lanyards? Well, this keychain is a version of that, made with ribbon. What a fun craft for kids to do. Why not make one for Mother’s Day? Make one yourself or teach your kids to weave a lanyard.

materials

They’re very few needed materials. You’ll need a keyring, four colors of ribbon, and a pair of scissors. I chose to seal the ends of my ribbons with a lighter. If you choose to do this with kids, I recommend supervising them or doing the lighter for them.

The links provided are for your use and may contain affiliate links.
They cost nothing for you to use.
Thank you in advance for supporting this site with its use.

ribbon pack

For spring, I chose to work with pastels from the Gwen Studios grosgrain ribbon pack. These ribbons are available at Walmart and Walmart.com. Look at how beautiful those colorful ribbons are. There are so many color combinations to choose from for this project.

woven ribbon

This little nugget of weaving was made with four ribbons each 32″ in length. If you want your piece to be bigger, use longer ribbons.

Video Tutorial:

top of weaving

I chose to wind the keyring through this end of the weaving. If you don’t want ribbon tails, you could turn the whole thing around and loop those tails around the keyring and finish it off in the same manner that I collected the ribbon tails – what a fun alternative!

Making a Magical Fairy Wand

Make a magical fairy wand with materials from Gwen Studios.

with Gwen Studios

fairy wand
fairy wand

This fairy wand was so fun to make, I love the color combination. I’ve never curled this kind of ribbon and it was fun watching it go from straight to curly after heating. I am sure your little girls would love to have one to play with.

Many of the items I use in posts are provided by the manufacturers to promote their products.
A special thanks to those brands who sponsor this site. Some links are affiliates, thank you for using them.

ribbons
ribbons

Solid and Polka Dot Grosgrain Ribbon Pack, 24 Bright Colors, 3/8″ x 48 Yards by Gwen Studios are available at Walmart. [ribbons]

parts

Many of the items I used to make the fairy wand can be found at Walmart.

Materials:

  • Gwen Studios ribbon
  • 1/4″ dowel rods
  • fray check
  • scissors
  • binder clips
  • adhesive
  • Fabri-tac
  • Gwen Studio star patches
  • oven
twirled ribbon on rods

The ribbons in the photo above are wrapped around 1/4″ dowel rods. The bottom one is glued in place while the others were placed in the oven at 250 degrees for 20 minutes to curl them.

Video Tutorial:

The wand is finished and so fun to play with and so pretty to look at. Who would you make a fairy wand for?

Suggested Materials:

Links are Affiliates
AZ – Amazon, SSS – Simon Says Stamps, O – Other
1/4
1/4″ dowel rods
Shop at:
AZ | O
Fabri-tac
Fabri-tac
Shop at:
AZ
Fray Check
Fray Check
Shop at:
AZ | O
Gwen Studios at Walmart
Shop at:
O
ribbons
ribbons
Shop at:
O
Scotch Tacky Glue
Scotch Tacky Glue
Shop at:
AZ | SSS

DIY Filled Ornament Gift

Make your own diy filled ornament that is great for gift giving.

with Gwen Studios

ornament

Make a two-fold gift for holiday giving with this Christmas Ornament. It’s an ornament to hang on your tree and you fill it with a special treat. Anyone would love to receive this special gift. All the beautiful ribbons are from Gwen Studios and can be easily found at your local Walmart store.

Many of the items I use in posts are provided by the manufacturers to promote their products.
A special thanks to those brands who sponsor this site
Some links are affiliates, thank you for using them.

Materials:

  • scissors
  • cardstock
  • Zyron sticker maker
  • Ribbons from Gwen Studios
  • clear ornament
  • Christmas medallion

This Christmas Tree ribbon is amazing, I have never seen anything like it. Gwen Studios has a variety of different patterns of die-cut ribbon available. It is cut really well but because of the small pieces, you may need to remove some from the design to gain the full effect.

photo credit: J. McGuffee

Check out the display of Gwen Studios die-cut ribbons at Walmart. There are trees, snowflakes, gingerbread men, ornaments, deer, and more.

I ran both the tree and red ribbon through a Zyron sticker maker and stacked them together before I wrapped my ornament with them. Now I am adding the double bow and Christmas medallion to the ornament with a bit of Fabri-Tac glue.

Don’t forget to fill the ornament and attach the gift tag that coordinates. I filled mine with candies but bath salts or hot cocoa would be nice as well. Just personalize the filling to your recipient.

The complete video tutorial can be viewed below:

Video Tutorial:

The filled and finished ornament is ready to gift. It would be great to make a few of these to have on hand for last-minute gift-giving.

christmas inchies

And if you would like the printable to make the Christmas embellishment, you can find the inchies printable here: [Christmas inchies]

Suggested Materials:

Links are Affiliates
AZ – Amazon, SSS – Simon Says Stamps, SB – Scrapbook, O – Other
Fabri-tac
Fabri-tac
Shop at:
AZ
Westcott 14849 8
Westcott 14849 8″ Straight Titanium Bonded Non-Stick Scissors
Shop at:
AZ
Xyron Sticker Maker
Xyron Sticker Maker
Shop at:
AZ | SSS | SB
Gwen Studios at Walmart
Shop at:
O
Clear Ornament
Clear Ornament
Shop at:
O

How to Make Ribbon Earrings

You are going to love making these earrings from ribbon with Gwen Studios.

With Ribbon from Gwen Studios

ribbon earrings

Today I am back working with Gwen Studios ribbon as an application to be on their design team. We were asked to make jewelry or home decor and since I had already made a decor piece with ribbon, I chose to make earrings. These ribbon earrings use coordinating ribbons layered together. The fun thing about them is that you can make them at whatever length you want.

I would first like to thank Designer Crafts Connection for the opportunity to work with amazing companies and designers. Specifically for this post, I would like to thank Gwen Studios for providing me with an amazing box of materials to work with.

ribbon earring materials
materials

Materials:

Many of the items I use in my posts are provided by the manufacturers in order to promote their products.
A special thanks to those brands who sponsor this site.
.

  • ribbons – Gwen Studios
  • jewelry making pliers
  • jewelry findings – ear wires and ribbon ends
  • scissors
  • ruler
  • lighter
  • adhesive – optional

Gwen Studios products can be found at your local Walmart store.

Directions:

measure ribbon

To make the earrings, you want to measure and cut your ribbons into different lengths. Starting with the widest ribbon as the longest. Keep in mind most of the ribbons will be folded in half.

Video Tutorial:

I am a total fan of pink so they were the first pair of earrings I made. Gwen Studios has so many beautiful ribbons I couldn’t stop making only one pair.

How to Make an Alternative Halloween Pumpkin with Cricut

Make an alternative bucket pumpkin with Cricut.

This is a sponsored conversation written by me on behalf of Cricut. The opinions and text are all mine.

I was intrigued when I first saw the bucket camping lights people were making. We don’t camp so I thought they might be a great alternative to a carved pumpkin as a DIY Halloween Craft. So I pursued how to make the bucket lights and changed it a bit for an alternative Halloween Pumpkin with the assistance of my Cricut Maker. I used the Cricut to cut out the bats from vinyl and felt. The Cricut Maker has exchangeable blades that were used. The Rotary Blade™, with its gliding, rolling action, cuts through virtually any fabric and I used it for the felt. I used the Fine Point blade to cut the permanent vinyl. Both of these blades come with the Maker, there are additional blades available.

________________________________________________________________________

I want to personally thank Cricut for providing materials for this post.
I am a design team member at Cricut.


The following links may contain affiliate links. They help support this site and cost you nothing to use them.
_________________________________________________________________________

Materials:

Directions:

cutting vinyl for alternative pumpkin with Cricut
Begin by using the bat template from Cricut for cutting vinyl. Using an entire sheet of 12 x 12 black vinyl, cut out this design.

bats - alternative pumpkin with Cricut
Bats after being weeded.

cover bucket - alternative pumpkin with Cricut
Using the bats like a sticker, apply them to the bucket in a random design.

cut felt - alternative pumpkin with Cricut
Cut out the felt.
Using the same design as the vinyl. Edit the file to only have the medium sized bats.
Then cut the felt with the Rotary Blade.

glueing felt - alternative pumpkin with Cricut
Glue two felt bats together.
Follow the next step before gluing together.

using wire - alternative pumpkin with Cricut
Place a rolled wire between the two felt bats.
Allow them to dry overnight.

join wires after glue dries - alternative pumpkin with Cricut
Bundle the wires together.

ribbon rolls - alternative pumpkin with Cricut
Decorative ribbon from Dollar Tree.

making bow - alternative pumpkin with Cricut
Using both entire rolls of ribbon, make a bow.
Wrap the wire from the felt bats around the bow.

bow to lid - alternative pumpkin with Cricut

This is where it gets a little tricky.
I tried hot glue and super glue to attach the bow to the lid.
Neither worked.
I then drilled a little hole in the center of the lid, wrapped another wire around the bow,
and fed it through the lid to hold the bow in place.

finished bat bucket - alternative pumpkin with Cricut
Here is the Alternative Halloween Pumpkin or “Bat Bucket” done.

bucket with light - alternative pumpkin with Cricut
Here is the bucket with the light inside turned on.

This is a sponsored conversation written by me on behalf of Cricut. The opinions and text are all mine.