I have been intrigued with tea folding. For Valentine’s Day, I made a tea-folded decor piece using ribbons from Gwen Studios. Using ribbon was very easy to do because the edges of the ribbons are finished and don’t need to be folded, making the construction a bit faster.
The links provided are for your use and may contain affiliate links. They cost nothing for you to use. Thank you in advance for supporting this site with its use.
To identify and contain your technology cables and cords, wrap and snap them with materials from Gwen Studios. #affiliate #design_team @gwenstudios
Back to school is right around the corner for us. With more technology being used in the classrooms, there is a need to organize and identify those cables and cords. Using Gwen Studios ribbon and Snap Setting Tool can solve that problem.
The links provided are for your use and may contain affiliate links. They cost nothing for you to use. Thank you in advance for supporting this site with its use.
Follow the instruction to make your own ribbon keychain. Made with ribbons from Gwen Studios.
with Gwen Studios
This keyring craft was a reminder of times past. Did you attend summer camp and make lanyards? Well, this keychain is a version of that, made with ribbon. What a fun craft for kids to do. Why not make one for Mother’s Day? Make one yourself or teach your kids to weave a lanyard.
They’re very few needed materials. You’ll need a keyring, four colors of ribbon, and a pair of scissors. I chose to seal the ends of my ribbons with a lighter. If you choose to do this with kids, I recommend supervising them or doing the lighter for them.
The links provided are for your use and may contain affiliate links. They cost nothing for you to use. Thank you in advance for supporting this site with its use.
For spring, I chose to work with pastels from the Gwen Studios grosgrain ribbon pack. These ribbons are available at Walmart and Walmart.com. Look at how beautiful those colorful ribbons are. There are so many color combinations to choose from for this project.
This little nugget of weaving was made with four ribbons each 32″ in length. If you want your piece to be bigger, use longer ribbons.
Video Tutorial:
I chose to wind the keyring through this end of the weaving. If you don’t want ribbon tails, you could turn the whole thing around and loop those tails around the keyring and finish it off in the same manner that I collected the ribbon tails – what a fun alternative!
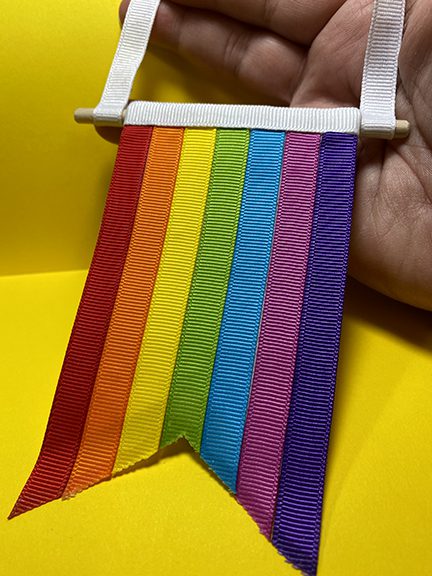
Making a mini ribbon rainbow banner with Gwen Studios.
with Gwen Studios
This month for the Gwen Studios design team, we are making projects that are for St. Patrick’s Day, using Green, White, and Rainbow Colored ribbons. I chose to go with the rainbow idea and make a mini banner using the colors of the rainbow. Have you heard of ROYGBIV? This is how my daughters learned the colors of the rainbow, R = red, O = orange, Y = yellow, G = green, B = blue, I = indigo, and V = violet (purple).
Many of the items I use in posts are provided by the manufacturers to promote their products. A special thanks to those brands who sponsor this site. Some links are affiliates, thank you for using them.
The ribbons I used are solid grosgrain ribbons and are available in a pack of 12 bright colors, 3/8″ x 36 Yards by Gwen Studios available at Walmart.
I used washi tape a few times in making the banner. Make sure to watch the video to see the tips for using washi tape, it was so helpful.
There are two different ways to seal the ends of ribbons. You can burn them as shown above with a lighter, or use a product called fray check. I used both in this project to show you the differences.
I used a variety of different tools to make the banner. The items I found helpful were scissors, a nail file, a craft knife, a cutting mat, and a white ink pen.
The ribbons are glued on top of craft foam. The foam is wrapped around a dowel rod and glued in place using Fabri-Tac. I found sewing clips were a big help in holding the foam in place as the glue dried.
Video Tutorial:
Close-up of the final banner. It really turned out so cute and my daughter has claimed it as hers!
To see all the other projects created by the Gwen Studios design team, visit Designers Craft Connection. [just click the logo below]
Suggested Materials:
Links are Affiliates AZ – Amazon, C – Cricut, SSS – Simon Says Stamps, SB – Scrapbook, O – Other
Make a woven ribbon greeting card with this SVG file. #affiliate #SVG
with CutCardStock
I had an idea for weaving ribbon through a card and here is the result. I love how you can change the look by changing the color of the ribbons. What about trying paper strips instead? Don’t add the bow and add a sentiment strip instead would also change the look of the card. It is so versatile.
This post includes affiliate links.
I used this beautiful Stardream Metallic Crystal cardstock. The cardstock is smooth and metallic. The cardstock has a mica pearlescent coating on both sides. It really is beautiful and shimmery in person. Changing the color of the cardstock would also change the look of the card – again so versatile.
I cut the SVG file on a Cricut Maker. The cardstock is heavy, you might find cutting it twice will help.
Here are all the parts I used to make the card. I used an additional piece of cardstock inside the front flap of the card because one of the ribbon strips was sheer. Depending on the ribbon or paper strips you choose this might not be necessary.
I chose to use double-stick tape inside my card to hold the ribbon ends in place. Using a stamp pad to hold back the ribbons while placing the tape was a big help.
Video Tutorial:
Please visit the shop to download the SVG file for the card. [Ribbon Card SVG]
Making a nautical themed decor with Gwen Studios and Designer Crafts Connections. #sponsored @DesignerCraftsConnection @beaconcreatesbybeaconadhesives
With Ribbon from Gwen Studios
I am making a Woven Nautical Wall Decor piece working with ribbon from Gwen Studios. The stripped ribbons in blue, red, and white when placed and woven remind me of nautical flags. The process of weaving can be applied to any size frame you would like to use. Alternately, you could build a frame from 1 x 1s for any size needed. If you chose to weave different patterns or arrange the ribbon differently, your results would be decor pieces that coordinate together but are different. Follow along and learn how to make your own nautical wall decor.
I would first like to thank Designer Crafts Connection for the opportunity to work with amazing companies and designers. And specifically for this post, I would like to thank Gwen Studios for providing me with an amazing box of materials to work with.
If you would like to see all the materials Gwen Studios sent, you can view the following YouTube unboxing video.
materials
Materials:
Links below may be affiliates and are provided for your convenience. Using them costs nothing and may provide a small fee to support this site. Thank you for considering using them.
Cover the frame with white felt using hot glue to adhere it to the back of the frame.
On the back of the frame, glue each ribbon end to one edge of the frame. Be sure to align the first ribbon as close to the edge of the frame as possible. (see the video tutorial below for details.)
Travel the ribbon to the opposite side of the frame, glue and trim the ribbon.
Continue the pattern until the entire frame is covered.
5. Begin weaving each ribbon through the ribbons on the frame as pictured above. You can change the order of the ribbons or follow the pattern you used adhering the ribbon to the frame, as I have done. 6. Glue the ends to the back of the frame. 7. Pulling the ribbon taut, trim, and glue them to the opposite side of the back of the frame. (see the video below for details)
8. Continue the weaving process until the frame is full.
back materials
There are a few different ways to finish off your piece. I am using adhesive felt on the back and wrapping ribbon around the outer edge of the frame. As an alternative hanging piece, you can use a soda can tab.
The above image shows the finished piece from the back.
Here is the finished piece close up so you can see the side edge.
These Ribbon Flowers are very versatile. You could use them as craft embellishments or how about for clips in girl’s hair? I found them to be very comforting and peaceful to make, maybe even more therapeutic for me than for their final use.
This post and photos contain affiliate links. If you purchase something through any link, I will receive a small commission at no extra charge to you. Any supplies used may be given to me free of charge, however, all projects and opinions are my own.