Folding a Paper Ball

Learn how to fold an origami paper ball.

origami paper balls

Learn how to fold origami paper balls. Not only is it satisfying, but they also make great decor pieces. These are made from two different colors of paper. Try using all one color or four different colors. Origami balls can also be made from ribbon, but I recommend learning how with paper first.

Many of the items I use in posts are provided by the manufacturers to promote their products.
A special thanks to those brands who sponsor this site. Some links are affiliates, thank you for using them.

paper
paper from Ikea

Materials:

The paper I used was purchased at Ikea. You want colored paper that is solid and not as heavy as card stock but a bit more than copy paper.

True origami doesn’t use tape or scissors. For this project, the tape makes it easier to fold and isn’t used to hold the final piece together.

History:

Origami is usually credited to the Japanese originating about a thousand years ago. The art of recreational folding was probably begun with other materials like fabric or leather. The history could also be credited to the Chinese. There are no definite historical facts to be sure of either origination.

Video Instructions:

Curvy Box SVG

Grab a free SVG file to make a curvy box. #sponsored @cutcardstock

The design team at CutCardStock is featuring projects made with Astrobright card stock this month. I love the three colors I was sent and how they work well together. I created a curvy box SVG to use with them.

————————————————————————————–
This post contains affiliate links
Some products used in this post were provided by
Cricut, and CutCardStock
————————————————————————————–

The full post and tutorial can be found at: [curvy box]

I cut the Astrobright at a 100 lb setting. Don’t forget to set the red lines to score.

SVG image

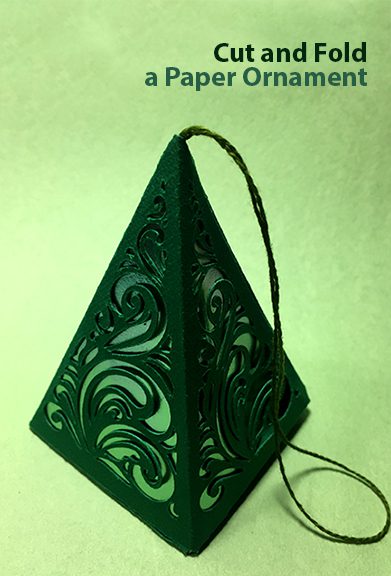
Paper Christmas Tree Ornament

Make this tree ornament with a free SVG file included in the post.

I am participating in an SVG hop. This months challenge was to create an ornament. I love making paper ornaments cut on my Cricut Maker. The Maker can cut such detail as seen in the sides of my tree ornament.

This ornament can be cut out and put together as is. You can line the ornament as I have done. I used Rinea foiled paper to do so, or you could line it with tissue paper or rice paper and put a light inside. So you have different options with this ornament along with making it in different sizes or colors.

Materials:

  • Green Cardstock
  • Green Rinea Paper
  • Cricut Maker
  • Free SVG file
  • scissors
  • glue
  • twine

Directions:

SVG file

Download the above SVG file. All black lines and shapes cut while you will need to change the red lines to score before cutting. You might also want to change the size of the file before you cut.

Once the card stock is cut, it should look like the above image. At this point you need to decide if you will line the ornament. The tree ornament is designed so you can place a light inside it if you desire.

To construct the ornament, follow along with the video tutorial below.

Here is my finished ornament hanging on our tree.

You might also like these Cricut Ornaments:

As mentioned above, this post is a part of an SVG hop, here are the links to the other participants.

Suggest Materials:

Links are Affiliates
AZ – Amazon, SSS – Simon Says Stamps, SB – Scrapbook, O – Other
Scraperfect Best Glue Ever
Shop at:
AZ | SSS
Scraperfect 32 Clog Writing Cap, Medium
Shop at:
AZ | SSS
Cricut Maker® Machine
Shop at:
AZ | O | C
Cotton Yarn Variegated Crochet thread
Shop at:
AZ
Rinea Foiled Paper - jade and gold
Rinea Foiled Paper – jade and gold
Shop at:
O
Westcott 14849 8
Westcott 14849 8″ Straight Titanium Bonded Non-Stick Scissors
Shop at:
AZ

Peanuts Origami Book Review and Giveaway

Enter to win a copy of the new Peanuts Origami book.

book cover

Are you a fan of Peanuts or origami? If you are a fan of one or both you will love this new book with Peanuts origami projects. Included in the pages are direction on folding, cartoons, trivia, and information on the characters. So even when you are done folding the origami, there is still rich content to view and revisit.

There is a detailed how-to fold basics section in the front of the book.

Each design has two printed pages to fold. There is a star on the designed pages so that you can always orient your project to the steps in the book. Each project is labeled with its difficulty level, you can start simply and build up to the different levels.

The video below shows a quick run-through of some of the different folding projects included in the book.

PEANUTS ORIGAMI
by Charles Schulz
Andrews McMeel Publishing
ISBN: 978-1-5248-5118-7
Price: $19.99 ($26.99 Canada) Available on Amazon
Paperback: 8.5 x 8 inches,
240 pages

Enter to Win

The winner will be chosen by random and the prize will be provided by the publisher.

a Rafflecopter giveaway

I was provided a sample of this product in order to write a review.

Folding a paper frame using Cricut Design Space

Make a 3D frame using this free SVG file.

Need a frame? They are so easy to make with cardstock. Using a personal cutting machine makes it that much easier. They are very sturdy. Thick enough to also be used as a shadow box. The frames were really easy to make and rather addictive. Fold your own paper frame with this free SVG file.

Materials:

  • 1 – 12×12 sheet of cardstock
  • personal cutting machine (I used a Cricut Maker)
  • optional adhesive
  • SVG file

Open the file in Design Space, ungroup. Select all and then center the two layers vertically and horizontally. Then attach, change the red box to score, and then cut.

Special thanks to Cricut for providing the Maker making this project possible. 
This post may contain affiliate links. Using them will cost you nothing but allow Try it – Like it – Create it to earn a small amount to continue this site.

Directions:

cricut machine and paper
Begin by cutting out the SVG file linked above.


This is what the SVG file looks like. The black outline cuts and the red lines need to be set to score. 


The video below will show you how to set up the file in Cricut Design Space as well as how to fold it after cutting.

finished frame
finished frame, ready to use for artwork

final measurements:
outer measure 4 7/8” x 6”
inner measure 3 3/8”  x 4 1/2”

Tulip Flower Origami

How to fold an Origami Tulip Flower.

Crusty Crunchy Spicy offers a tutorial for this origami tulip flower. Great for spring, mother’s day or brightening one’s day. Learn how to make your own here. [link]

The original link that promoted this post is no longer active. Since this is one of my most popular posts, I didn’t want to leave everyone hanging so I created a tutorial video. I hope it is helpful. 

Embed YouTube Video


Heart Boxes

This is an example of the sixty some odd heart boxes we made for Valentine’s Day. Who were the lucky recipients? Kids in my daughters’ classes and their basketball teammates. What was inside? Those famous lip balm balls everyone is talking about, a mustache whistle and a valentine gumball. Some boxes were filled with spritz heart cookies as well. We had so much fun making them, we worked in a production line fashion. This was from last year. This year, we need to come up with something similar to place those yummy Lindt Chocolates into. That post will be coming soon.


A few more of the boxes finished. 

Materials:

  • Valentine-themed scrapbook paper
  • personal cutting machine (I used a Cricut Explore Air 2)
  • or scissors
  • free svg file or free printable template (both are linked below)

Special thanks to  Cricut for providing the Cricut Explore Air 2 in order to produce posts similar to this one. 
This post contains affiliate links to help support this site. 

The files we used were from The Craft Chop and you can use them too. Oh, did I mention they were free? 

Tags SVG file post: http://thecraftchop.bravesites.com/entries/svg/tags

Heart box SVG file post: http://thecraftchop.bravesites.com/entries/svg/heart-box-2

How to Make Origami Boxes for Ornaments and Gifts

Making origami boxes that work for ornaments and gift wrapping. Learn how to make your own.

I enjoy Origami and when I saw this box form, I thought, “this would make a great ornament.” As I was making them, I then realized they could also double as wrapping for a gift because they can be opened up. What an excellent idea to hang little gifts on the tree or make a lot of them for an Advent!

Materials:

  • scissors
  • decorative paper
  • ruler

This post is a part of the Creative Craft Bloggers Group monthly craft challenge. For the month of December, we were challenged to make ornaments. At the bottom of this post, you can see all the entries and links to their tutorials. 

Directions:

six sheets
You will need six squares of paper. I used 6″x6″.

1st fold
Using one piece, fold it in half and then open it back up.

2nd fold
Fold each side into the centerfold.

both folds
Both folded.

flip it over
Turn the paper over.

fold
Diagram 1, fold C to F

fold
Diagram 1, fold B to E

fold
Diagram 2, fold D to E.

fold
Diagram 2, fold A to F.

Make six.
See the following video for an example of the folding and then how the pieces fit together.

Life Beyond the Kitchen    

Al Things Beautiful    

Try it – Like it – Create it    

  • Origami Boxes    
  • you’re here

2 Dishing Divas