Making a Fall Leaf Garland

Make a fall leaf garland with CutCardStock and a free SVG file.

with Cutcardstock

leaf garland

Cutcardstock’s featured theme this month is orange, brown, and gold. These colors say fall to me and that makes me think about all the colors of the changing leaves. As a part of the Cutcardstock Design Team, I created an SVG file of leaf shapes. I then cut the file from five different colors of card stock. Using the leaves in a random order, I sewed them together.

The links provided are for your use and may contain affiliate links.
They cost nothing for you to use.
Thank you in advance for supporting this site with its use.

card stock

These five colors are so beautiful together and the little bit of sparkle from the gold and orange really coordinate well. I cut the leaves from Green Curry, Stardream Metallic Flame, Stardream Metallic Gold, Bonsai, and Kraft.

cricut maker

Three of the colors are 80# card stock and the other two are 105#. These papers cut really well in my Cricut Maker. I used a setting of 100lb card stock. For the two heavier pages I used a pressure setting of more.

cut leaves

Using one page of each color, here are all the cut leaves. Aren’t those colors gorgeous together? From here I made stacks of eleven leaves in random order. This gave me enough to make three strands.

sewing

The stacks were then used to sew the leaves. I was amazed at how easily the card stock fed through my machine.

tail of thread

This close-up shows the spacing between the leaves, it was about three to four stitches, you could do more or less depending upon the look you want. Before sewing, you’ll want to start with a tail of thread about 12″ long for hanging.

final garland

Here the leaf garland is hanging in a doorway. While I had cut enough for three strands, I am now thinking I need to make more to fill the entire space!

This project was so fun and relaxing to make. If you would like to make your own, please visit the store to download the free SVG file. [Fall Leaves].

Fall Pumpkin Plaque Decor

A fun festive and a bit scary decor plaque made with Denise Boddey Designs.

This mixed media fall decor plaque was quick and easy to make. It has a little glam and a little bit of scary. Follow along with the tutorial to see what I mean. Special thanks to Denise Boddey Designs for providing the pumpkin cut out for this piece. As a part of the Denise Boddey design team, this is my October project.

Materials:

  • yellow tissue paper
  • foam dots
  • wooden plaque
  • pumpkin cut out
  • paintbrush
  • fall leaves
  • ribbon bows
  • matte Mod Podge
  • white chalk paint
  • salmon paint
  • heat gun (optional)

Directions:


I began by using the chalk paint and doing a stain or whitewash technique on the plaque so the grain would show through.
To apply the paint, I wiped it on with a dry baby wipe.


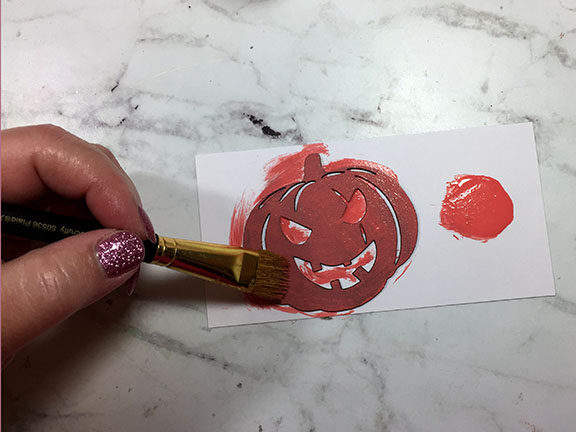
Setting the plaque aside to dry, I painted the pumpkin with salmon-colored paint.


Once those were dry, I decided upon the arrangement, and then began to Mod Podge everything in place.


I used a heat gun to speed up the drying process.
The leaves didn’t want to stick down but as the Mod Podge dried and I tapped on the leaves, they flattened and stuck.
The wood plaque showed where the Mod Podge was even though it was matte, so I covered the entire plaque.


Using a piece of wrinkled yellow tissue paper, I Mod Podged it to the back of the pumpkin.


Using a bit of Fabri-tac, I placed the bows on the top of the plaque.


To adhere the pumpkin to the plaque, I wanted it raised so I used a stack of two pop dots.


Once the plaque was done, I had another thought. What about having the face of the pumpkin glow in the dark!
I painted the tissue to glow in the dark. I really wish I had thought of this earlier, it would have been easier to do!


Glow in the dark is hard to photograph but I think you can get the gist of it here.
This added the scary feature to the plaque that isn’t really expected in the light.


Here is a quick tip for hanging.
Use a soda can tab as the hanger, just glue it to the back of the plaque.


And it is finished and ready to hang for fall!

Suggested Materials:

Links are Affiliates AZ – Amazon, SB – Scrapbook, 

Mod Podge - matte
Mod Podge – matte
Shop at:
AZ | SB | M
Homeright Heat Gun
Homeright Heat Gun
Shop at:
AZ
Ultimate Glow
Ultimate Glow
Shop at:
AZ
Fabri-tac
Fabri-tac
Shop at:
AZ
Chalk paint
Chalk paint
Shop at:
AZ
Salmon paint
Salmon paint
Shop at:
AZ

How to Decorate a Fall Candle with Transparent Glitter Vinyl

A craft tutorial for decorating a fall candle with vinyl leaves.

Decorating for fall can be store-bought, but it is so much more meaningful when you create it yourself. It isn’t difficult to make this fall candle. In fact, I cut the leaves and took the vinyl and candle in the car with me. I was running teens around town and had to wait for an hour while they were volunteering at a nursing home. I could easily place the leaves around the candle while I waited. I’ll show you a quick way to set up cutting the vinyl so that you only have to run the mat through the machine once. 

Another option to make a fall candle would be to use a paper punch with a leaf shape. Vinyl is easily cut with a cutting machine, a die cutting machine, scissors, or a paper punch.

materials
materials

Materials:

  • Personal cutting machine (Cricut Explore Air 2)
  • Transparent Glitter Vinyl (red, yellow, orange and grey)
  • scissors or a paper cutter
  • Candle in a glass container (I got mine at Walmart)
  • Free leaf SVG

This post contains affiliate links. Using them does not cost you anything additional but it does give Try it – Like it – Create it a small amount to help support the costs of running a website. 

Instructions:

Using the free leaf SVG linked above, I laid out the leaves to cut multiple times on four different groups. I set the leaf size to 1″ for this project. Using copy and paste made this really easy to do. Once the first column was set, I selected it all, attached them, and then duplicated it three more times. 

vinyl
cutting four colors at once

Using a paper cutter, I cut the four colors of vinyl into strips that were about 2.5″ wide. Placing them all on the mat at once allowed me to cut them all in one run on my Cricut Explore Air 2.

finished
finished fall candle

I applied the leaves in a random pattern around the glass candle. I peeled the leaves off each sheet just as you would a sticker. Since the vinyl is transparent, the overlapping leaves create a new color. Once the candle burns down, the light will travel through the transparent vinyl giving the glass jar a totally different look. The candle is a Fresh Cotton scent and I can’t wait to light it. I know it will smell wonderful. 

This fall candle post is a part of the Tape Technologies Inc. Design Team. We were asked to use Transparent Glitter Vinyl for a Fall or Halloween theme. You can purchase Tape Technologies vinyl from Amazon under the name StyleTech