DIY a Mini Santa Gnome

Learn how to make a Santa gnome from simple materials, many found at the dollar store.

Mini Santa Gnomes are so fun to make and are great holiday-themed items. Each one can have its own personality. They can have big noses or long beards. You can twist the fake fur making a handlebar mustache. Your Santa gnome can be made fat or skinny. Change the color of the hat for a different look. Different decorative elements on the hat can change the theme completely.

I chose to add a pin to the back so my Santa Gnome can be worn. Another option would be to add a hook and hang him on your Christmas tree. These mini gnomes can decorate packages or used for other decorative elements. I have one sitting on my desk!

materials

The list of materials may seem rather long but they aren’t expensive. Once you have obtained them all, you can actually make ten Santa Gnomes from one pack of gloves. You will have a lot of other materials left over, so grab another pack of gloves for more gnome making. Items noted with DT were bought at the Dollar Tree.

Materials:

  • 2 pairs of gloves DT
  • small rubber bands DT
  • nylons DT
  • pom pom or bell DT
  • scissors
  • polyfill (or similar)
  • Hot Glue and Gun
  • fake fur
  • pinback (optional)
  • ornament hook (optional)

Fake fur can be expensive so purchase as small a cut as possible – 1/4 a yard or even an 1/8 a yard. You don’t need much for the mini gnomes. I found mine at Walmart. Fake fur can be found in a variety of different colors.

Video Instruction:

Fall Pumpkin Plaque Decor

A fun festive and a bit scary decor plaque made with Denise Boddey Designs.

This mixed media fall decor plaque was quick and easy to make. It has a little glam and a little bit of scary. Follow along with the tutorial to see what I mean. Special thanks to Denise Boddey Designs for providing the pumpkin cut out for this piece. As a part of the Denise Boddey design team, this is my October project.

Materials:

  • yellow tissue paper
  • foam dots
  • wooden plaque
  • pumpkin cut out
  • paintbrush
  • fall leaves
  • ribbon bows
  • matte Mod Podge
  • white chalk paint
  • salmon paint
  • heat gun (optional)

Directions:


I began by using the chalk paint and doing a stain or whitewash technique on the plaque so the grain would show through.
To apply the paint, I wiped it on with a dry baby wipe.


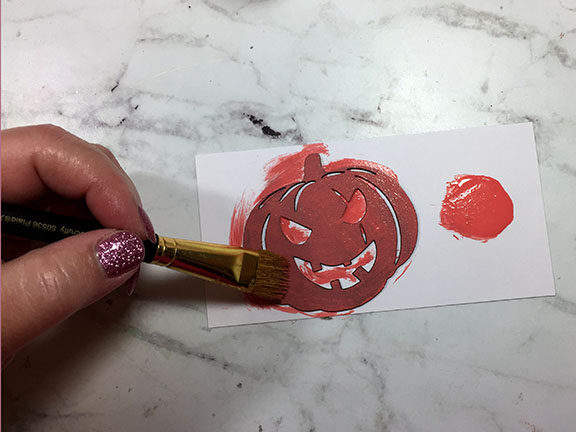
Setting the plaque aside to dry, I painted the pumpkin with salmon-colored paint.


Once those were dry, I decided upon the arrangement, and then began to Mod Podge everything in place.


I used a heat gun to speed up the drying process.
The leaves didn’t want to stick down but as the Mod Podge dried and I tapped on the leaves, they flattened and stuck.
The wood plaque showed where the Mod Podge was even though it was matte, so I covered the entire plaque.


Using a piece of wrinkled yellow tissue paper, I Mod Podged it to the back of the pumpkin.


Using a bit of Fabri-tac, I placed the bows on the top of the plaque.


To adhere the pumpkin to the plaque, I wanted it raised so I used a stack of two pop dots.


Once the plaque was done, I had another thought. What about having the face of the pumpkin glow in the dark!
I painted the tissue to glow in the dark. I really wish I had thought of this earlier, it would have been easier to do!


Glow in the dark is hard to photograph but I think you can get the gist of it here.
This added the scary feature to the plaque that isn’t really expected in the light.


Here is a quick tip for hanging.
Use a soda can tab as the hanger, just glue it to the back of the plaque.


And it is finished and ready to hang for fall!

Suggested Materials:

Links are Affiliates AZ – Amazon, SB – Scrapbook, 

Mod Podge - matte
Mod Podge – matte
Shop at:
AZ | SB | M
Homeright Heat Gun
Homeright Heat Gun
Shop at:
AZ
Ultimate Glow
Ultimate Glow
Shop at:
AZ
Fabri-tac
Fabri-tac
Shop at:
AZ
Chalk paint
Chalk paint
Shop at:
AZ
Salmon paint
Salmon paint
Shop at:
AZ

Make Your Own Crafting Shimmer Spray

You know craft supplies are expensive, but not all of them have to be. Did you know you can make your own shimmer spray? And, the materials can be found at the dollar store for significant savings. This shimmer spray hack works just as well and costs so much less, I had to give it a try and share the results with you. 

Materials:

  • mica powder eye shadow
  • liquid hair spray
  • empty bottle
  • water
  • glass bead
  • scissors

All the materials listed above can be found at your local dollar store.

Video Tutorial:

How to Etch a Cutting Board

You can easily upgrade a glass cutting board from the Dollar Tree into something worth putting on display. It was really easy to do using etchall etching creme. In no time at all, the cutting board was transformed. Make one for yourself or to gift. 

Materials:

  • etchall etching creme
  • paintbrush
  • scrap of cardstock
  • vinyl
  • transfer tape
  • personal cutting machine (Cricut Maker)
  • circle glass cutting board
  • weeding tool

Directions:

I used the image from Cricut Design Space. Rangoli Mandala, Vinyl #MB78A515


cutting the design on the Cricut Maker


weeding the image


clean the back of the glass cutting plate with alcohol


I aligned the vinyl on the glass.


here is the vinyl on the glass


getting ready to use etchall


apply generously and leave for at least 15 minutes
return the excess to the bottle after the allotted time
I used a scrap of card stock to remove the etchall.


Here is the final result – quick and easy but it looks like so much more.

Suggested Materials:
affiliate links

How to Make Ribbon Flowers

These Ribbon Flowers are very versatile. You could use them as craft embellishments or how about for clips in girl’s hair? I found them to be very comforting and peaceful to make, maybe even more therapeutic for me than for their final use. 

This post and photos contain affiliate links. If you purchase something through any link, I will receive a small commission at no extra charge to you.
Any supplies used may be given to me free of charge, however, all projects and opinions are my own.

Materials:

  • sheer ribbon (Dollar Tree – DT)
  • scissors – (DT)
  • tweezers
  • hot glue gun
  • finger protection (optional) – (DT)
  • needle – (DT)
  • lighter – (DT)

Directions:

Follow the video tutorial


Here is a variety of flowers made in different colors. I think they look like roses.

Items that can be found online at the Dollar Tree:
affiliate links

DIY Inexpensive Floral Embellishments

How to make inexpensive floral embellishments from Dollar Tree materials.

I have had so much fun making these colorful flowers. Would you believe me if I told you I spent a total of two dollars and I haven’t even made a dent in my supplies? OK, the colors came from a variety of products I already had on hand so I guess you could argue it costs more. I share with you a variety of different techniques so hopefully, it will cover some products you already own and will not need to purchase. Plus, you can make these flowers into the colors you need specifically for your craft project. 

Links may be affiliates. Please consider using them to help support this site. It will cost you nothing additional to do so. ~ Thank you in advance.

variety of materials used for color

Materials:

Options:

Video Demonstration:

detail of colored flowers

I found that placing the leaves on the back of the flowers left some glue dot uncovered, which could be used to adhere the flowers to my projects. I decided to place a glue dot on the back of all of the flowers and place them on a coated surface for storage.