My daughter saw a pair of ghost earrings at a Halloween store and decided she didn’t want to buy them because they would be easy to make. She sent me a picture and requested I make her a pair.
The materials are so simple you probably have everything you need to make them. I rescued some white cotton fabric from my daughter’s old school uniform and used a tissue for stuffing.
Make earrings with Shrink Plastic from @grafixinc and jewelry supplies from @beebeecraft. #affiliate
I enjoy making earrings. Often when I get an art supply I think about how I can make jewelry with it and that is the case when I got a set of beautiful stamps from BeebeeCraft, GLOBLELAND Flowers, and Leaves Background Silicone Clear Stamps.
The links provided are for your use and may contain affiliate links. They cost nothing for you to use. Thank you in advance for supporting this site with its use.
After stamping the shrink film with Stazon ink and trimming them down to the stamped image, I turned them over and applied alcohol ink with a cosmetic sponge.
Before shrinking, I used a paper punch to punch holes for hanging, and then I used a heat gun to shrink the film. To finish off the shrink film pieces, I coated each side with a single layer of UV Resin.
I used Benecreat wire and Mixed Green Round Glass Seed Beads from BeebeeCraft to finish the earrings.
Video Tutorial:
This close-up image shows the stamped image and the texture created by the alcohol inks.
Suggested Materials:
Links are Affiliates AZ – Amazon, SSS – Simon Says Stamps, SB – Scrapbook, O – Other
Using charms from the craft store make for quick and affordable earrings.
Making earrings from charms is so easy. These beautiful butterfly wings came in a set of four pairs from Hobby Lobby. I was able to make four pairs of earrings for less than $10, making these a very affordable gift. Charms and buttons make for quick and easy earrings.
Using two jewelry pliers, charms, and matching ear wires I was able to make four pairs of earrings in no time at all.
Video Tutorial:
These were such a huge hit in my house, I have to go and buy a few more sets of charms so we don’t fight over the colors!
Learn how quick and easy it is to make resin earrings with You-V jewelry gel resin.
with You-V Resin
These resin earrings are rather quick and very easy to make. I used You-V resin because of its quick drying time and safety features. Using a mold and a few inclusions and I have a new pair of earrings that work with a variety of different outfits.
The links provided are for your use and may contain affiliate links. They cost nothing for you to use. Thank you in advance for supporting this site with its use.
I used blue jewelry gel resin from You-V, an earring mold, a UV flashlight, and some glitter inclusions.
The resin and inclusions are in the mold. Blue jewelry gel resin is transparent and very light in color. In this image, you can see the randomness and similarities of the inclusions.
All the curing steps were done with a UV flashlight. The gel can be cured with a UV nail lamp as well. Because the resin cures quickly, it was easy to hold a flashlight for the time needed. A UV nail light will also work.
Once the resin pieces were taken out of the mold and cleaned up, they were ready for the jewelry findings. I actually needed 2 more small jump rings that aren’t seen in this photo.
To see all the process steps and tips watch the complete video tutorial below.
Video Tutorial:
Not all UV resin works the same way. You-V is rather special in that it cures quickly (30 seconds to a minute) and is SGS certified with solvent-free composition. Under regular handling, it has a low risk of skin irritation making it safe to use without protection as well as safe for kids to use.
Combine resin and cardstock for quick and easy earrings.
Combine cardstock and resin to make a pair of fabulous earrings. I have created a free printable inchie sheet of marbled circular designs for crafting. The first project I made using them was this pair of earrings. You-V resin, a quick-drying resin, made this project quick and easy.
marbled inches
Download the free PDF file from the store: [marbled inches]
I punched out circles using a 1″ paper punch using the printable and solid cardstock. Gluing the blue and the marbled circles together helped add thickness and a bit of weight to the earrings. Resin covers both sides of the glued circles.
Drilling small holes into the resined papers was done to add the ear wires. See the entire video below for the complete tutorial and tips.
Video Tutorial:
The finished earrings in hand also show the shine from the resin and the finished size. This marble pattern suits a variety of different colors found in your wardrobe.
The links provided are for your use and may contain affiliate links. They cost nothing for you to use. Thank you in advance for supporting this site with its use.
This month the Gwen Studios design team is working with curling ribbon. Curling ribbons can be used in a variety of different ways. Quilling paper is very similar to curling ribbon so I thought it would work in a similar way. I chose to roll the ribbons into disks and make earrings.
The links provided are for your use and may contain affiliate links. They cost nothing for you to use. Thank you in advance for supporting this site with its use.
Curling Ribbon comes in a variety of different colors. Gwen Studios curling ribbon can be found at Walmart.
I would like to thank Gwen Studios for providing me with the ribbon to work with. Designer Crafts Connection will share links to all the projects made for this month’s nautical theme design team projects.
The photo above shows the difference in size between the curling ribbon on the left and the quilling paper on the right. The ribbon is just about twice the width but comes in a really long length that you can cut to your desired size.
Using a battery-operated quilling tool, made the rolling of the ribbon quick and easy. The ribbon naturally curls in one direction, following that direction makes the rolling of the ribbon a bit easier to work with. Use tacky glue to add different colors to the rolling.
To secure the ribbon, I added a piece of cardstock onto the back of the curled ribbon in a coordinating color. To see the entire process, watch the video tutorial below:
Video Tutorial:
I made two different pairs of earrings using the same curling technique. The blue pair are stud earrings while the pink version is made using ear wires.
See how 3 different pairs of earrings were made using K&S Precision Metal.
With K&S Metals
Whenever I am introduced to a new to me material, my first thought is, “can I make jewelry with it”? So of course when I was sent metal from K&S, I knew I was going to attempt to make earrings. And it worked out really well. After making my first pair, I couldn’t stop. I had to try different techniques with the metal.
The links provided are for your use and may contain affiliate links. They cost nothing for you to use. Thank you in advance for supporting this site with its use.
K&S sent me 5 rolls of precision metal to work with in pink, gold, blue, purple, and green. The first pair of earrings I made was from the pink roll. Each roll of the metal is aluminum-based and .004″ Thick (36 Ga) x 12″ Wide x 24″ Long.
I chose to try die-cutting the metal. Earrings are small enough to use a small cutting machine and the mini Maker was just the perfect size. I cut the pink metal with the large heart twice and then flipped over the metal to cut the small heart out twice in silver.
To make the earrings I added black cardboard to the metal die-cut hearts to add thickness and weight. After all the pieces of the hearts were glued together, I poked a hole through the layers with a t-pin. Please refer to the video tutorial for detailed instructions.
Video Tutorial:
The next pair of earrings I made were silver and gold. For this pair, I began the same way with die-cutting. I used a decorative circle shape in two different sizes and then folded the circles in half, and placed them on top of each other. No glue was needed.
The final pair of earrings I made incorporated die-cut faux leather circles upon which I added die-cut metal stars. Before adding the stars, I ran the foil through my machine in an embossing folder and then filled the tops of the embossed dots with a nail file to remove the blue color so the silver could show through. The stars were then glued to the faux leather.
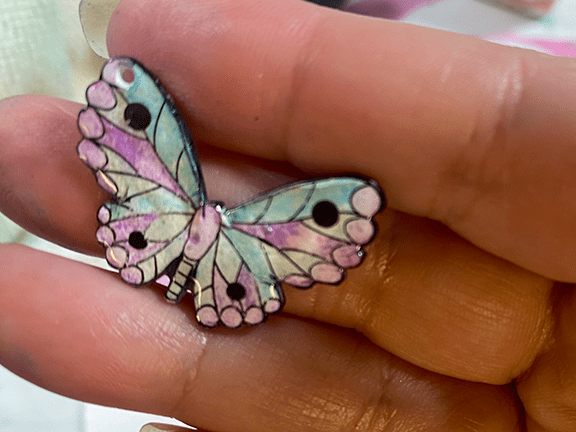
Learn how to make butterfly earrings with shrink film and UV Resin.
I was so happy with the result of these DIY Butterfly Earrings. When my daughters saw them they requested pairs be made for them too, so I knew I had stumbled upon something good.
I began with a stamped image on Grafix shrink art film in white. StazOn ink is great for this process because it is made for every surface and stamps a rich dark black.
After stamping the image and allowing the ink to dry, I cut out the butterflies with a small detail scissor.
Coloring the butterfly with water-based markers was a bit of a challenge on plastic but I have a few tips in the video tutorial to make it work.
See the size difference between the stamped image and after the film has been shrunk. I used a heat gun to shrink the film, a dedicated toaster oven also works well.
I colored the edge and the back of the butterfly with a permanent black marker. Then I coated the back with matte UV resin and the front with jewelry resin both from You-V. The cool thing about You-V resin is that it is a quick cure resin, less than a minute under a UV flashlight.
You can see the gloss of the resin on the butterfly now. Drilling a hole into the top of the wing prepares the piece for the jewelry findings.
Video Tutorial:
Suggested Materials:
Links are Affiliates AZ – Amazon, SSS – Simon Says Stamps, SB – Scrapbook, O – Other
These resin earrings almost glow. They were so quick to make. To do so you need the right products and those would be from You-v. They have resin that is non-toxic and cures in less than a minute. I was recently introduced to You-v. and I can tell it is going to change how and when I use resin.
These earrings glow in the light making them hard to photograph and get them in focus. You will have to take my word for it. They are stunning in person.
The links provided are for your use and may contain affiliate links. They cost nothing for you to use. Thank you in advance for supporting this site with its use.
Two tutorials for making sheer ribbon rose earrings with Gwen Studios.
with Gwen Studios
Today I am making two different kinds of ribbon rose earrings for the Gwen Studios design team. I am using sheer ribbon from Gwen Studios in red and pink. These would make great gifts and just in time for Valentine’s Day. The pink earrings have a stud back and the red rosebud earrings are dangles.
I am working with 7/8″ sheer Gwen Studios ribbon that can easily be found at Walmart. (links at the bottom of the post)
If you would like to see all the other creations made for Romancing the Ribbon by the Gwen Studios design team members, you can find them at Designer Crafts Connection.
Pink Ribbon Rose Earrings
The ribbon rose earrings in pink are made by free forming the ribbon into a rose, this is better described in the video tutorial below. The addition of green satin ribbon is used for leaves. Everything is held together with Farbri-tac glue and a binder clip while drying. I used a needle to move the ribbon around – there is no sewing needed.
After the roses have dried completely and the excess ribbon is cut away, I used gel Super Glue to adhere the stud earring backs to the roses.
Ribbon Rose Earrings Video Tutorial:
Red Ribbon Rosebud Earrings
The red rosebud earrings use a different technique to create the buds. The ribbon is folded and held together with double-sided tape. This process is explained in the video tutorial below.
To make the bud earrings, I needed a pair of scissors, lighter, flat nose pliers with wire cutter, green craft wire, and double-sided tape. I also used folded paper to wrap the ribbon around which is explained in the video below.
Rosebud Earrings Video Tutorial:
I am showing you each pair of earrings in my hand so you can get a sense of the size of the finished earrings.