Making Little Houses with Kokorosa

little houses

These little houses were so fun to make using a die from Kokorosa. This is a great project to use up small pieces of cardstock. The dies also work well with small die-cutting machines.

die-cutting

The dies fit perfectly in a Sizzix Sidekick machine. I was able to cut a variety of little houses in no time at all. It was really fun to mix and match the different colors to make the houses.

The following links are affiliates. Thank you for using them.

  • For a 25% discount use the code: L44991
  • Kokorosa
  • Kokorosa Metal Cutting Dies with Mini House $5.99

Video Tutorial:

Suggested Materials:

Links are Affiliates
AZ – Amazon, SSS – Simon Says Stamps, SB – Scrapbook, O – Other
Cut Cardstock
Cut Cardstock
Shop at:
O
Glassboard discount code JANET20
Shop at:
AZ | O
Reptile Glue
Reptile Glue
Shop at:
AZ
Scrapbook Scissors
Scrapbook Scissors
Shop at:
SB
Sizzix Sidekick
Sizzix Sidekick
Shop at:
AZ | SSS | SB
Temu Glue Bottles
Temu Glue Bottles
Shop at:
O

Valentine’s Day Cardmaking

with Kokorosa

final card

This heart card was made with dies from Kokorosa, mica powder, and mineral powders. There were a few bumps along the way but they can always be resolved, sometimes in a different direction than planned. The technique has merit and I would use it again.

die material

I set my die-cutting machine using double-sided tape to only cut through the double-sided tape, not the cardboard backing.

more matierlas

At the very top of the card front, you can see where I tested the different colors of powders.

Video Tutorial:

enjoy

The close-up image shows the detail of the die-cut word. You can also see the metallic shine in the cardstock.

The links provided are for your use and may contain affiliate links.
They cost nothing for you to use.
Thank you in advance for supporting this site with its use.

kokorosa logo

Use the following code for a 25% discount: L44991

Product links:

description: Kokorosa: https://kokorosastudio.com/
“Enjoy” Word: https://bit.ly/3TWZmWP
Hearts Background Board: https://bit.ly/3Ufvi95

Unlocking Creativity: Exploring the Versatility of Die Cuts from Everyday Boxes

Exploring the Versatility of Die Cuts from Everyday Boxes. #tutorial #craft_from_trash #recycle

I don’t know if this is genius or if I stumbled onto something everyone already does. I was getting ready to throw away a box and noticed the blank areas that could be die-cut. I will never look at a box the same way again and I am kind of kicking myself wondering about all the boxes I have already thrown away.

Video Tutorial:

Making Words with Washi

Use your washi tape to create colorful sentiments. #sentiment #words #washitape

washi words

As a crafty person, you probably already have a collection of colorful washi tapes in your stash. But have you ever thought of using them to create custom die-cuts? With just a few easy steps, you can create an image or pattern using washi tape and then use a die-cutting machine to cut it into a word or phrase of your choice. This DIY project is a fun and colorful way to add personalized touches to your paper crafts, such as cards, scrapbook pages, or even home decor.

parts

Materials:

  • die-cutting machine
  • dies
  • washi tape
  • cardstock
  • Xyron machine (optional)

Video Tutorial:

Miniature Card Making

Having fun making a miniature card with Scraperfect.

front of card
front

I enjoy making cards of all different sizes. I don’t limit myself to a standard size. Mini cards are sometimes the most fun cards to make. Probably because I have a love of all things in miniature.

stamping
stamping

Stamping images for die-cutting, I often stamp them more than once – just in case. And when they are small it takes up very little room. You can even use up scraps this way.

die cutting
die cutting

Using the mini stamps and dies I might as well also use my Mini Maker from Makers Movement! Taping the dies in place with washi tape helps to keep them aligned.

parts of the card
parts of the card

After coloring the rose with markers and pencils, I am ready to put the card together. Notice I used washi tape on the front of the card and mitered the corners.

the Best Glue Ever               ScraPerfect’s No-Clog Writing Cap™

gluing
gluing

Using the no-clog writing cap on the Best Glue Ever lets me control the small amount of adhesive that is needed when working with small elements.

inside
inside of card

Typically you place your images on the front of the card but in this case, it is a surprise on the inside!

Making a Fall Greeting Card

Making a fall greeting card with Makers Movement.

with Makers Movement

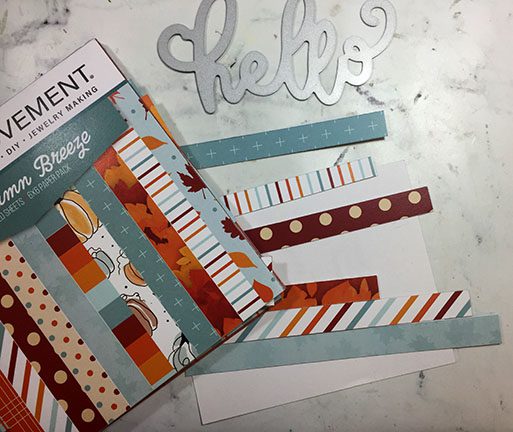
Using a hello die from Makers Movement and their Autumn Breeze paper pack, I made this fall greeting card. This card uses a stacking technique for the greeting as well as the background of the card. I love the Autumn colors and the rich feeling they have. I actually used scraps from past projects so this technique is a great way to use up your leftovers.

Materials:

  • Autumn Breeze paper pack
  • Hello die
  • cardstock – a variety of colors
  • Xyron
  • CrossOver II
  • Cricut paper trimmer
  • rubber eraser
  • tape runner
colored cardstock

Here are the pieces of cardstock I used for the layered background. You can see how the entire card is put together in the video tutorial below.

Video tutorial:

Suggested Materials:

Links are Affiliates
AZ – Amazon, SSS – Simon Says Stamps, SB – Scrapbook, O – Other, C – Cricut
Cricut Portable Trimmer
Shop at:
AZ | C
Crossover II
Crossover II
Shop at:
AZ
Maker's Movement
Maker’s Movement
Shop at:
O
Tape Runner
Tape Runner
Shop at:
AZ | SSS | SB
Xyron 510
Xyron 510
Shop at:
AZ

Fairy Card with Heart Stems

Follow along to make this fairy card with heart stems. Lots of techniques included.

Today I am working with a stamp from Fairy Hugs called Alexa. She is joyful and playful so I added an array of three different colored heart stems behind her to amplify her action. The card doesn’t have a sentiment. I like leaving them blank until later so the card can be used for a variety of different occasions. I can always add a sentiment but changing one isn’t that easy.

Many of the items I use in posts are provided by the manufacturers to promote their products.
A special thanks to those brands who sponsor this site
Some links are affiliates, thank you for using them.

Materials:

  • Alexa stamp
  • stamp block
  • black ink
  • colored pencils
  • embossing plate
  • CrossOver II
  • heart stem die
  • clear embossing powder
  • Versamark ink pad
  • heat tool
  • purple ink pad
  • card stock – a variety of colors
  • tape runner
  • foam tape *
  • scissors *
  • Brother Scan n Cut
  • Wink of Stella
  • Blue metallic marker *
  • Cricut Paper Trimmer
    * items were purchased at the Dollar Tree

A variety of different techniques were used in putting this card together. You can see them step by step in the video tutorial below.

Video Tutorial:

Above is a close-u image of the card so you can see some of the details. The final touches while seem small really do add to the overall vision of the card.

Suggested Materials:

Links are Affiliates
AZ – Amazon, C – Cricut, SSS – Simon Says Stamps, SB – Scrapbook, O – Other
Crossover II
Crossover II
Shop at:
AZ
Intense Black Ink Pad
Shop at:
SSS
Portable Trimmer
Portable Trimmer
Shop at:
AZ | O | C
Tape Runner
Tape Runner
Shop at:
AZ | SSS | SB
Versamark
Versamark
Shop at:
AZ | SSS | SB
Woodless Colored Pencils
Shop at:
AZ | O |

Making a Beary Cute Card

Working with products from the Maker’s Movement made this card so bear cute!


Notice: Function WP_HTML_Tag_Processor::set_attribute was called incorrectly. Invalid attribute name. Please see Debugging in WordPress for more information. (This message was added in version 6.2.0.) in /misc/10/000/100/650/7/user/web/tryit-likeit.com/wordpress/wp-includes/functions.php on line 6078

with Maker’s Movement

Planning, coloring, and die-cutting this card was so peacefully enjoyable. I knew the moment I saw the bear stamp he was going to be a polar bear. My daughter loves polar bears. What excites me about the card is that I used the leftover cut-out leaves from a past project as the stencil to create the background! What a great way to extend the use of the die and the card stock. I keep all my left-over parts just in case for moments like this.

Many of the items I use in posts are provided by the manufacturers to promote their products.
A special thanks to those brands who sponsor this site
.

Materials:

  • card stock – white and patterned
  • the Works Board
  • Let’s Get Cozy Die (leaves)
  • Woodland Friends – die and stamp sets
  • Distress Oxide
  • blending brush
  • Mini Maker
  • tape runner
  • Stazon black ink pad
  • Intense black ink pad
  • washi tape
  • Derwent Inktense pencils

Because I video the process, I didn’t get a chance to stop and photograph the ink blending with the DIY stencil on the front of the card. But you can see it all happen in the video tutorial below.

Isn’t that bear just so cute? After stamping and coloring, I taped the die in place then sent it all through the Mini Maker to cut. The only thing left to do is stamp the sentiment and put the card together.

Video Tutorial:

Suggested Materials:

Links are Affiliates
AZ – Amazon, SSS – Simon Says Stamps, SB – Scrapbook, O – Other
Derwent Inktense
Derwent Inktense
Shop at:
AZ
Distress Ink Bundle
Distress Ink Bundle
Shop at:
AZ
Intense Black Ink Pad
Shop at:
SSS
Maker's Movement
Maker’s Movement
Shop at:
O
Mini Maker
Mini Maker
Shop at:
O
Professional Makeup Brush Set
Shop at:
AZ
StazOn
StazOn
Shop at:
AZ | SSS | SB
Tape Runner
Tape Runner
Shop at:
AZ | SSS | SB
We R Memory Keepers - All-In-One Tool - The Works
We R Memory Keepers – All-In-One Tool – The Works
Shop at:
AZ | SSS | SB
Westcott 14849 8
Westcott 14849 8″ Straight Titanium Bonded Non-Stick Scissors
Shop at:
AZ

Stamping a Card with Fireflies

Before summer leaves, learn how to make this firefly stamped card.

with Fairy Stamper

Do you love fireflies? Or maybe you call them lightning bugs? Either way, make this cute encouraging card before summer’s end and they disappear. This card was made as a part of the Fairy Stampers Video Design Team. Twice a month I create and post on their YouTube channel a video tutorial.

Many of the items I use in posts are provided by the manufacturers to promote their products.
A special thanks to those brands who sponsor this site
.

Materials:

  • Firefly stamp
  • Fairy Hugs ink pad
  • The Works Board
  • Rinea Foiled Paper
  • sentiment die
  • Mini Maker
  • card stock – white
  • Yellow Marker
  • Black thin tip pen
  • Best Glue Ever
  • No-Clog Writing Cap
  • Nuvo Aqua Shimmer

Video Tutorial:

A close-up of the finished card so you can see the Aqua Shimmer on the bodies of the fireflies.

Suggested Materials:

Links are Affiliates
AZ – Amazon, SSS – Simon Says Stamps, SB – Scrapbook, O – Other
Scraperfect Best Glue Ever
Shop at:
AZ | SSS | O
Scraperfect 32 Clog Writing Cap, Medium
Shop at:
AZ | SSS | O
We R Memory Keepers - All-In-One Tool - The Works
We R Memory Keepers – All-In-One Tool – The Works
Shop at:
AZ | SSS | SB
Rinea Foiled Paper - jade and gold
Rinea Foiled Paper – jade and gold
Shop at:
O
Mini Maker
Mini Maker
Shop at:
O
Nuvo Aqua Shimmer - Midas Gold
Nuvo Aqua Shimmer – Midas Gold
Shop at:
AZ | SSS
Stabilo Fineliner
Stabilo Fineliner
Shop at:
AZ

Making a Fall Blessings Card

Make a fall greeting card with products from the Makers Movement.

with the Makers Movement

The Makers Movement sent me a recently released die set and card stock pack. The fall colors of the card stock were perfect for making a card. The leaves cut out in two different tones of green were placed in a circle to make a wreath. I really enjoy the fall colors in the card stock pack.

Many of the items I use in posts are provided by the manufacturers to promote their products.
A special thanks to those brands who sponsor this site
.

Materials:

  • card stock – white and patterned
  • Paper Trimmer
  • Rinea foiled paper
  • Let’s Get Cozy Die
  • CrossOver II
  • Mini Maker
  • washi tape punch
  • tape runner
  • adhesive
  • pencil
  • sentiment die

I chose to work with coordinating paper that included two shades of green to make the wreath. The curved leaf die was perfect for the circular shape of the wreath.

I began getting the parts needed together. Cutting the leaf shape on the CrossOver II. My favorite thing about the CrossOver II is the adjustable steel roller bar, which allows various thicknesses to cut easily. The sentiment was an afterthought so I cut it on the Mini Maker. Both machines are made by the Makers Movement.

To see the card being put together, watch the video tutorial below.

Video Tutorial:

Suggested Materials:

Links are Affiliates
AZ – Amazon, SSS – Simon Says Stamps, SB – Scrapbook, O – Other
Scraperfect Best Glue Ever
Shop at:
AZ | SSS | O
Scraperfect 32 Clog Writing Cap, Medium
Shop at:
AZ | SSS | O
We R Memory Keepers - All-In-One Tool - The Works
We R Memory Keepers – All-In-One Tool – The Works
Shop at:
AZ | SSS | SB
Rinea Foiled Paper - jade and gold
Rinea Foiled Paper – jade and gold
Shop at:
O
Crossover II
Crossover II
Shop at:
AZ
Maker's Movement
Maker’s Movement
Shop at:
O
Mini Maker
Mini Maker
Shop at:
O
Tape Runner
Tape Runner
Shop at:
AZ | SSS | SB
Washi Chomper
Washi Chomper
Shop at:
AZ | SSS | SB | O