Making a Colorful Card

Create a colorful card for Valentine’s Day or another special occasion with card stock from CutCardStock. #affiliate #cardmaking

with CutCardStock

finished card

Making this HUGS card with Valentine’s day in mind, it can actually be used year-round. I intend to use it for a friend that is recovering from surgery. The finished card is 4″ x 6″.

The links provided are for your use and may contain affiliate links.
They cost nothing for you to use.
Thank you in advance for supporting this site with its use.

paper

The card stock used for the card base is Basis in neutral. I am working with a pre-cut and folded card. CutCardStock has a ton of different colors of Basis to choose from. The colorful card stock comes from an assortment pack of Pop-Tones.

cricut maker

I used my Cricut Maker to cut the letters. Strategically aligning the colors, I was able to cut all the letters in one pass. I like to have a bit of additional security by using washi tape to hold the pieces in place when cutting.

cut letters on mat

The hollow letters actually leave behind another thin letter that can be used for another project.

With a bit of glue and attention to alignment, the card was easy to finish.

Video Tutorial:

Please visit the store to grab the free SVG file. Hugs

Suggested Materials:

Links are Affiliates
AZ – Amazon, C – Cricut, SSS – Simon Says Stamps, SB – Scrapbook, O – Other
Cricut Maker® Machine
Shop at:
AZ | O | C
Cricut Portable Trimmer
Shop at:
AZ | C
Cut Cardstock
Cut Cardstock
Shop at:
O
Glue Bottles
Glue Bottles
Shop at:
AZ
Make Art Board
Make Art Board
Shop at:
AZ | SSS | SB
Reptile Glue
Reptile Glue
Shop at:
AZ

Making an Embellished Square Card

Making a card with the Cricut Joy and cutting card stock.

with CutCardStock

card with pen

It is so fun to craft and try new things. This card was made using a Cricut Joy. I wanted to experiment with Stardream card stock to see if it would cut on a smaller cutting machine.

I created this card as a part of the CutCardStock‘s design team where I share projects twice a month.

The links provided are for your use and may contain affiliate links.
They cost nothing for you to use.
Thank you in advance for supporting this site with its use.

The card stock used for this card was Stardream Metallic in Coral and Latte Tan for the card. CutCardStock has a ton of different colors of Stardream to choose from, they are all just beautiful and my favorite card stock from CutCardStock.

Cricut Joy

I wanted to see if I could cut heavier card stock on the Cricut Joy. I chose a free design on the Cricut Joy app. The setting I chose was for glitter card stock, it worked well. Cutting each shape twice, even the smallest of shapes were cut without trouble.

The two parts I used for the card are the folded card stock for the background, and the cut cardstock I cut on the Cricut Joy. The cut square is 3″ x 3″ and the folded piece is 3.5″ x 7″.

After gluing the card parts together, I chose to embellish the center of the flowers with gems in two sizes. These pearlized gems were bought at the Dollar Tree.

Video Tutorial:

Making a Paper Ornament

Make a paper ornament with a free SVG file and cardstock from CutCardStock.

with CutCardStock

finished ornament

It is so fun to craft for the holidays. This ornament is a beautiful addition to your tree but would also make a great hostess gift for those holiday parties you are invited to attend. You could stylize the surface design to suit the receiver.

I created this free SVG file to share with you as a part of the CutCardStock design team. I love creating SVG files, and I will be sharing projects, including SVG files, with you twice a month.  

The links provided are for your use and may contain affiliate links.
They cost nothing for you to use.
Thank you in advance for supporting this site with its use.

card stock

The card stock used for the ornament is Bonsai and is weighted at 80# cover. CutCardStock has a ton of different colors to choose from.

finished texture

I chose to create a visual texture on the surface of the cardstock. I began by stamping, then color smooshing, and finally ended by spraying with DIY shimmer spray.

Make sure the cardstock is completely dry before cutting. Set the red line to score, and the black shape to cut.

I cut nine ornament shapes from the 8.5″ x 11″ page. Each piece then got folded in half along the score line.

Video Tutorial:

The ornament SVG can be downloaded for free from the store [Ornament]

ornament

The pieces were glued together with twine added for hanging. A pearl bead was added to the top and a DIY tassel to the bottom for embellishment.

ornaments

You can find this SVG file to purchase in the store if you are looking for additional ornament shapes. [ornaments]

Making a Paper Owl Mask

Make your own owl mask with the free SVG file.

with CutCardStock

owl mask

What a fun time of the year to create. As the summer weather turns cooler the colors change to an autumn palette. This DIY mask can be worn for Halloween or made as a decorative piece to hang. If you change the color or eliminate some of the pieces you can totally change the look and feel of the mask. Create in all white and you’d have a beautiful winter owl.

The free SVG file was created as a part of the CutCardStock design team and is linked below.

The links provided are for your use and may contain affiliate links.
They cost nothing for you to use.
Thank you in advance for supporting this site with its use.

Video Tutorial:

basis papers

I chose the colors from the Basis line, weighted at 80# cover, and come in a variety of different colors.

Cricut Maker

Cutting this file on a Cricut Maker, I set it to cut 100# cardstock.

cut parts

All the pieces are cut and ready to assemble. I set the width of the file to 7.5″ to fit comfortably on the 8.5 x 11″ pieces.

inks and mask

I wanted to add some detail and depth to the mask so I chose to ink blend the pieces with Distress Oxide. Then I worked the pieces with a ball tool to add some actual dimension.

close-up

From this angle, you can see the dimension and a close-up of some of the ink blending. Adding a bit of elastic is all that is needed in order to wear the mask.

wearing the mask

A perfect fit!

Please visit the store to download the free SVG [Owl Mask]

Making a Fall Leaf Garland

Make a fall leaf garland with CutCardStock and a free SVG file.

with Cutcardstock

leaf garland

Cutcardstock’s featured theme this month is orange, brown, and gold. These colors say fall to me and that makes me think about all the colors of the changing leaves. As a part of the Cutcardstock Design Team, I created an SVG file of leaf shapes. I then cut the file from five different colors of card stock. Using the leaves in a random order, I sewed them together.

The links provided are for your use and may contain affiliate links.
They cost nothing for you to use.
Thank you in advance for supporting this site with its use.

card stock

These five colors are so beautiful together and the little bit of sparkle from the gold and orange really coordinate well. I cut the leaves from Green Curry, Stardream Metallic Flame, Stardream Metallic Gold, Bonsai, and Kraft.

cricut maker

Three of the colors are 80# card stock and the other two are 105#. These papers cut really well in my Cricut Maker. I used a setting of 100lb card stock. For the two heavier pages I used a pressure setting of more.

cut leaves

Using one page of each color, here are all the cut leaves. Aren’t those colors gorgeous together? From here I made stacks of eleven leaves in random order. This gave me enough to make three strands.

sewing

The stacks were then used to sew the leaves. I was amazed at how easily the card stock fed through my machine.

tail of thread

This close-up shows the spacing between the leaves, it was about three to four stitches, you could do more or less depending upon the look you want. Before sewing, you’ll want to start with a tail of thread about 12″ long for hanging.

final garland

Here the leaf garland is hanging in a doorway. While I had cut enough for three strands, I am now thinking I need to make more to fill the entire space!

This project was so fun and relaxing to make. If you would like to make your own, please visit the store to download the free SVG file. [Fall Leaves].

Make a Wreath Card

Make a wreath card in a variety of different ways with this one free SVG file.

with CutCardStock

wreath card

Cutcardstock’s featured theme this month is white and ivory. This month I created an SVG file that is more of a kit than one item. The file has a variety of different flora pieces that can be put together in a variety of different ways. You can use the card without any of the additional elements added. I chose to color the flower and leaves for the card I made.

The links provided are for your use and may contain affiliate links.
They cost nothing for you to use.
Thank you in advance for supporting this site with its use.

basic white
Basic White card stock

The soft white color, matte vellum finish, and medium weight of this Basic White card stock cuts really well in electronic cutting machines.

cricut maker

I used a Cricut Maker with a 100lb card stock setting and a pressure setting of more. I wanted to make sure the small detailed pieces were cut thoroughly.

There are multiple pieces in the file. The card has a cut-away circle with a woven center. The flora pieces can be added in a variety of different arrangements, or not at all, making this file very flexible for crafting.

Here are the pieces I chose to work with from the file. Using Distress Oxide ink, I blended the ink onto the cut pieces with a brush.

This close-up shows the detail and the dimension of the card.
You also get a nice look at the yellow gem in the flower’s center.

Video Tutorial:

card standing

I really like how the light is showing through the woven circle. It would also look nice with a colored inset inside.

Please visit the store for the free SVG file: [Wreath Card]

Suggested Materials:

Links are Affiliates
AZ – Amazon, C – Cricut, O – Other
Cricut Maker® Machine
Shop at:
AZ | O | C
Cricut Standard Grip Mat
Shop at:
AZ | C
Cut Cardstock
Cut Cardstock
Shop at:
O
Distress Ink Bundle
Distress Ink Bundle
Shop at:
AZ
Glue Bottles
Glue Bottles
Shop at:
AZ
Reptile Glue
Reptile Glue
Shop at:
AZ
rhinestones
rhinestones
Shop at:
AZ
Craft Brushes
Craft Brushes
Shop at:
AZ

How to Weave a Paper Vase

Weave a paper vase with this free SVG file.

with CutCardStock

finished vase with flowers

This month Pop-Tone is the featured cardstock over at CutCardStock. I’ve created a decorative piece that is 3-dimensional. The above is shown in two coordinating colors but it works equally well in one color. Such a cute finished piece that is great for gift-giving, decorating a small space, or sharing as a group craft project with others.

The links provided are for your use and may contain affiliate links.
They cost nothing for you to use.
Thank you in advance for supporting this site with its use.

cardstock colors used

I used two colors from the Pop-Tone sample pack, Gumdrop Green, and Sour Apple. These are 65# card stock. Each Pop-Tone sample pack comes with one sheet of all the colors in the 65 lb cover weight and has one sheet of each of the Pop-Tone 100 lb cover weight. This is a nice way to sample all the colors. Of course, you can purchase the colors separately.

cricut maker

I cut the design on a Cricut Maker. Before cutting, I scaled the design to fit onto a letter-size sheet, then I set my file to cut 1 of each of the two colors. The cutting pressure was set to 100# cardstock with no additional pressure.

cut pieces

To begin weaving, flip one of the colors so the angled “rays” are in the opposite direction from the other piece, and then stack them on top of each other.

weaving

I used binder clips to hold the weaving in place to make sure the results were correct before gluing it all together.

finished in hand

Please visit the store to download the free SVG file [Woven Vase]

Video Tutorial:

View the tutorial for detailed construction information.

A Few Other Ideas:

vase with light
One-color vase with an electric tea light inside.
stacked vases
Make two vases, and turn one upside down with a battery tea light inside. Then stack them for a unique look.

Floral 3D Decor

Make a 3D floral decor with this free SVG file and CutCardStock.

with CutCardStock

final decor piece

This month Pop-Tone is the featured cardstock at CutCardStock. I’ve created a decorative piece that is 3-dimensional but the layers can also be used individually. This would make a beautiful alternative to a bow on a gift. I have a cord attached to mine to hang in a doorway. I like it as is but a tassel might be a nice addition.

The links provided are for your use and may contain affiliate links.
They cost nothing for you to use.
Thank you in advance for supporting this site with its use.

cardstock colors

I used three colors from the Pop-Tone sample pack, Gumdrop Green, Blue Raspberry, and Grape Jelly. These are 100# card stock, a nice thickness for 3D creations. Each Pop-Tone sample pack comes with one sheet of all the colors in the 65 lb cover weight and has one sheet of each of the Pop-Tone 100 lb cover weight. This is a nice way to sample all the colors. Of course, you can purchase the colors separately.

cricut maker

Cutting the file on a Cricut Maker, I set it to 100# cardstock with a pressure setting of more.

cut pieces

I set my file to cut 1 of the centerpieces and then 2 of the other pieces so that the piece would be dimensional.

adding gems

I added these glittered gems to the center on each side and it really finished off the piece. It is amazing how such a small thing can add so much to a design.

Video Tutorial:

Please visit the store to download the free SVG file [Floral Decor]

How to Make a Textured Card

How to make a layered and textured card with DIY texture paste.

final enjoy card

The other day I shared about making your own texture paste. What I didn’t share was what to do next, so here is one example of its use. The background leaves are all made with my homemade texture paste.

The links provided are for your use and may contain affiliate links.
They cost nothing for you to use.
Thank you in advance for supporting this site with its use.

card parts

This card has a few layers and textures. The card base is layered with a beautiful metallic Kunzite cardstock from CutCardStock. The next layer is the leaves made with DIY texture paste. Because of the slight depth from the texture paste, I thought the sentiment would need to be elevated from the front of the card.

layering word

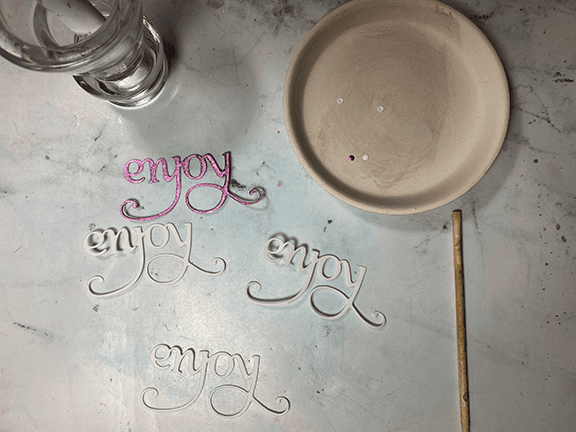
The word enjoy was cut from white cardstock three times and once from Rinea foiled paper. I then layered them all together to give the word additional height. If you are interested in Rinea foiled paper use my discount code of “TRYIT” for 10% off your order.

Video Tutorial:

closeup

Finally, a close-up of the card front so you can see the layers and depth of all the parts used. If you look closely, you can see I used a gem to dot the j instead of the layered cardstock, adding one additional texture to the card.

Suggested Materials:

Links are Affiliates
AZ – Amazon, SSS – Simon Says Stamps, O – Other
Cut Cardstock
Cut Cardstock
Shop at:
O
Mini Maker
Mini Maker
Shop at:
O
rhinestones
rhinestones
Shop at:
AZ
Rinea Foiled Paper - jade and gold
Rinea Foiled Paper – jade and gold
Shop at:
O
Scotch Tacky Glue
Scotch Tacky Glue
Shop at:
AZ | SSS

Making a Window Card

Make a window card with this free SVG file. It’s versatile for many card giving opportunities.

with CutCardStock

final card

I have another pretty card that could be used for a wedding, an anniversary, or just a special greeting. You can add your own sentiment or leave it as is. There are options for adding 3 dimensions to this card by lifting up some of the cutting. I have also added gems to finish the card off.

basic white

The links provided are for your use and may contain affiliate links.
They cost nothing for you to use.
Thank you in advance for supporting this site with its use.

The paper I used was Basis White Card Stock for the card. Basis White is so versatile. I love it for the foundation of most of my card making. It cuts and scores beautifully.

cricut maker

At 80#, I choose to set my Cricut Maker at a card stock setting of 100# which works well even for small detailed cuts. Don’t forget to set the red line to score before sending the file to cut.

The addition of the gems to the centers isn’t necessary but a nice option. If you don’t want to use your personal cutter for the smaller square piece, I cut mine on a paper trimmer to 3″ x 3″. The finished card is 4″ x 6″.

Please visit the store to download the free SVG file for the card. Window Card SVG

close-up of lifting

This view shows the detail of the 3-D effect of the lifting on the front of the card. I like the dimension gained as well as the see-through element of the cut-away pieces.

Video Tutorial:

close-up of final card

And here is a close-up view of the finished card with the lifting finished and the gems in place. I am wondering what coloring option and details you will use, please comment below.