Jot at Dollar Tree

How similar are Jot pens at the Dollar Tree to Ooly brand pens?

pen pack

Have you seen this four-pack of pens at Dollar Tree made by Jot? They are also available in a four-pack of black (all the same size). When I saw them they reminded me of a pack of pens I have from Ooly. I thought they would make a great gift so I had to give them a try and see how well they worked.

ooly pens

I love my Ooly pens and I have been carrying them around in my purse for some time. They were given to me as a gift and I have thoroughly enjoyed them. So when I saw a similar set at the Dollar Tree by Jot, I had to try them.

The links provided are for your use and may contain affiliate links.
They cost nothing for you to use.
Thank you in advance for supporting this site with its use.

As I said, I love my Ooly pens, I have the Modern Writers package. But for the price difference and the loss of two colors, the Dollar Tree pens are great too!

Making a Fabric Ornament

Using Dollar Tree fabric strips to make no-sew fabric ornaments.

ornaments

I saw a tutorial on YouTube for these fabric ornaments and thought they were very nice but that I would probably never make them. Then I saw strips of Christmas fabric at the Dollar Tree and remembered the ornaments and that the strips would work for the ornaments, but I had to make some alterations to the directions.

fabric strips

The fabric strips come in a package of three coordinating patterns. They are 2″ x 36″ strips of cotton, one strip of each design.

ironing fabric

For the small ornaments you are going to cut each strip into 4 pieces and then iron them in half as shown in the image above, and then in half again. To make these strips work you will need to follow the details about the folding in the video below.

all ironed

There are a few different ways to fold, iron, and make the ornaments with the fabric strips from the Dollar Tree. Make sure to view the details and explanations in the video tutorial.

Video Tutorial:

The links provided are for your use and may contain affiliate links.
They cost nothing for you to use.
Thank you in advance for supporting this site with its use.

If you are interested in my craft iron it is from Oliso https://amzn.to/3r70pD9 and my iron mat is from Cricut https://cricut.pxf.io/x9Weqy

Start Mandala Painting

How to start dot painting.

trio of mandalas

Dot Mandala painting is trendy. It isn’t a difficult craft but it does require practice. You can build on your technique and difficulty of imagery. To start you will want some basic craft paint, a few tools for dot-making (which can be found around your house), a pallet, and paper.

The links provided are for your use and may contain affiliate links.
They cost nothing for you to use.
Thank you in advance for supporting this site with its use.

dot painting

Tools you can use to make dots can be made. Here is a tutorial for making your own ball tool [DIY Ball Tool]. Other items you might want to collect and try:

  • push pin
  • end of paintbrush
  • dry pen
  • pencil eraser
  • needle
  • dowel
  • knitting needle
  • crochet hook
pallet and tools

Next, you will want to get your paint to the right consistency. Adding a bit of water if needed to make a liquid or runny paint. I am using craft paint from Arteza.

If you don’t want to mix water into your paint you may want to buy paint made for pour painting since it will be a good consistency for dot painting. Arteza has a variety of pour paint sets. There are even color sets that coordinate. And if you are truly just getting started and have no materials, you might be interested in the Arteza Dot Tool Kit. It includes everything you will need except paint.

After practicing your dots and you are now ready to paint a mandala, many people start with a stencil. There are many stencils you can use to create mandalas. If you have a personal cutting machine you can use this SVG file and cut one, to begin with. [madala stencil]

Video Tutorial:

Etching a Fall Votive

How to etch a votive with dip n’ etch for a nice upcycle project.

with etchall

votive

Today I am making a votive for fall using Etchall Dip. The glass is a recycled Oui yogurt container. Instead of applying a cream to the glass you actually submerge the glass into the etching liquid. The etching results are the same, just the process is different.

The links provided are for your use and may contain affiliate links.
They cost nothing for you to use.
Thank you in advance for supporting this site with its use.

cricut maker

To begin, you’ll want to clean your glass with rubbing alcohol. Using hand sanitizer with a high alcohol content will also work well. I cut a small acorn shape on my Cricut Maker.

vinyl applied

Then I applied the vinyl to the glass like you would stickers in a random pattern. The acorn SVG is free and can be found in the store at the following link [acorn SVG]

dipping

Use a plastic container for the dip n’ etch liquid. Measure how much liquid is needed by testing with water first. Details for this technique can be found in the video tutorial below. You will also want something to weigh down the project so the glass doesn’t float.

dip n etch

The time to etch is the same as the etchall cream, 15 minutes. The liquid is reusable so make sure to put it back into the etchall container when finished.

Video Tutorial:

with light

I chose to finish off the votive with a wrap of raffia tied in a knot. The votive can be used in a variety of different ways. The image above uses an electric tea light. It also makes for a cute pencil cup. What a nice way to upcycle!

Making a Card from Leftovers

It’s time to make a card from your leftover elements.

finished card

When you craft and save all your little bits and leftovers, there comes a time when you need to use them. This card is made from a collection of leftover pieces. I chose to coordinate the elements with similar colors for this card.

materials

Using The Works Board, I have gathered my collection of leftover elements. All I need to do is glue them all into place.

The butterfly came from a tutorial on How to Foil Your Stamping.
The leaves were leftover from another card tutorial: Making a Fall Blessing Card
The background piece is from a tutorial on Embossing with Color

Video Tutorial:

Suggested Materials:

Links are Affiliates AZ – Amazon, SSS – Simon Says Stamps, SB – Scrapbook, O – Other
Deco Foil
Deco Foil
Shop at:
AZ | SSS
Deco Foil Adhesive Pen
Shop at:
AZ | SSS | SB
Maker's Movement
Maker’s Movement
Shop at:
O
Marabu Art Crayons
Marabu Art Crayons
Shop at:
AZ | O
Rinea Foiled Paper - jade and gold
Rinea Foiled Paper – jade and gold
Shop at:
O
Scraperfect 32 Clog Writing Cap, Medium
Shop at:
AZ | SSS | O
Scraperfect Best Glue Ever
Shop at:
AZ | SSS | O
WRMK - All-In-One Tool - The Works
WRMK – All-In-One Tool – The Works
Shop at:
AZ | SSS | SB

Back to School Bookmarks

DIY bookmarks with Gwen Studios ribbon.

with Gwen Studios

Now that it is time to head back to school, I am making a few versions of bookmarks using ribbons from Gwen Studios. These bookmarks would pair well with gifting a book as well. My family often gives what we call a moment gift consisting of a good book and a bag of M&Ms. I think we now need to add a handmade bookmark to the gift.

The links provided are for your use and may contain affiliate links.
They cost nothing for you to use.
Thank you in advance for supporting this site with its use.

As a design team member for Gwen Studios, I was recently sent this great box full of ribbon samples. There are satin and grosgrain ribbons. It was fun choosing different widths and colors to work together for the bookmarks.

Gwen Studios ribbons can be found at Walmart and Michaels. To see all the back-to-school themed projects made with Gwen Studios ribbons, make sure to visit the Designer Crafts Connection website.

Ruffled Ribbon Bookmark

This first bookmark I am calling a ruffled bookmark because of the folded/ruffled green ribbon. The brown and burgundy ribbon had the ends melted with a lighter to keep them from raveling. All the layers were glued together using Fabri-Tac.

The central ribbon that appears to be ruffled was actually folded and glued. Each fold was glued twice – front and back. You could choose to sew instead of glue but I didn’t want a line of thread to show so I glued it.

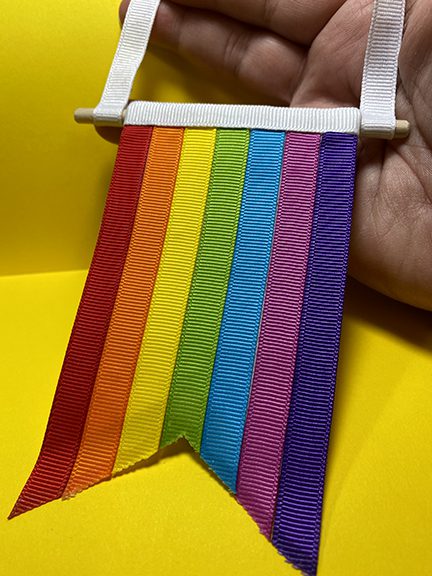
Blue Fringe Bookmark

blue bookmark

The blue bookmark was similar in that it used three layers of ribbon. All the ends were sealed with a lighter so they don’t fray except the end of the blue ribbon. One end of the blue ribbon was fringed. To do this, the very thin edge of the ribbon needed to be cut away where the fringe is. This made making the fringe easy to do.

The blue ribbon bookmark was put together using double-sided tape. The glue will also work but might seep through the light-colored ribbon so tape was used instead as a precaution.

Magnetic Bookmark

magnetic bookmark

This is a magnetic bookmark. It only uses one piece of ribbon.

stamping

I stamped the yellow ribbon with bees using Staz-on black ink in a random pattern.

paint magnets

To use magnets, I used a thin advertising magnet that is easily cut with scissors. Since the ribbon was light-colored, the ad showed through the ribbon so I painted the advertisement side with white paint.

glue magnets

Once the paint was dry, I glued the magnets to the back side of the ribbon leaving a very small space between the magnets. In hindsight, the double-sided tape might have worked better.

The excess ribbon was folded and glued to the magnets creating a nicely finished folded edge. Because the magnet I used wasn’t that strong, I left a small area of each magnet exposed. It would look a lot better to cover the entire magnet so using a strong magnet really would help.

Wrinkled Sublimation Necklace

Learn how to create a wrinkled technique for sublimation on jewelry.

with Artesprix

necklace

This wrinkle technique creates great results. I first tried it with regular stamp pads and was inspired by not wanting to throw away my used protective paper from sublimation. You can read about that here. [wrinkle technique] Immediately after doing so, I thought why not use the new sublimation ink pads from Artesprix for this technique? So here it is applied to a

Video Tutorial:

side of pendant

To finish off the pendant after sublimating the front, I used permanent black ink on the sides and back of the piece.

Suggested Materials:

Links are Affiliates
AZ – Amazon, C – Cricut, O – Other
Cricut EasyPress
Cricut EasyPress
Shop at:
AZ | O | C
Heat Resistent Tape
Heat Resistent Tape
Shop at:
AZ | O
Jewelry Tool Kit
Jewelry Tool Kit
Shop at:
AZ
Protective Paper
Protective Paper
Shop at:
AZ | O
Sublimation Ink Pad
Sublimation Ink Pad
Shop at:
AZ | O

Mini Rainbow Banner

Making a mini ribbon rainbow banner with Gwen Studios.

with Gwen Studios

This month for the Gwen Studios design team, we are making projects that are for St. Patrick’s Day, using Green, White, and Rainbow Colored ribbons. I chose to go with the rainbow idea and make a mini banner using the colors of the rainbow. Have you heard of ROYGBIV? This is how my daughters learned the colors of the rainbow, R = red, O = orange, Y = yellow, G = green, B = blue, I = indigo, and V = violet (purple).

Many of the items I use in posts are provided by the manufacturers to promote their products.
A special thanks to those brands who sponsor this site. Some links are affiliates, thank you for using them.

gwen studio

The ribbons I used are solid grosgrain ribbons and are available in a pack of 12 bright colors, 3/8″ x 36 Yards by Gwen Studios available at Walmart.

washi tape

I used washi tape a few times in making the banner. Make sure to watch the video to see the tips for using washi tape, it was so helpful.

burn ends

There are two different ways to seal the ends of ribbons. You can burn them as shown above with a lighter, or use a product called fray check. I used both in this project to show you the differences.

back of banner

I used a variety of different tools to make the banner. The items I found helpful were scissors, a nail file, a craft knife, a cutting mat, and a white ink pen.

The ribbons are glued on top of craft foam. The foam is wrapped around a dowel rod and glued in place using Fabri-Tac. I found sewing clips were a big help in holding the foam in place as the glue dried.

Video Tutorial:

Close-up of the final banner. It really turned out so cute and my daughter has claimed it as hers!

To see all the other projects created by the Gwen Studios design team, visit Designers Craft Connection. [just click the logo below]

Suggested Materials:

Links are Affiliates
AZ – Amazon, C – Cricut, SSS – Simon Says Stamps, SB – Scrapbook, O – Other
1/4
1/4″ dowel rods
Shop at:
AZ | O
Craft Foam
Craft Foam
Shop at:
O
Cricut True Control Knife Blade
Shop at:
AZ | C
Fabri-tac
Fabri-tac
Shop at:
AZ
Fray Check
Fray Check
Shop at:
AZ | O
Gwen Studios at Walmart
Shop at:
O
ribbons
ribbons
Shop at:
O
Sewing Clips
Sewing Clips
Shop at:
AZ | O
Xyron Sticker Maker
Xyron Sticker Maker
Shop at:
AZ | SSS | SB

Transfer an Inked Stencil

Learn this special technique to transfer ink from a stencil to create a negative image.

It might be hard to imagine that these two cards were made with the same stencil. The Get Well Card came first. A stencil was used to create a subtle tie-dye effect for the background and is the positive stencil image. With all the ink on the stencil, I didn’t want to just wash it away. I tried a transfer technique using a die-cutting machine and it worked really well making the background piece I used for the magical card. (the magical card tutorial will post on Jan 3, 2022)

Many of the items I use in posts are provided by the manufacturers to promote their products.
A special thanks to those brands who sponsor this site. Some links are affiliates, thank you for using them.

materials

You can see the materials I used to create the background on the blue cardstock. The colors of Distress Oxide used were Faded Jeans, Broken China, and Chipped Sapphire. The stencil is from Fairy Stampers and is used with a light application of Pixie Spray to hold it in place.

I used the CrossOver II die cutting machine to impress the inked stencil onto my cardstock. This machine has an adjustable steel roller system so I could add the amount of pressure I needed to get a good transfer.

A close-up of the card’s corner shows how the ink transferred from the stencil. I love how I was able to get two different images from one stencil. The inks I used were three different colors of Distress Oxide that were randomly applied with a blending brush.

Video Tutorial:

Making a Playful Cat Tag

Making a playful cat tag with Fairy Stamper.

with Fairy Stamper

cat tag

Cats are playful. The Nala stamp from Fairy Stamper needed to be playful and the scrapbook paper with the birds worked well. I put the two together to make a playful tag.

Materials:

  • scrapbook paper
  • cardstock
  • Nala stamp
  • black ink pad
  • clear embossing powder
  • heat gun
  • DIY shimmer spray
  • Distress Oxide
  • blending brush
  • ribbons
  • hole punch
  • works board
  • scissors
  • tape runner

Video Tutorial:

The glimmer on the tag is hard to capture on video and photography. Hopefully, the image above shows a bit of how it shimmers. I make my own shimmer spray. If you would like to learn how to make your own you can follow this link. [DIY shimmer spray]

Suggested Materials List:

Links are Affiliates
AZ – Amazon, SSS – Simon Says Stamps, SB – Scrapbook,
Distress Ink Bundle
Distress Ink Bundle
Shop at:
AZ
Intense Black Ink Pad
Shop at:
SSS
Professional Makeup Brush Set
Shop at:
AZ
Tape Runner
Tape Runner
Shop at:
AZ | SSS | SB
We R Memory Keepers - All-In-One Tool - The Works
We R Memory Keepers – All-In-One Tool – The Works
Shop at:
AZ | SSS | SB
Westcott 14849 8
Westcott 14849 8″ Straight Titanium Bonded Non-Stick Scissors
Shop at:
AZ