Making a Notepad Cover with a Napkin

Learn how to use a napkin to cover a notepad.

This colorful notepad is covered with a napkin. Learn how to easily use a napkin and Xyron to make a cover. Covered notepads make a quick and easy gift. Make a few of them to have on hand. These bright colors will give a special someone a lift.

Materials:

  • notepad
  • napkin
  • Xyron
  • scissors
  • cardstock
  • ribbon
  • adhesive

Video Instruction:

finished!

Let it Snow – Free SVG

Grab this free SVG file with the theme of Snow and visit all the others included in the hop.

This month I am participating in a group SVG hop. We each created a free SVG file using the them Snow. I love the colors used in the mug giving it a frosty winter feel.

Of course, you can make it in whatever colors you desire.

Here are all the other SVG files for the month of December with the theme of snow. Enjoy and stay warm!

DIY Candy Advent

Create your own Candy Advent with this free SVG file.

Making your own advent for Christmas lets you customize it your own way. I made mine into a candy advent but it would also be fun as coins, dollars, or any other little items.

Special thanks to Cricut for providing materials that were used in this post.

Materials:

  • Cricut Maker
  • Cardstock – 12″ x 12″
  • candy
  • Cricut Markers
  • Glue Dots
  • SVG file

Directions:

To begin, download the free SVG file – Candy Advent.

The SVG file can be used to cut and draw. I chose to draw the type and numbers but you can cut them out of vinyl or card stock too. Then the shape was cut from the 12 x 12 card stock.

The drawn text is done as an outline. I chose to fill it in with a marker. A thick permanent marker was used to fill in the numbers. I did so in a rough, quick manner to make the advent appear more handmade. You can choose to do yours as you desire.

I used snack sized candy and attached them to the advent with Glue Dots.

Here is a close up of the numbers and the candy attached to the advent.

What will you use on your advent?

Links are Affiliates
AZ – Amazon, SSS – Simon Says Stamps, SB – Scrapbook, 0 – Other, C – Cricut
Cricut Maker® Machine
Shop at:
AZ | O | C
Glue Dots
Glue Dots
Shop at:
AZ | SSS | SB
Cricut Markers
Cricut Markers
Shop at:
AZ | C

Making a Motion Card with a TLC Die

Follow along as I made a motion card using a die from TLC Designs.

title card

I received this Double Dial Die from TLC Designs. This is my first time using a die with motion or activity and making a motion card. The process is rather two-fold in that you put the mechanism together and then design the visual elements for the card. It was fun trying to decide what images would work well with the motion.

Many of the items used in this post have be provided by companies I work with in order to promote there company and products.

Materials:

  • Double Dial Die
  • Hampton Art stamp set
  • CrossOver II
  • Mini Maker
  • leaf die
  • 3 ink pads
  • Simons Says intense black ink
  • Distress Oxide Inks
  • Blending brush
  • WRMK Works Board
  • double-sided tape
  • foam tape
  • foam tape squares
  • scissors
  • white card stock
  • brads

Directions:

This is the die and stamp set that was used.
The die pieces laid out on the CrossOver II. The pie shape needs to be placed into the largest die piece.
Distress Oxide being used to blend onto the front of the motion card.
These are the three inks used and the finished front piece.

Video Tutorial:

finished card

Suggested Materials:

Links are Affiliates
AZ – Amazon, SSS – Simon Says Stamps, SB – Scrapbook, M – Michaels
We R Memory Keepers - All-In-One Tool - The Works
We R Memory Keepers – All-In-One Tool – The Works
Shop at:
AZ | SSS | SB
Professional Makeup Brush Set
Shop at:
AZ
Gina K foam tape
Gina K foam tape
Shop at:
AZ | SSS | SB
Crossover II
Crossover II
Shop at:
AZ
Intense Black Ink Pad
Shop at:
SSS
Double Sided Tape
Double Sided Tape
Shop at:
AZ
Distress Ink Bundle
Distress Ink Bundle
Shop at:
AZ
Layer Butterfly
Layer Butterfly
Shop at:
AZ

My Spiral Ornament for the Cricut Ornament Exchange

I am participating in a Cricut Ornament Exchange. We were challenged to make a Christmas Ornament using our Cricut machine and then we sent them to another participant. I sent my ornament to Kara at Happy Go Lucky. The ornament I made is from an original design and the SVG file will be included below. The inspiration for this ornament was the red and white spiraled hard candies as well as candy canes.

Materials:

  • Doubled sided scrapbooking card stock
  • 2 brads
  • Personal cutting machine (I used a Cricut Explore Air 2)
  • SVG Spiral Ornament Pattern 

Directions:

The process for this ornament is more hands-on after the cutting of the design. When I cut out the design, I wasn’t getting through the card stock. I finally went to change the blade and found that my blade had some form of material stuck around it. Once this problem was resolved, the cutting was so easy. I really like using two-sided paper. I chose red which had burgundy on the other side. The only downside to using this kind of paper is the core of the paper is white and shows a bit on the edges of the paper. 

showing process
Design Space showing the progress of cutting the paper.

cut paper
The cut paper before weeding.

cut pieces
The cut shapes.

brads
The two brads, you can use any color.

curve paper
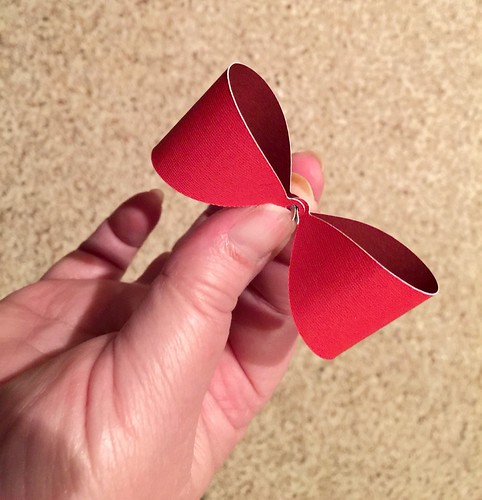
Take the bow shape, using your fingers, curve the bow shape.
bow
To begin you are going to stack the elements in order on the brad. Here is the bow we began to curve in the above image.

bow 2
Then add the ends of the ribbon to make the bow.

curl paper
Stacking all six similar pieces together, curve the paper by rolling it in your hand. This will help form the ornament in a later step.

add sides
Add the six pieces to the brad and then add the brad to the bottom. Make sure all pieces are facing the same direction if you are using a two-toned paper. Fan open the brads but not the full amount so there is some movement available.
start to seperate
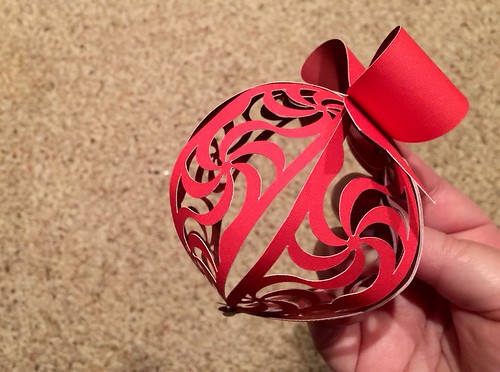
Begin to seperate the ornament shape once piece of paper at a time.

finished
Now you can tighten up the brads by reaching into the ornament. You can manipulate the shape as needed even by pushed top and bottom towards each other until you are happy with the rounded shape.

I sent the file to my sister and that same night she went a bit crazy and made these two.

Take a peek at all the other entries:
An InLinkz Link-up

Folding a paper frame using Cricut Design Space

Make a 3D frame using this free SVG file.

Need a frame? They are so easy to make with cardstock. Using a personal cutting machine makes it that much easier. They are very sturdy. Thick enough to also be used as a shadow box. The frames were really easy to make and rather addictive. Fold your own paper frame with this free SVG file.

Materials:

  • 1 – 12×12 sheet of cardstock
  • personal cutting machine (I used a Cricut Maker)
  • optional adhesive
  • SVG file

Open the file in Design Space, ungroup. Select all and then center the two layers vertically and horizontally. Then attach, change the red box to score, and then cut.

Special thanks to Cricut for providing the Maker making this project possible. 
This post may contain affiliate links. Using them will cost you nothing but allow Try it – Like it – Create it to earn a small amount to continue this site.

Directions:

cricut machine and paper
Begin by cutting out the SVG file linked above.


This is what the SVG file looks like. The black outline cuts and the red lines need to be set to score. 


The video below will show you how to set up the file in Cricut Design Space as well as how to fold it after cutting.

finished frame
finished frame, ready to use for artwork

final measurements:
outer measure 4 7/8” x 6”
inner measure 3 3/8”  x 4 1/2”

Tulip Flower Origami

How to fold an Origami Tulip Flower.

Crusty Crunchy Spicy offers a tutorial for this origami tulip flower. Great for spring, mother’s day or brightening one’s day. Learn how to make your own here. [link]

The original link that promoted this post is no longer active. Since this is one of my most popular posts, I didn’t want to leave everyone hanging so I created a tutorial video. I hope it is helpful. 

Embed YouTube Video


Tulle Christmas Tree

tree

: Nylon Net Christmas Tree 
: Materials: 
: 3 1/2 yards Nylon Net–72″ wide
: 1 dowel stick 18″ long–1/4 diameter
: 1 5×5 wood block
: 1 cardboard circle 8″ in diameter
: small ornaments, angel or ornament for top
: glitter 
: cut one strip 15″ long x 72″ wide
: 14″ long x 72″ wide
: 13″ long x 72″ wide
: 12″ long x 72″ wide
: 11″ long x 72″ wide
: 10″ long x 72″ wide
: 9″ long x 60″ wide
: 8″ long x 60″ wide
: 7″ long x 60″ wide
: 6″ long x 45″ wide
: 5″ long x 45″ wide
: 4″ long x 45″ wide
: 3″ long x 45″ wide
: Fold strips in half starting with 15×72″, making it 7 1/2 x 72″. Run heavy basting thread close to fold 1/4″. Tie both ends of thread together as tightly as possible, tying several knots. Open material and ruffle. Slip disc over dowel stick which has been mounted in wood base. Round cardboard goes on first to support ruffle. Repeat for each strip. After all net discs have been placed on dowel stick, ruffle completely. Add small ornaments. Put glue on edges and add glitter for extra decorations.

Photo found at : http://www.craftster.org/forum/index.php?topic=332694.0

How To Make Faux Leather Earrings

How to make faux leather earrings with a Cricut. Includes a free SVG file. How to Make Jewelry Using a Cricut Machine.

Making earrings with your personal die cutting machine is a current hot topic in crafting. I’ve done it before [see post here], but these leaf-like earrings are my newest design. This version of earrings was made using The Best Glue Ever by ScraPerfect. It really made making them and attaching the layers together easy. The tacky glue dries quickly but leaves enough time to maneuver the position of the layers. 

________________________________________________________________________

I want to personally thank Cricut and ScraPerfect for providing materials for this post. I am a design team member with Cricut and ScraPerfect.

The following links may contain affiliate links. They help support this site and cost you nothing to use them.
_________________________________________________________________________

Materials:​​

  • 2 colors of faux leather (Cricut Brand)
  • Personal cutting machine (Cricut Maker)
  • The Best Glue Ever
  • a weight (I used a tile)
  • 2 crystal beads – blue
  • 2 silver jump rings – small
  • 2 earring wires – loop on 1 end
  • 2 fish hook ear wires
  • jewelry making tools (wire cutter, round nose plier, flat plier)
  • free SVG file
    To save as an SVG click the image and do a save as SVG


Using a Cricut Maker, I cut the faux letter


cut pieces of faux leather


using The Best Glue Ever


Once glued and in place, I used a tile to weight
the layered faux leather down.
Let dry overnight.


I used a T-pin to poke a hole in the faux leather and
attached a jump ring and earring wire.
Threading the crystals and finishing off the wirework
to make the finished earrings.

DIY Fairy Lantern

How to DIY a fairy lantern in a plastic bottle.

​Make a Fairy Jar or Fairy Lantern of your own with this free SVG file.

A DIY Fairy Lantern reminds me of childhood and stories of fantasy. It is really easy to make this fairy lantern. You don’t need a lot of materials and can personalize it as you desire. I made my fairy lantern in a plastic bottle so it is very kid-friendly and will not break. And, you can recycle a plastic bottle or jar to make your own fairy jar.

materials

Links below are affiliates.

Materials:

Instructions:

Download the free fairy SVG file.

bottle
Start with a clean bottle or jar

fairy in jar
Using super glue, adhere the fairy to the inside of the jar. Don’t worry about the glue showing.

align jar and tissue
Cut the tissue paper to fit around the jar.

mod podge
Cover the outside with mod podge 

cover exterior with mod podge
Line up the tissue paper and wrap it around the jar. Align the top edge, don’t worry about the bottom, it get’s tucked under. Wrinkles add to the personality, just be careful not to tear the tissue paper. Then cover it again with mod podge. Allow it to dry.

decorate the lantern
Decorate the rim as you desire. I used ribbon and paper cut out flowers.

with light
Insert the flickering light and you are done!