Tag it Tuesday

A new series of mixed media tags called “Tag it Tuesday!” #tagitTuesday

finished tag

I am starting a new series I am calling “Tag it Tuesday.” Using a variety of different materials and mediums, a tag will be created. It’s a fun way to get our creative juices flowing. A tag isn’t too large of a project – something quick and easy to try out new ideas.

Tag Tutorial Video:

If you follow my other posts you will see that this project uses a variety of different materials from past posts. The tea cup is from a Cricut Cut n Paste tutorial and the word is from Die Cutting a Box.

I’d love for you to join along and make your own tags, and if you do, remember to tag the project with this hashtag #tagitTuesday.

Unlocking Creativity: Exploring the Versatility of Die Cuts from Everyday Boxes

Exploring the Versatility of Die Cuts from Everyday Boxes. #tutorial #craft_from_trash #recycle

I don’t know if this is genius or if I stumbled onto something everyone already does. I was getting ready to throw away a box and noticed the blank areas that could be die-cut. I will never look at a box the same way again and I am kind of kicking myself wondering about all the boxes I have already thrown away.

Video Tutorial:

How to Etch a Candy Dish

You can etch glass at home with etchall creme. See how easy it can be with simple materials and tools. @etchallcreme

with etchall creme

candy dish

Etch a colorful candy dish with etchall creme is quick and easy. No need for a cutting machine, just a paper punch in your desired shape. I am using a circle punch with vinyl scraps and finishing it off with buffing wax.

The links provided are for your use and may contain affiliate links.
They cost nothing for you to use.
Thank you in advance for supporting this site with its use.

alcohol cleaning

Before starting any etching project, you will want to clean the glass surface you will be etching. I am using 91% Isopropyl Alcohol.

vinyl

This is a great project to use up your smaller pieces of vinyl. I used a paper punch to create the circle templates that I intend to etch onto the glass dish. Don’t forget to save those punched circles for another craft project!

etchall creme

Apply the vinyl to the glass dish just like you would a sticker, no transfer tape is needed. Fill in any gaps that might get etching creme on them with additional vinyl. Apply the etching creme to the circles and set a time for 15 minutes.

  • I like to set my timer for 7 minutes and then move the etching creme around to make sure all the surfaces are covered and then set the timer for an additional 7 minutes
remove creme

To wrap up, remove the excess creme from your project and return it to the container. etchall etching creme is reusable.

Wash the glass in running water, and remove the vinyl.

• I use a baby wipe and then rubbing alcohol instead of running water.

Video Tutorial:

Suggested Materials:

Links are Affiliates
AZ – Amazon, O – Other
1
1″ Circle Punch
Shop at:
AZ
Etchall
Etchall
Shop at:
AZ | O
Mr. Pen Crayons
Mr. Pen Crayons
Shop at:
AZ
Oracal Vinyl
Oracal Vinyl
Shop at:
AZ
Rub On Metallic Colors
Shop at:
AZ

DIY a Mixed Media Tag

Mixed media tag making that was inspired by the craft materials.

mixed media tag

As a crafter, it is fun to just be inspired by your materials and craft with them. This is the case for this mixed media tag. I was inspired by a washi tape sticker and went from there. In the end, I actually changed the washi sticker I was going to use with a different one. Sometimes that is just how crafting goes.

Video Tutorial:

close-up of tag

Here is a closer look at the tag. There is a lot of color and different textures. The Vintage Photo ink is showing darker in the photograph than the actual finished product.

Suggested Materials:

Links are Affiliates
AZ – Amazon, SSS – Simon Says Stamps, SB – Scrapbook, O – Other
Blending Brushes
Blending Brushes
Shop at:
AZ
Distress Ink Bundle
Distress Ink Bundle
Shop at:
AZ
Gwen Studios at Walmart
Shop at:
O
Reptile Glue
Reptile Glue
Shop at:
AZ
ribbons
ribbons
Shop at:
O
Scrapbook Scissors
Scrapbook Scissors
Shop at:
SB
Temu Butterfly Washi
Shop at:
O
Temu Glue Bottles
Temu Glue Bottles
Shop at:
O
WRMK - All-In-One Tool - The Works
WRMK – All-In-One Tool – The Works
Shop at:
AZ | SSS | SB

Shaving Cream Marbling Coasters

Learn how to marble sublimation inks for colorful coasters. #artesprix

with Artesprix

coasters

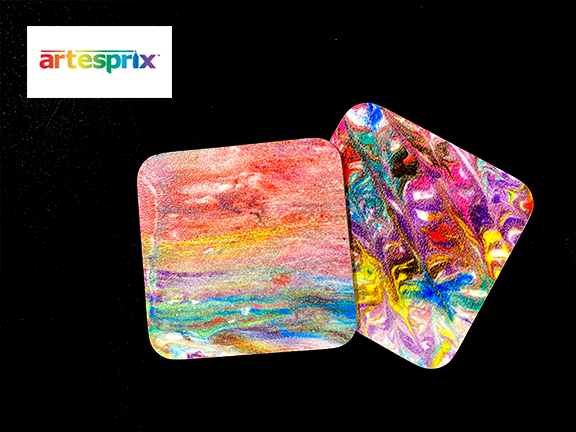
I  am thrilled to be a guest designer at Artesprix using the textured coasters. I actually experimented with a technique I’ve been wanting to try, shaving cream marbling. I wondered if it would work with the sublimation inks. These coasters are the results of my experiment. 

The links provided are for your use and may contain affiliate links.
They cost nothing for you to use.
Thank you in advance for supporting this site with its use.

inks

Materials:

shaving cream

After filling the pan with shaving cream and using the scrapper to smooth the surface, I dropped eight drops of each color onto the shaving cream.

marbled

Swirl the ink into the shaving cream until you like the design. Then place the paper on top of the design and press down until you see the entire surface of the paper appears covered. 

lifted

Lift the paper off of the shaving cream and then place it on a flat surface.

ink on paper

Scrap the shaving cream off the paper. Set the paper aside to dry.

designs and product

The ink and shaving cream can be used over and over again. You can add ink as needed or use what remains. Here are the two designs I tested out on the coasters. 

sandwich

Once the area of the design was chosen, I used heat-resistant tape to hold the paper in place. Then sandwiched that between protective paper. 

easypress

I used a Cricut EasyPress at the settings recommended on the Artesprix website. 

peek test

After heat setting, do a peek test before totally removing the sublimation design from the blank. Be careful handling the blank since it will be hot. 

finished coasters

The results are quite colorful. I am happy with the results and I look forward to trying it again with the Artesprix paint.  

Freebie Friday – Floral Inchies

Free printable Floral Inchies. #printable #freebie_Friday

This week’s freebie is a set of floral inchies. After printing, use a 1″ paper punch to cut each image. These are great for collage, mixed media, jewelry making, and more.

Free PDF printable: [Floral Inchies]

Decorate a Lemonade Glass

Etch a lemonade glass this summer with etchall creme. @etchallxreme #affiliate

with etchall creme

finished glass

A great project to make this summer is a lemonade etched glass. My husband drinks lemonade all year long so this will be his glass. I used a clear glass I had in my stash and etched it with etchall etching creme.

The links provided are for your use and may contain affiliate links.
They cost nothing for you to use.
Thank you in advance for supporting this site with its use.

I altered the SVG file from the store (it’s free) and altered it in Design Space using the contour tool to remove the outline around the word squeeze.

SVG link: [Just Squeeze it SVG]

cricut maker

I cut the design on a Cricut Maker after I set the width of the design to 2.5″

weed

After cutting the design, weed away the parts of the design you want to etch. Then apply transfer tape to the design.

clean glass

Clean the glass with rubbing alcohol before applying the design.

Getting ready to apply the design, I measured and marked the glass so I could apply the design aligned to the top of the glass.

vinyl

Apply the vinyl to the glass and remove any wrinkles. Burnish the vinyl down well.

apply creme

Apply the etching creme over the design. Make sure not to go beyond the design. It only takes 15 minutes to etch.

finished close up

After 15 minutes, remove the etching creme and put it back into the container because it is reusable. Then wash the glass and remove the vinyl.

Easy DIY Glitter Pen

See how you can easily make a glitter pen with products from @Ceya @beacon @dollartree

final pen

This glitter pen is so easy to make and the results look so professional. There are only a few steps from start to completion. The glitter is enclosed on the inside of the pen so it doesn’t interact with your hand in any way when writing.

The links provided are for your use and may contain affiliate links.
They cost nothing for you to use.
Thank you in advance for supporting this site with its use.

materials

The materials needed for this project are:

pen parts

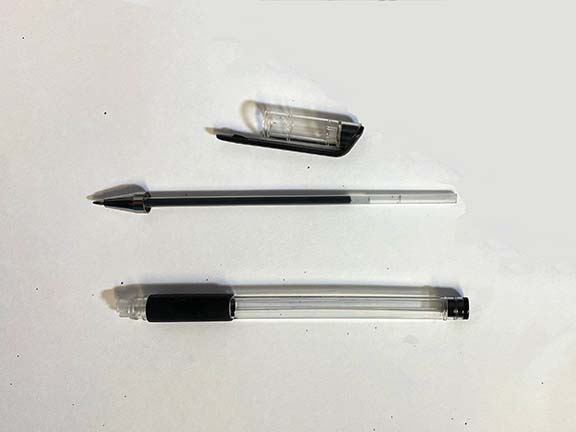
To begin, you want to disassemble the pen. We are going to add glitter to the tube part of the pen.

glue in pen

Adding Glitter-it glue to the tube part of the pen and roll it around or shake it with the opening covered to make sure the entire interior of the pen tube is covered. Glitter-it is very liquid and works so well for this project, I am not sure there is another glue that could be substituted to work as well.

Then pour any excess Glitter-it back into the container.

glitter

Add glitter to the pen tube. I started by using a paper funnel but the liquid glue soaked the paper so I used a small spoon and scooped it into the tube over the glitter container which ended up being less messy.

Cover the end of the pen tube with your finger and shake the glitter around the pen tube. If needed, you can put the ink chamber of the pen back in place and use it to help move the glitter around the inside.

Then all you need to do is put the pen pieces back together to finish the pen. There is no need to wait for it to dry before assembling the pen.

close up of glitter pen

Look how beautiful that glitter is inside the pen tube in the close-up image above!

I think it would also be neat to add a word in vinyl to the outside of the pen tube. Tell me in the comments below what word you would use on your own pen.

Etch a Treat Jar

You can add an etched design to a little jar to make it a special treat jar for gifting. #etchallcreme #designtam #affiliate

with etchall creme

This cute little jar makes for a great treat gift. What a fun way to say thanks with a little jar filled with a special treat. I etched a design around the jar using etchall creme and to make it more special I colored it with silver rub-on wax to match the hardware.

The links provided are for your use and may contain affiliate links.
They cost nothing for you to use.
Thank you in advance for supporting this site with its use.

materials

To etch the jar I used etchall etching creme and a stick-on stencil from the Dollar Tree. The stencil wrapped perfectly around the width of the glass jar.

clean with alcohol

To prepare the glass surface for etching, I always clean it first with alcohol. This removes dirt and sticker residue.

stencil

I applied the stencil around the glass jar and then covered it above and below the stencil with plastic washi tape as an extra precaution against any etching creme going beyond the stencil.

using the etching creme

etchall etching creme takes 15 minutes to work its magic. I set a timer for 7 minutes, and then move the creme around in case I missed any spots. For this project, I turned the jar upside down at this point and then set the timer for an additional 7 minutes.

Once the time has passed, I removed the creme and put it back into the jar. etchall etching creme is reusable. Then I “washed” the etching with a baby wipe, peeled off the stencil and tape, cleaned the glass again with alcohol, and finally buff the etching with a cloth.

finished no wax

Here is the jar with the etching and it could be finished at this point.

wax rubon

I chose to enhance the design with a rub on metallic wax in silver. Using a cotton swab to apply the creme and then I buffed the excess off with a cloth.

final with treat

Here is a perfect little single serving treat in a specially etch jar ready for gifting.

Freebie Friday – Purple Passion Envelopes

This week’s free printable is the first in a series of the purple passion pattern. Two envelopes and a pocket design. #freebie #printable

envelopes

This weeks free printable is a set of two envelopes and a pocket using the beautiful purple passion pattern. If you like the combination of complementary colors purple and green, then you are going to love this series. The envelopes are the first in a set of three different printables in this pattern so stay tuned for the following week’s printables.

Free PDF envelope and pocket printable [Purple Passion envelopes]