February Calendar Transformation

Transform a colored image into a greeting card. #freeprintable #freecalendar #cardmaking #cardtutorial

final card

As I sat there, admiring my colorful calendar image for the month of February, I couldn’t help but feel inspired. The vibrant hues and playful design gave me an idea. Why not turn this into a one-of-a-kind, personalized greeting card for a loved one? With a few adjustments, I was able to create a beautiful, unique piece that was sure to brighten someone’s day.

Materials Used:

  • purple cardstock
  • white cardstock
  • February Calendar Image – free printable
  • velum
  • die cut and machine
  • various adhesives
  • paper trimmer
  • rhinestone gems

The free Calendar is available here: https://tryit-likeit.com/2023-printable-calendar/

pencils and pens

The February calendar image was colored using mostly pencils from Staedtler and fineliners from Stabilo.

Video Tutorial:

Suggested Materials:

Links are Affiliates
AZ – Amazon, C – Cricut, SSS – Simon Says Stamps, SB – Scrapbook, O – Other
Cricut Portable Trimmer
Shop at:
AZ | C
Cut Cardstock
Cut Cardstock
Shop at:
O
Double Sided Tape
Double Sided Tape
Shop at:
AZ
Glue Bottles
Glue Bottles
Shop at:
AZ
Mini Maker
Mini Maker
Shop at:
O
Reptile Glue
Reptile Glue
Shop at:
AZ
rhinestones
rhinestones
Shop at:
AZ
Stabilo Fineliner
Stabilo Fineliner
Shop at:
AZ | O
Staedtler colored pencil triangular 48Pc
Shop at:
AZ | O
Tape Runner
Tape Runner
Shop at:
AZ | SSS | SB
Teflon Craft Mat
Teflon Craft Mat
Shop at:
AZ
Temu
Temu
Shop at:
O

DIY Kitchen Trivet

Learn how to make a kitchen trivet. #kitchencraft #crafttutorial

finished trivet

If you have looked into buying a trivet, they can be expensive. A trivet is something you probably need, but don’t necessarily want to spend a lot of money on. Consider making your own with this simple technique and easy-to-find materials. You can alter the size and make a coaster or enlarge it and make a placemat. 

Materials:

  • Clothesline (cotton)
  • Cotton yarn (Peaches n Cream)
  • Tapestry needle
  • Scissors

Directions:

This technique isn’t crochet or knitting but rather a wrapping and stitching technique. Start with the Cotton yarn and pull out a length you are comfortable working with, 1-2 yards in length. Thread one end of the yarn through the needle. 

Take the clothesline end and roll it onto itself to make a circle. 

beginning circle

Wrap the end of the Cotton yarn around the clothesline circle – similar to winding a ball of yarn. 

Once the circle is covered, wrap the Cotton yarn around the length of the clothesline.

 stitching together

I wrapped it 10 times around and then took a stitch into the circle.
Then I wrapped another 10 times around the clothesline and took a stitch into the row before.
Continue to wrap and stitch around the outside of the circle.
** Continue this technique to finish. 

changing yarns

**Add a new Cotton yarn as needed, covering the ends of each piece of yarn with the wrapping

Using all cotton material is the safest option when using the finished piece with pots and pans that will be hot.

finished

Options:

There’s an almost unending variety that can be achieved with this concept. Just be sure to set your parameters before you begin so that your work is consistent. 

  • change the color of the yarn 
  • change your stitching pattern (like 3 sewn stitches instead of 1)
  • stitch down two rows of the wrapped lines instead of one
  • dye the work after you are finished
  • dye the clothesline

This post was a part of the #CCBG Creatively Crafty Blog Group’s September Craft Challenge where the theme was Kitchen Craft. This is a repost of the original post.

Sublimating Ribbon

Learn how easy it is to create your own ribbon designs using sublimation ink pads and markers. @gwenstudios @artesprix #affiliate

finished gift box

Now you can create your own special designer Gwen Studios ribbon. I love how this sublimated ribbon made this gift box so special. Putting your own design on a ribbon is very easy to do using sublimation ink pads and markers. The ones I am using are from Artesprix.

The links provided are for your use and may contain affiliate links.
They cost nothing for you to use.
Thank you in advance for supporting this site with its use.

coloring

To create the image I am using a layering technique. I stamped the image and with the use of a light table, I can see the image and know where to add the color. Then I stamped the image on top of the colored work. The reason for doing it this way was to illuminate the possibility of the inks bleeding together. You can see how this was done in the video below.

colored image

I actually did the entire process twice. I started with pastel colors as seen in the first image. They did transfer but weren’t visible enough for my taste so I did it again with brighter colors as seen above. Here I am making the sublimation sandwich to transfer the image.

sublimation sandwich

This image show what is referred to as a sublimation sandwich. Working on a heat-resistant surface, I have a layer of protective paper, then the ribbon faces up, the colored and stamped image face down is held in place with heat-resistant tape, and the entire thing will be covered with another piece of protective paper before heating.

iron

Because my project is small I chose to use a craft iron instead of a heat press. With the iron set on high and no steam, I used a bit of pressure and left the iron on for a minute. Before removing the tape and image you will want to do a peek test to make sure everything is transferred.

This post is created for the Gwen Studios design team. Other projects can be found on the Designer Crafts Connection website. Gwen Studios ribbons can be found at Walmart and Michaels.

Video Tutorial:

Suggested Materials:

Links are Affiliates
AZ – Amazon, O – Other
Heat Tape
Artesprix Heat Tape
Shop at:
AZ | O
Artesprix Protective Paper
Shop at:
AZ | O
Artexprix Project Mat
Shop at:
AZ | O
Gwen Studios at Walmart
Shop at:
O
Oliso Mini Iron
Oliso Mini Iron
Shop at:
AZ
Pastel Sublimation Markers
Shop at:
AZ | O
Sewing Clips
Sewing Clips
Shop at:
AZ | O
Sublimation Ink Pad
Sublimation Ink Pad
Shop at:
AZ | O

Glitter and Mica Powder Ornament

with Ceya

ornament

When I got products from Ceya I wanted to combine glitter and mica powder. On the first try, I decided to make an ornament. Having not done this before, I wasn’t sure of the outcome, but I am thrilled with the results and can’t wait to try other applications.

Materials:

  • plastic ornament
  • polyacrylic
  • chunky glitter
  • mica powder
  • small spoon
  • disposable cups

Video Tutorial:

If you’d like to see more products from Ceya I have an unboxing video here:

Making an Embellished Square Card

Making a card with the Cricut Joy and cutting card stock.

with CutCardStock

card with pen

It is so fun to craft and try new things. This card was made using a Cricut Joy. I wanted to experiment with Stardream card stock to see if it would cut on a smaller cutting machine.

I created this card as a part of the CutCardStock‘s design team where I share projects twice a month.

The links provided are for your use and may contain affiliate links.
They cost nothing for you to use.
Thank you in advance for supporting this site with its use.

The card stock used for this card was Stardream Metallic in Coral and Latte Tan for the card. CutCardStock has a ton of different colors of Stardream to choose from, they are all just beautiful and my favorite card stock from CutCardStock.

Cricut Joy

I wanted to see if I could cut heavier card stock on the Cricut Joy. I chose a free design on the Cricut Joy app. The setting I chose was for glitter card stock, it worked well. Cutting each shape twice, even the smallest of shapes were cut without trouble.

The two parts I used for the card are the folded card stock for the background, and the cut cardstock I cut on the Cricut Joy. The cut square is 3″ x 3″ and the folded piece is 3.5″ x 7″.

After gluing the card parts together, I chose to embellish the center of the flowers with gems in two sizes. These pearlized gems were bought at the Dollar Tree.

Video Tutorial:

Quick and Easy Earrings

Using charms from the craft store make for quick and affordable earrings.

earrings

Making earrings from charms is so easy. These beautiful butterfly wings came in a set of four pairs from Hobby Lobby. I was able to make four pairs of earrings for less than $10, making these a very affordable gift. Charms and buttons make for quick and easy earrings.

materials

Using two jewelry pliers, charms, and matching ear wires I was able to make four pairs of earrings in no time at all.

Video Tutorial:

These were such a huge hit in my house, I have to go and buy a few more sets of charms so we don’t fight over the colors!

How to Etch a Candle

Learn how to turn a dollar tree candle into a beautiful gift with Etchall Creme.

with Etchall Creme

finished candle

Grab a candle and some ribbon from the Dollar Tree and make a beautiful etched candle using Etchall Creme. Such a simple idea makes for an elegant finished product and an affordable gift any time of the year.

The links provided are for your use and may contain affiliate links.
They cost nothing for you to use.
Thank you in advance for supporting this site with its use.

Process:

rubbing alcohol

Remove all the labels from the glass and clean it with rubbing alcohol. The higher the content of alcohol the better. In a pinch, you can use hand sanitizer to clean with.

Cricut Joy

For the size of this project, I was able to cut the vinyl on a Cricut Joy. I used a free design and font in the design program for the Vinyl Sticker design. (Leaf Embellishment #M3A9A159F) If you don’t have a cutting machine you can cut vinyl by hand or use a paper punch design.

cut vinyl

After the cut is finished, weed away the design.

apply vinyl

When I apply vinyl, I fold the vinyl in half to mark the middle. Then I apply it to the candle, middle first, and smooth it out from there. Wrinkles in the vinyl are OK as long as the design is smooth and sealed against the glass.

applied creme

Apply the etching creme generously to the design. Let it sit for 15 minutes. Then remove the creme and replace it in the jar to use again. Wash the design and remove the vinyl. I use a baby wipe when the design is small enough and then clean the glass with rubbing alcohol.

finished etching

Here is the result of the etching.

ribbon and wax

To finish off the look of the candle, I applied rubbing wax to the design in silver to enhance the design and wrapped a coordinating ribbon around the neck of the glass container.

finished

Suggested Materials:

Links are Affiliates
AZ – Amazon, C – Cricut, O – Other

Cricut Joy
Cricut Joy
Shop at:
AZ | O | C
Dollar Tree
Dollar Tree
Shop at:
O
Etchall
Etchall
Shop at:
AZ | O
Non-Stick Scissors
Non-Stick Scissors
Shop at:
AZ
Rub On Metallic Colors
Shop at:
AZ

Making a Paper Ornament

Make a paper ornament with a free SVG file and cardstock from CutCardStock.

with CutCardStock

finished ornament

It is so fun to craft for the holidays. This ornament is a beautiful addition to your tree but would also make a great hostess gift for those holiday parties you are invited to attend. You could stylize the surface design to suit the receiver.

I created this free SVG file to share with you as a part of the CutCardStock design team. I love creating SVG files, and I will be sharing projects, including SVG files, with you twice a month.  

The links provided are for your use and may contain affiliate links.
They cost nothing for you to use.
Thank you in advance for supporting this site with its use.

card stock

The card stock used for the ornament is Bonsai and is weighted at 80# cover. CutCardStock has a ton of different colors to choose from.

finished texture

I chose to create a visual texture on the surface of the cardstock. I began by stamping, then color smooshing, and finally ended by spraying with DIY shimmer spray.

Make sure the cardstock is completely dry before cutting. Set the red line to score, and the black shape to cut.

I cut nine ornament shapes from the 8.5″ x 11″ page. Each piece then got folded in half along the score line.

Video Tutorial:

The ornament SVG can be downloaded for free from the store [Ornament]

ornament

The pieces were glued together with twine added for hanging. A pearl bead was added to the top and a DIY tassel to the bottom for embellishment.

ornaments

You can find this SVG file to purchase in the store if you are looking for additional ornament shapes. [ornaments]

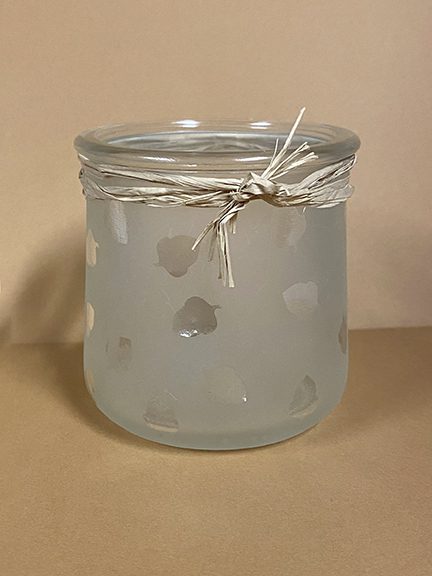
Etching a Fall Votive

How to etch a votive with dip n’ etch for a nice upcycle project.

with etchall

votive

Today I am making a votive for fall using Etchall Dip. The glass is a recycled Oui yogurt container. Instead of applying a cream to the glass you actually submerge the glass into the etching liquid. The etching results are the same, just the process is different.

The links provided are for your use and may contain affiliate links.
They cost nothing for you to use.
Thank you in advance for supporting this site with its use.

cricut maker

To begin, you’ll want to clean your glass with rubbing alcohol. Using hand sanitizer with a high alcohol content will also work well. I cut a small acorn shape on my Cricut Maker.

vinyl applied

Then I applied the vinyl to the glass like you would stickers in a random pattern. The acorn SVG is free and can be found in the store at the following link [acorn SVG]

dipping

Use a plastic container for the dip n’ etch liquid. Measure how much liquid is needed by testing with water first. Details for this technique can be found in the video tutorial below. You will also want something to weigh down the project so the glass doesn’t float.

dip n etch

The time to etch is the same as the etchall cream, 15 minutes. The liquid is reusable so make sure to put it back into the etchall container when finished.

Video Tutorial:

with light

I chose to finish off the votive with a wrap of raffia tied in a knot. The votive can be used in a variety of different ways. The image above uses an electric tea light. It also makes for a cute pencil cup. What a nice way to upcycle!

DIY a Decorative Pumpkin

Make your own decorative pumpkin for the season.

final pumpkin

It’s the season, whether it is Halloween or Fall, this DIY Decorative Pumpkin works. I started with a plan to add flowers and a bow at the top, but after finishing the pumpkin, it was grand enough on its own. Nothing more is needed.

materials

I found the pumpkin and napkins at Hobby Lobby. To apply the napkin, I made a mixture of white glue and water that got applied with a foam brush. Before applying the napkin, separate the layers and tear it into pieces.

Video Tutorial: