Shrink Film Earrings

Make earrings with Shrink Plastic from @grafixinc and jewelry supplies from @beebeecraft. #affiliate

finished earrings

I enjoy making earrings. Often when I get an art supply I think about how I can make jewelry with it and that is the case when I got a set of beautiful stamps from BeebeeCraft, GLOBLELAND Flowers, and Leaves Background Silicone Clear Stamps.

The links provided are for your use and may contain affiliate links.
They cost nothing for you to use.
Thank you in advance for supporting this site with its use.

stamped and inking

After stamping the shrink film with Stazon ink and trimming them down to the stamped image, I turned them over and applied alcohol ink with a cosmetic sponge.

after shrinking

Before shrinking, I used a paper punch to punch holes for hanging, and then I used a heat gun to shrink the film. To finish off the shrink film pieces, I coated each side with a single layer of UV Resin.

materials

I used Benecreat wire and Mixed Green Round Glass Seed Beads from BeebeeCraft to finish the earrings.

Video Tutorial:

detail

This close-up image shows the stamped image and the texture created by the alcohol inks.

Suggested Materials:

Links are Affiliates
AZ – Amazon, SSS – Simon Says Stamps, SB – Scrapbook, O – Other
Benecreat Wire
Benecreat Wire
Shop at:
O
Flower and Leaves Stamps
Shop at:
O
Grafix Shrink Film
Grafix Shrink Film
Shop at:
O
Green Seed Beads
Green Seed Beads
Shop at:
O
Non-Stick Scissors
Non-Stick Scissors
Shop at:
AZ
StazOn
StazOn
Shop at:
AZ | SSS | SB
T-Rex Alcohol Inks
T-Rex Alcohol Inks
Shop at:
AZ
Teflon Craft Mat
Teflon Craft Mat
Shop at:
AZ
WRMK Stamping Platform
Shop at:
AZ
You-V Resin
You-V Resin
Shop at:
O

Easy DIY Glitter Pen

See how you can easily make a glitter pen with products from @Ceya @beacon @dollartree

final pen

This glitter pen is so easy to make and the results look so professional. There are only a few steps from start to completion. The glitter is enclosed on the inside of the pen so it doesn’t interact with your hand in any way when writing.

The links provided are for your use and may contain affiliate links.
They cost nothing for you to use.
Thank you in advance for supporting this site with its use.

materials

The materials needed for this project are:

pen parts

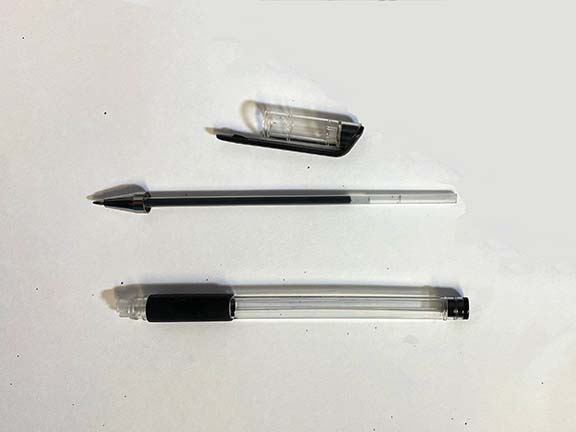
To begin, you want to disassemble the pen. We are going to add glitter to the tube part of the pen.

glue in pen

Adding Glitter-it glue to the tube part of the pen and roll it around or shake it with the opening covered to make sure the entire interior of the pen tube is covered. Glitter-it is very liquid and works so well for this project, I am not sure there is another glue that could be substituted to work as well.

Then pour any excess Glitter-it back into the container.

glitter

Add glitter to the pen tube. I started by using a paper funnel but the liquid glue soaked the paper so I used a small spoon and scooped it into the tube over the glitter container which ended up being less messy.

Cover the end of the pen tube with your finger and shake the glitter around the pen tube. If needed, you can put the ink chamber of the pen back in place and use it to help move the glitter around the inside.

Then all you need to do is put the pen pieces back together to finish the pen. There is no need to wait for it to dry before assembling the pen.

close up of glitter pen

Look how beautiful that glitter is inside the pen tube in the close-up image above!

I think it would also be neat to add a word in vinyl to the outside of the pen tube. Tell me in the comments below what word you would use on your own pen.

Making a Father’s Day Card

How to make a Father’s Day card with a ribbon tie. #cardmaking #affiliate #GwenStudios

with Gwen Studios

father's day card

This is such a fun card for Father’s Day using Gwen Studios’ satin ribbon for a tie. You can stylize the tie or leave it a solid color. Having the kids do the decorating will make this project just that much more special. Add a sentiment or handwrite a special greeting.

The links provided are for your use and may contain affiliate links.
They cost nothing for you to use.
Thank you in advance for supporting this site with its use.

This project was created for Gwen Studios. You can find all the design team projects listed on the Designer Crafts Connection website. Gwen Studios products can be found at Walmart and Michaels.

ribbon

Gwen Studios’ satin ribbon makes the focal point of the card with the tie being made with the ribbon.

materials

Materials used for making this Father’s Day card are simple. Colored cardstock for the card, white cardstock for the shirt, satin ribbon, ink pens to decorate the ribbon, scissors, tape runner, and adhesive.

card parts

Once the tie is stylized, there are only three parts to making the card; the card base, the shirt, and the tie.

Video Tutorial

Suggested Materials

Links are Affiliates
AZ – Amazon, C – Cricut, SSS – Simon Says Stamp, O – Other
Cricut Portable Trimmer
Shop at:
AZ | C
Cut Cardstock
Cut Cardstock
Shop at:
O
Fabri-tac
Fabri-tac
Shop at:
AZ
Glue Pens
Glue Pens
Shop at:
O
Gwen Studios at Walmart
Shop at:
O
Non-Stick Scissors
Non-Stick Scissors
Shop at:
AZ
Tape Runner
Tape Runner
Shop at:
AZ | SSS | SB

Making a Resin Charm Necklace

Learn how easy it is to make a resin charm necklace. #beebeecraft #craspire #youv #temu

necklace

I crafted this uv resin charm necklace using a collage piece of paper from my stash. I love being able to use created papers in jewelry making.

If you are interested in learning how to make the collage book pages, the tutorial is in the first part of this YouTube Video:
https://youtu.be/jck3y6k38Yk

I used YouV jewelry resin in clear. This resin is toxic-free and cures in seconds to a minute making it very easy to work with.

Materials:

  • resin mold (Craspire)
  • YouV jewelry resin
  • YouV resin light
  • DIY craft paper
  • glitter
  • soda can
  • scissors
  • jewelry wire – 20 gauge silver
  • jewelry pliers – needle nose and flat
  • purple bead (BeebeeCraft)
  • black necklace cord (Temu)

YouTube Tutorials:

Resin Charm:

Necklace Tutorial:

Affiliate Information:

Craspire
https://www.craspire.com/?s=Try10
Coupon code: Try10 (Save 10% off of your order)
Mold: https://www.craspire.com/products/resin-silicone-molds-diy-ta0002-13?variant=44509201268967

YouV Resin
https://www.youv.art/?ref=tryit

Beebee Craft
https://www.beebeecraft.com/?s=Try
For 10% off use Coupon: Try10
Save 10% for the whole order It’s valid until 2025-3-6.

Temu
https://www.temu.com/k/e210df73
Necklace cords https://share.temu.com/aJLROmEWTrA

Etching a Jewelry Dish

Make a lovely jewelry dish gift for Mother’s Day by up-cycling a glass dish and etching it with etchall. #etchallcreme #upcycle #tutorial

with etchall

jewelry dish

I found this glass piece at my local Goodwill store. It might have been a coaster but there was only one. I thought it would make for a nice jewelry dish after I enhanced it with etchall etching creme.

The links provided are for your use and may contain affiliate links.
They cost nothing for you to use.
Thank you in advance for supporting this site with its use.

alcohol

The first step is to remove the price label and clean the glass with rubbing alcohol.

cricut

After measuring the piece and adjusting the size of my design, I cut vinyl on a Cricut Maker.

weeded design

I weeded the design and centered it on the back of the dish. It would work on the inside as well.

etching creme

After I made sure the design was well attached, I covered the design with etchall etching creme. It only takes 15 minutes to etch the glass and the creme is reusable.

dish at an angle

After removing the used etching creme, wash the glass and discard the vinyl.

Video Tutorial:

closeup

In the close-up image, check out the clarity of the smallest lines in the design.

Suggested Materials:

Links are Affiliates AZ – Amazon, C – Cricut, O – Other
Cricut Maker® Machine
Shop at:
AZ | O | C
Cricut Standard Grip Mat
Shop at:
AZ | C
Etchall
Etchall
Shop at:
AZ | O

February Calendar Transformation

Transform a colored image into a greeting card. #freeprintable #freecalendar #cardmaking #cardtutorial

final card

As I sat there, admiring my colorful calendar image for the month of February, I couldn’t help but feel inspired. The vibrant hues and playful design gave me an idea. Why not turn this into a one-of-a-kind, personalized greeting card for a loved one? With a few adjustments, I was able to create a beautiful, unique piece that was sure to brighten someone’s day.

Materials Used:

  • purple cardstock
  • white cardstock
  • February Calendar Image – free printable
  • velum
  • die cut and machine
  • various adhesives
  • paper trimmer
  • rhinestone gems

The free Calendar is available here: https://tryit-likeit.com/2023-printable-calendar/

pencils and pens

The February calendar image was colored using mostly pencils from Staedtler and fineliners from Stabilo.

Video Tutorial:

Suggested Materials:

Links are Affiliates
AZ – Amazon, C – Cricut, SSS – Simon Says Stamps, SB – Scrapbook, O – Other
Cricut Portable Trimmer
Shop at:
AZ | C
Cut Cardstock
Cut Cardstock
Shop at:
O
Double Sided Tape
Double Sided Tape
Shop at:
AZ
Glue Bottles
Glue Bottles
Shop at:
AZ
Mini Maker
Mini Maker
Shop at:
O
Reptile Glue
Reptile Glue
Shop at:
AZ
rhinestones
rhinestones
Shop at:
AZ
Stabilo Fineliner
Stabilo Fineliner
Shop at:
AZ | O
Staedtler colored pencil triangular 48Pc
Shop at:
AZ | O
Tape Runner
Tape Runner
Shop at:
AZ | SSS | SB
Teflon Craft Mat
Teflon Craft Mat
Shop at:
AZ
Temu
Temu
Shop at:
O

DIY Kitchen Trivet

Learn how to make a kitchen trivet. #kitchencraft #crafttutorial

finished trivet

If you have looked into buying a trivet, they can be expensive. A trivet is something you probably need, but don’t necessarily want to spend a lot of money on. Consider making your own with this simple technique and easy-to-find materials. You can alter the size and make a coaster or enlarge it and make a placemat. 

Materials:

  • Clothesline (cotton)
  • Cotton yarn (Peaches n Cream)
  • Tapestry needle
  • Scissors

Directions:

This technique isn’t crochet or knitting but rather a wrapping and stitching technique. Start with the Cotton yarn and pull out a length you are comfortable working with, 1-2 yards in length. Thread one end of the yarn through the needle. 

Take the clothesline end and roll it onto itself to make a circle. 

beginning circle

Wrap the end of the Cotton yarn around the clothesline circle – similar to winding a ball of yarn. 

Once the circle is covered, wrap the Cotton yarn around the length of the clothesline.

 stitching together

I wrapped it 10 times around and then took a stitch into the circle.
Then I wrapped another 10 times around the clothesline and took a stitch into the row before.
Continue to wrap and stitch around the outside of the circle.
** Continue this technique to finish. 

changing yarns

**Add a new Cotton yarn as needed, covering the ends of each piece of yarn with the wrapping

Using all cotton material is the safest option when using the finished piece with pots and pans that will be hot.

finished

Options:

There’s an almost unending variety that can be achieved with this concept. Just be sure to set your parameters before you begin so that your work is consistent. 

  • change the color of the yarn 
  • change your stitching pattern (like 3 sewn stitches instead of 1)
  • stitch down two rows of the wrapped lines instead of one
  • dye the work after you are finished
  • dye the clothesline

This post was a part of the #CCBG Creatively Crafty Blog Group’s September Craft Challenge where the theme was Kitchen Craft. This is a repost of the original post.

Sublimating Ribbon

Learn how easy it is to create your own ribbon designs using sublimation ink pads and markers. @gwenstudios @artesprix #affiliate

finished gift box

Now you can create your own special designer Gwen Studios ribbon. I love how this sublimated ribbon made this gift box so special. Putting your own design on a ribbon is very easy to do using sublimation ink pads and markers. The ones I am using are from Artesprix.

The links provided are for your use and may contain affiliate links.
They cost nothing for you to use.
Thank you in advance for supporting this site with its use.

coloring

To create the image I am using a layering technique. I stamped the image and with the use of a light table, I can see the image and know where to add the color. Then I stamped the image on top of the colored work. The reason for doing it this way was to illuminate the possibility of the inks bleeding together. You can see how this was done in the video below.

colored image

I actually did the entire process twice. I started with pastel colors as seen in the first image. They did transfer but weren’t visible enough for my taste so I did it again with brighter colors as seen above. Here I am making the sublimation sandwich to transfer the image.

sublimation sandwich

This image show what is referred to as a sublimation sandwich. Working on a heat-resistant surface, I have a layer of protective paper, then the ribbon faces up, the colored and stamped image face down is held in place with heat-resistant tape, and the entire thing will be covered with another piece of protective paper before heating.

iron

Because my project is small I chose to use a craft iron instead of a heat press. With the iron set on high and no steam, I used a bit of pressure and left the iron on for a minute. Before removing the tape and image you will want to do a peek test to make sure everything is transferred.

This post is created for the Gwen Studios design team. Other projects can be found on the Designer Crafts Connection website. Gwen Studios ribbons can be found at Walmart and Michaels.

Video Tutorial:

Suggested Materials:

Links are Affiliates
AZ – Amazon, O – Other
Heat Tape
Artesprix Heat Tape
Shop at:
AZ | O
Artesprix Protective Paper
Shop at:
AZ | O
Artexprix Project Mat
Shop at:
AZ | O
Gwen Studios at Walmart
Shop at:
O
Oliso Mini Iron
Oliso Mini Iron
Shop at:
AZ
Pastel Sublimation Markers
Shop at:
AZ | O
Sewing Clips
Sewing Clips
Shop at:
AZ | O
Sublimation Ink Pad
Sublimation Ink Pad
Shop at:
AZ | O

Glitter and Mica Powder Ornament

with Ceya

ornament

When I got products from Ceya I wanted to combine glitter and mica powder. On the first try, I decided to make an ornament. Having not done this before, I wasn’t sure of the outcome, but I am thrilled with the results and can’t wait to try other applications.

Materials:

  • plastic ornament
  • polyacrylic
  • chunky glitter
  • mica powder
  • small spoon
  • disposable cups

Video Tutorial:

If you’d like to see more products from Ceya I have an unboxing video here:

Making an Embellished Square Card

Making a card with the Cricut Joy and cutting card stock.

with CutCardStock

card with pen

It is so fun to craft and try new things. This card was made using a Cricut Joy. I wanted to experiment with Stardream card stock to see if it would cut on a smaller cutting machine.

I created this card as a part of the CutCardStock‘s design team where I share projects twice a month.

The links provided are for your use and may contain affiliate links.
They cost nothing for you to use.
Thank you in advance for supporting this site with its use.

The card stock used for this card was Stardream Metallic in Coral and Latte Tan for the card. CutCardStock has a ton of different colors of Stardream to choose from, they are all just beautiful and my favorite card stock from CutCardStock.

Cricut Joy

I wanted to see if I could cut heavier card stock on the Cricut Joy. I chose a free design on the Cricut Joy app. The setting I chose was for glitter card stock, it worked well. Cutting each shape twice, even the smallest of shapes were cut without trouble.

The two parts I used for the card are the folded card stock for the background, and the cut cardstock I cut on the Cricut Joy. The cut square is 3″ x 3″ and the folded piece is 3.5″ x 7″.

After gluing the card parts together, I chose to embellish the center of the flowers with gems in two sizes. These pearlized gems were bought at the Dollar Tree.

Video Tutorial: