Keeping small thank-you cards in your stash are so useful. I made this one with products provided to me by Penny Black. I fell in love with the Stick and Shine sticker set, it was so so fun to work with.
Here are the materials I worked with. The links below are for Penny Black products provided to me at Creativation and available on Amazon.
This card can be used for so many different occasions. I am not sure which makes it more beautiful, the die or the foil technique. Together they are exquisite.
Kokorosa provided the Bubbles Background Board die for this post. If you would like to get the same die, here is a discount and link.
I used my DIY Mixed Media Spray and a die from Kokorosa to make this beautiful card. I chose not to use a sentiment, leaving just the lovely image. The card turned out so nice that I wouldn’t mind framing the image.
Kokorosa Metal Cutting Dies with Butterflies & Flowers Background Board is the die I used.
I used Gold Stardream in 8.5 x 11 for the card. The metallic gold enhances the colors of the die-cut image.
Video Tutorial:
The close-up image above shows the detail of the small shapes that cut out well along with the details of the color created by the media spray. The combination of the two is just amazing.
A lattice die offers endless possibilities to enhance card designs. Adding a lattice pattern can instantly elevate your creation, whether you’re creating birthday cards, holiday greetings, or wedding invitations. The delicate and intricate nature of this pattern provides an air of sophistication that impresses recipients. This pretty card was made with a lattice die from Beebee Craft.
There are many ways to use a lattice die, but I chose to layer a printable image adding dimension to the image. You can grab the free printable PDF here: [stained glass foral]
Video Tutorial:
This close-up image shows the detail of the dimensions created with the lattice die.
Use Coupon: Try10 and Save 10% for your whole order from Beebee Craft https://www.beebeecraft.com?s=Try
How to make a Father’s Day card with a ribbon tie. #cardmaking #affiliate #GwenStudios
with Gwen Studios
This is such a fun card for Father’s Day using Gwen Studios’ satin ribbon for a tie. You can stylize the tie or leave it a solid color. Having the kids do the decorating will make this project just that much more special. Add a sentiment or handwrite a special greeting.
The links provided are for your use and may contain affiliate links. They cost nothing for you to use. Thank you in advance for supporting this site with its use.
Gwen Studios’ satin ribbon makes the focal point of the card with the tie being made with the ribbon.
Materials used for making this Father’s Day card are simple. Colored cardstock for the card, white cardstock for the shirt, satin ribbon, ink pens to decorate the ribbon, scissors, tape runner, and adhesive.
Once the tie is stylized, there are only three parts to making the card; the card base, the shirt, and the tie.
Video Tutorial
Suggested Materials
Links are Affiliates AZ – Amazon, C – Cricut, SSS – Simon Says Stamp, O – Other
Make a lovely greeting card with Transfer Me sheets from Dress My Craft. #affiliate #dressmycraft
from Dress My Craft
This lovely card was made using Transfer Me sheets from Dress My Craft. They are so fun to work with and the process is a bit addictive. With over 300 different designs you are sure to find one to suit your needs.
This is one of the transfer sheets I used to make my greeting card.
After working with the transfer sheets, I coordinated colored cardstock and a butterfly I had in my stash. Using a stamp that says “Just A Note” made the card so useful for a variety of different occasions. Tape runner and foam tape helped put it easily altogether.
If you are interested in the 3D butterfly, you can find the tutorial and free printable here [3D butterflies]
Video Tutorial:
A close-up image shows off the Transfer Me images and some of the dimensions of the butterfly and the sentiment.
Suggested Materials:
Links are Affiliates AZ – Amazon, C – Cricut, SSS – Simon Says Stamps, SB – Scrapbook, O – Other
A great card to use up your scrap papers. #affiliate #craspire
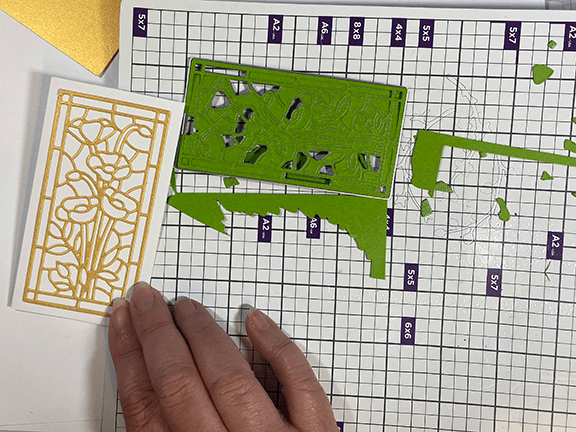
Using a die from a set of dies from Craspire, I made this stain-glassed little card. The size of the card and the die are great for using up your stash of scrap papers. I used a variety of greens, metallic orange, and metallic gold for the frame.
The links provided are for your use and may contain affiliate links. They cost nothing for you to use. Thank you in advance for supporting this site with its use.
After cutting the metallic gold frame and gluing it to the card front, I continued to cut the different colors. The above image shows the green that is used for the stems and leaves. Putting these in place is a bit like working a puzzle.
The next color was metallic orange for the flowers. After the flowers, I cut a dark green and placed the outer border. Then I had to decide how I was going to finish the background pieces. I was torn between leaving it white, a pale green, or a craft paper brown. Any of them would work and look good but I finally decided on the light green.
Transform a colored image into a greeting card. #freeprintable #freecalendar #cardmaking #cardtutorial
As I sat there, admiring my colorful calendar image for the month of February, I couldn’t help but feel inspired. The vibrant hues and playful design gave me an idea. Why not turn this into a one-of-a-kind, personalized greeting card for a loved one? With a few adjustments, I was able to create a beautiful, unique piece that was sure to brighten someone’s day.
Repurpose your colored calendar into a card and share your work with others. #card #reuse #coloring
This year’s free calendar from Try it – Like it – Create it is an adult coloring calendar. Once the month has passed, please don’t throw away your creation, turn it into a card!
If you haven’t downloaded the free calendar yet, you can do so at the following link. [2023 calendar]
The materials are straightforward, you’ll need a slimline card base, your colored image, a way to cut down the calendar, and some adhesive.
I couldn’t just leave the image as it was, I chose to add some shimmering watercolor paint to a few areas. I bought the watercolors from Temu – they are fantastic metallic-based watercolors available at a great price.
Video Tutorial:
Making the card is pretty straightforward forward but I’ve added a simple way to make a matching envelope with no measurements needed.
The dark green petals around the center have the shimmer added. I love how this project is a kind of recycling project where you can get more mobility from your colored image. What a nice way to share your work with someone special!
Making a card with the Cricut Joy and cutting card stock.
with CutCardStock
It is so fun to craft and try new things. This card was made using a Cricut Joy. I wanted to experiment with Stardream card stock to see if it would cut on a smaller cutting machine.
I created this card as a part of the CutCardStock‘s design team where I share projects twice a month.
The links provided are for your use and may contain affiliate links. They cost nothing for you to use. Thank you in advance for supporting this site with its use.
The card stock used for this card was Stardream Metallic in Coral and Latte Tan for the card. CutCardStock has a ton of different colors of Stardream to choose from, they are all just beautiful and my favorite card stock from CutCardStock.
I wanted to see if I could cut heavier card stock on the Cricut Joy. I chose a free design on the Cricut Joy app. The setting I chose was for glitter card stock, it worked well. Cutting each shape twice, even the smallest of shapes were cut without trouble.
The two parts I used for the card are the folded card stock for the background, and the cut cardstock I cut on the Cricut Joy. The cut square is 3″ x 3″ and the folded piece is 3.5″ x 7″.
After gluing the card parts together, I chose to embellish the center of the flowers with gems in two sizes. These pearlized gems were bought at the Dollar Tree.