White on White Rose Card

How to make a layered white on white rose card.

with CutCardStock

final card

I have a very pretty white-on-white card that could be used for a wedding, an anniversary, or just a special greeting. You can add your own sentiment or leave it as is.

I suggest this cut file for intermediate or above users.

The links provided are for your use and may contain affiliate links.
They cost nothing for you to use.
Thank you in advance for supporting this site with its use.

basis card stock

The paper I used was Basis White Card Stock for the card. Basis White is so versatile. I love it for the foundation of most of my card making. It cuts and scores beautifully. At 80#, I choose to set my Cricut Maker at a card stock setting of 100# which works well even for small detailed cuts.

Cricut maker

I cut the file on a Cricut Maker. As a reminder, set the red lines to score and load your scoring tool before setting the file to cut.

card parts

There are three rose cuts for this card. You could choose to use only one or you could enlarge them if desired. I urge you to watch the video tutorial below for tips and techniques on how to weed these delicate cuts.

Video Tutorial:

Please visit the shop at Try it – Like it – Create it to download the SVG file for the card. Rose Card SVG

close-up

This view shows the detail of the 3-D effect of the layering of the roses. on the front of the card. You can also see some of the added mist that was sprayed on the top of the roses. To make your own DIY spray, see the tutorial here: [DIY Shimmer Spray]

To purchase this rose card file, please visit the shop [rose card]

Making a Window Card

Make a window card with this free SVG file. It’s versatile for many card giving opportunities.

with CutCardStock

final card

I have another pretty card that could be used for a wedding, an anniversary, or just a special greeting. You can add your own sentiment or leave it as is. There are options for adding 3 dimensions to this card by lifting up some of the cutting. I have also added gems to finish the card off.

basic white

The links provided are for your use and may contain affiliate links.
They cost nothing for you to use.
Thank you in advance for supporting this site with its use.

The paper I used was Basis White Card Stock for the card. Basis White is so versatile. I love it for the foundation of most of my card making. It cuts and scores beautifully.

cricut maker

At 80#, I choose to set my Cricut Maker at a card stock setting of 100# which works well even for small detailed cuts. Don’t forget to set the red line to score before sending the file to cut.

The addition of the gems to the centers isn’t necessary but a nice option. If you don’t want to use your personal cutter for the smaller square piece, I cut mine on a paper trimmer to 3″ x 3″. The finished card is 4″ x 6″.

Please visit the store to download the free SVG file for the card. Window Card SVG

close-up of lifting

This view shows the detail of the 3-D effect of the lifting on the front of the card. I like the dimension gained as well as the see-through element of the cut-away pieces.

Video Tutorial:

close-up of final card

And here is a close-up view of the finished card with the lifting finished and the gems in place. I am wondering what coloring option and details you will use, please comment below.

Fairy Card with Heart Stems

Follow along to make this fairy card with heart stems. Lots of techniques included.

Today I am working with a stamp from Fairy Hugs called Alexa. She is joyful and playful so I added an array of three different colored heart stems behind her to amplify her action. The card doesn’t have a sentiment. I like leaving them blank until later so the card can be used for a variety of different occasions. I can always add a sentiment but changing one isn’t that easy.

Many of the items I use in posts are provided by the manufacturers to promote their products.
A special thanks to those brands who sponsor this site
Some links are affiliates, thank you for using them.

Materials:

  • Alexa stamp
  • stamp block
  • black ink
  • colored pencils
  • embossing plate
  • CrossOver II
  • heart stem die
  • clear embossing powder
  • Versamark ink pad
  • heat tool
  • purple ink pad
  • card stock – a variety of colors
  • tape runner
  • foam tape *
  • scissors *
  • Brother Scan n Cut
  • Wink of Stella
  • Blue metallic marker *
  • Cricut Paper Trimmer
    * items were purchased at the Dollar Tree

A variety of different techniques were used in putting this card together. You can see them step by step in the video tutorial below.

Video Tutorial:

Above is a close-u image of the card so you can see some of the details. The final touches while seem small really do add to the overall vision of the card.

Suggested Materials:

Links are Affiliates
AZ – Amazon, C – Cricut, SSS – Simon Says Stamps, SB – Scrapbook, O – Other
Crossover II
Crossover II
Shop at:
AZ
Intense Black Ink Pad
Shop at:
SSS
Portable Trimmer
Portable Trimmer
Shop at:
AZ | O | C
Tape Runner
Tape Runner
Shop at:
AZ | SSS | SB
Versamark
Versamark
Shop at:
AZ | SSS | SB
Woodless Colored Pencils
Shop at:
AZ | O |

Ways to Stamp Texture

Learn fun stamping techniques with Fairy Stamper stamps.

with Fairy Stamper

I enjoy creating my own textured papers using a variety of different techniques. For my Fairy Stampers Video Design post this month, I used a bulrushes stamp in different ways to create the background paper for my card. Another Fairy Stampers stamp was used for the sentiment. This was a fun card to make.

Many of the items I use in posts are provided by the manufacturers to promote their products.
A special thanks to those brands who sponsor this site
. Some links are affiliates, thank you for using them.

stamping materials
s

The card came together in a two-step process. The first was creating the background, and the second was creating the sentiment strip.

stamping  sentiment

After embossing the cardstock, the sentiment was stamped on top. Since the embossed cardstock has texture, the stamp needed to be applied more than once.

Once the parts of the card were made, it was time to put it all together. A tape runner and foam tape were used.

card close-up

Here is a close-up shot of the card so you can see the texture and misting spray as well as the raised sentiment. You can really see how the colors work together in this image.

Video Tutorial:

Suggested Materials:

Links are Affiliates
AZ – Amazon, SSS – Simon Says Stamps, SB – Scrapbook
Distress Ink Bundle
Distress Ink Bundle
Shop at:
AZ
Gelli Plate
Gelli Plate
Shop at:
AZ | SSS
Gina K foam tape
Gina K foam tape
Shop at:
AZ | SSS | SB
StazOn
StazOn
Shop at:
AZ | SSS | SB
Tape Runner
Tape Runner
Shop at:
AZ | SSS | SB
Versamark
Versamark
Shop at:
AZ | SSS | SB
We R Memory Keepers - All-In-One Tool - The Works
We R Memory Keepers – All-In-One Tool – The Works
Shop at:
AZ | SSS | SB

Making a Beary Cute Card

Working with products from the Maker’s Movement made this card so bear cute!

with Maker’s Movement

Planning, coloring, and die-cutting this card was so peacefully enjoyable. I knew the moment I saw the bear stamp he was going to be a polar bear. My daughter loves polar bears. What excites me about the card is that I used the leftover cut-out leaves from a past project as the stencil to create the background! What a great way to extend the use of the die and the card stock. I keep all my left-over parts just in case for moments like this.

Many of the items I use in posts are provided by the manufacturers to promote their products.
A special thanks to those brands who sponsor this site
.

Materials:

  • card stock – white and patterned
  • the Works Board
  • Let’s Get Cozy Die (leaves)
  • Woodland Friends – die and stamp sets
  • Distress Oxide
  • blending brush
  • Mini Maker
  • tape runner
  • Stazon black ink pad
  • Intense black ink pad
  • washi tape
  • Derwent Inktense pencils

Because I video the process, I didn’t get a chance to stop and photograph the ink blending with the DIY stencil on the front of the card. But you can see it all happen in the video tutorial below.

Isn’t that bear just so cute? After stamping and coloring, I taped the die in place then sent it all through the Mini Maker to cut. The only thing left to do is stamp the sentiment and put the card together.

Video Tutorial:

Suggested Materials:

Links are Affiliates
AZ – Amazon, SSS – Simon Says Stamps, SB – Scrapbook, O – Other
Derwent Inktense
Derwent Inktense
Shop at:
AZ
Distress Ink Bundle
Distress Ink Bundle
Shop at:
AZ
Intense Black Ink Pad
Shop at:
SSS
Maker's Movement
Maker’s Movement
Shop at:
O
Mini Maker
Mini Maker
Shop at:
O
Professional Makeup Brush Set
Shop at:
AZ
StazOn
StazOn
Shop at:
AZ | SSS | SB
Tape Runner
Tape Runner
Shop at:
AZ | SSS | SB
We R Memory Keepers - All-In-One Tool - The Works
We R Memory Keepers – All-In-One Tool – The Works
Shop at:
AZ | SSS | SB
Westcott 14849 8
Westcott 14849 8″ Straight Titanium Bonded Non-Stick Scissors
Shop at:
AZ

Pumpkin Mandala Card

Follow along and make this pumpkin mandala for fall, Halloween, or Thanksgiving. It is so versatile it works for card making or home decor. #sponsored #cutcardstock

with printable and free SVG

Today I am using an SVG file to create a Pumpkin Mandala Card. This design works well for Halloween, Fall, or Thanksgiving. I’ve used the mandala for a card but you could make it larger for a beautiful decor piece. Or just framing the card would be nice too.

Many of the items I use in my posts are provided by the manufacturers in order to promote their products.
A special thanks to those brands who sponsor this site.

Orange, brown, and gold card stocks are being featured this month on CutCardStock. I am using Cosmic Orange and Stardream Metallic Card Stock in Bronze. I really like the iridescent quality of the Stardream card stocks.

I cut the CutCardStock on a Cricut Maker. The Cosmic Orange was cut at 100# and the Metallic Bronze was cut twice at 100#. While the mat is still in the Maker, just hit the go button again.

materials

Materials:

  • CutCardStock papers (linked above)
  • Distress Oxide ink pads
  • blending brushes
  • adhesive
  • rhinestones
  • Embelli Gelli
  • free SVG file
  • printable paper file

Video Tutorial:

pumpkin circle
pumpkin mandala SVG

The SVG file for the pumpkin mandala can be found at: [mandala]

The printable paper design for the barn wood is a part of a Halloween pack and can be found at: [barn wood]

A close-up of the finished card shows off some of the detail in the printed barn wood image and the ink blending on the mandala.

Suggested Materials:

Links are Affiliates
AZ – Amazon, SSS – Simon Says Stamps, SB – Scrapbook, O – Other
Scraperfect Embellie Gellie Tool
Shop at:
AZ | SSS | O
Professional Makeup Brush Set
Shop at:
AZ
Distress Ink Bundle
Distress Ink Bundle
Shop at:
AZ
rhinestones
rhinestones
Shop at:
AZ
Scotch Tacky Glue
Scotch Tacky Glue
Shop at:
AZ | SSS

Mother’s Day Card

An SVG to make a card for Mother’s Day. #affiliate

As a mom, I have to say some of the best presents are homemade. I love it when my daughters take the time to make me something. I’d rather they not spend money on me. This Mother’s Day Card is one with a few steps but it isn’t difficult to make. I think any mother would appreciate a handmade card.

I work with a few different companies and with this card, I was able to combine their products. The following links are affiliate links, they cost nothing for you to use and in fact, they help support this site. Thank you for using them.

Materials:

Directions:

Using the free SVG file listed above, cut the white card stock with your personal cutting machine.

I am using a Cricut Maker. I set the red line to score and added the scoring tool.

This card is made from three parts, the cut cardstock,
the polka dot card stock cut just shy of 6″ x 8″, 
and a piece of Rinea red foil paper 4″ x 2.25″.
 

I used the Best Glue Ever to attach all the layers.
 

I applied glue around the word Mom and around the outer edge of the Rinea foil paper.
 

The back of the red foil paper is gold.

Hopefully, you can get a sense of the luminous red foil from the above photo.

Using the same process, I attached the polka-dotted scrapbooking paper.
The paper I chose had a white back, making the inside of the card ready for a special message.
The folded size is 6″ x 4″.

Lucky Card and SVG

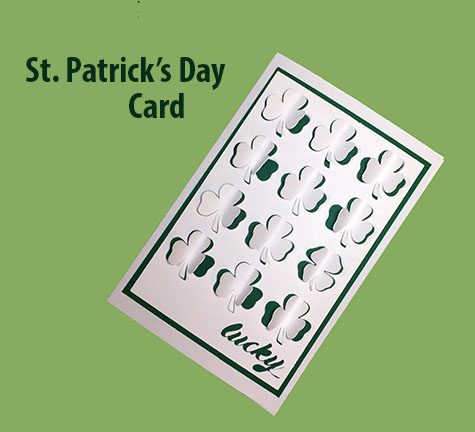
Make a lucky card for St. Patrick’s Day.

Do you celebrate St. Patrick’s Day or know some one Irish? Make this lucky card to send them a greeting. It is a quick card to make with a personal cutting machine. I really like the 3D aspect of the shamrocks (clovers), and there is one lucking one hiding among the others.

Some products used in this post were provided by the following companies: Cricut, CutCardStock, Scrapbook Adhesives

You’ll want to grab the SVG file to make the card and cut it out on your personal cutting machine. I used a Cricut Maker.

Purchase file: St. Patricks Day SVG

Materials:

  • SVG file linked above
  • Personal cutting machine (Cricut Maker)
  • white cardstock
  • green cardstock (CutCardstock)
  • tape runner or Adhesive (Scrapbook Adhesives)

Video Tutorial:

up close detail of the lifting shamrocks

Suggested Materials:

Links are Affiliates
AZ – Amazon, SSS – Simon Says Stamps, SB – Scrapbook, O – Other, C – Cricut
Cricut Maker® Machine
Shop at:
AZ | O | C
Cut Cardstock
Cut Cardstock
Shop at:
O
Cricut Standard Grip Mat
Shop at:
AZ | C
Tape Runner
Tape Runner
Shop at:
AZ | SSS | SB

Thinking of You Card

Hello Friend card for a video hop and giveaway sponsored by @crackerboxandsuzystamps. #sponsored #scrapbookadhesives

Video Hop and Giveaway

Today I have a video up on YouTube where I am participating in a video hop and giveaway that is sponsored by Crackerbox & Suzy Stamps. I was provided with stamps in order to participate in this hop.

To enter the giveaway, make sure to visit each video in the hop and leave a comment.

Giveaway Information:

Please visit the following Rafflecopter link by February 7, 2021 to enter the giveaway, generously gifted by Crackerbox & Suzy Stamps: http://www.rafflecopter.com/rafl/display/07ad29b419/?

(P.S. Earn BONUS entries for each video on the hop that you comment on! Complete as many or as few of the Rafflecopter options as you choose; but the more you complete, the better your chances of winning!)

To see the amazing products offered by Crackerbox & Suzy Stamps, please visit their online store: http://rubberartstamps.com/ Once the giveaway is closed, the winner will be chosen at random and contacted by our sponsor.

If you are the winner, you will have one week (after contact) to claim your prize. Failure to do so will result in forfeiting the prize and an alternate winner will be chosen. Thanks for hopping along with us!

*This giveaway is gifted by Crackerbox & Suzy Stamps. YouTube is not responsible for prize fulfillment.

Hop Lineup:

EK Gorman: https://youtu.be/gWsAFTUjIKE
Nadine Carlier: https://youtu.be/VrmnrRuPV9Q
Jenlee: https://youtu.be/pRviLW58Zkg
Cards by Kendra: https://youtu.be/1WrU6jpw8J4
Crafty Pink Pixie: https://youtu.be/W5aYZRB9uf8
Karen Hasheck: https://youtu.be/H4vsMwomNKI
Cherished Cards: https://youtu.be/18QkF5ryDeQ
LeeAnn McKinney: https://youtu.be/SdHpKYrTboA
Akansha Sahgal: https://youtu.be/zJA5g3OcBpI
Podpopper’s Place: https://youtu.be/AI_yDs_qvr4
Straw-Bearie Designs: https://youtu.be/e8qzSMbA0QQ
Debbie J.’s Crafting Corner: https://youtu.be/DJN0Ux4s6hQ
Try it – Like it – Create it: https://youtu.be/o4js7NyOahw
Handi Scandi’s Crafty Adventures: https://youtu.be/lbqNKd_Ottg
MAD About Cards and Crafts: https://youtu.be/aM5NPf6U89A

Suggested Materials:

Links are Affiliates
AZ – Amazon, SSS – Simon Says Stamps, SB – Scrapbook
Scraperfect Perfect Crafting Pouch
Shop at:
AZ | SSS
Professional Makeup Brush Set
Shop at:
AZ
Distress Ink Bundle
Distress Ink Bundle
Shop at:
AZ
Versamark
Versamark
Shop at:
AZ | SSS | SB
Zing! Embossing Powder
Shop at:
AZ
Tape Runner
Tape Runner
Shop at:
AZ | SSS | SB

Make a Quick and Easy Card with ScraPerfect

I have a post up on ScraPerfect today for making a quick and easy card.

I began this card with a gelli print I was playing around with and decided to stamp onto it. Which then turned into making a card. Sometimes that’s how things happen, with the end not in sight. Using ScraPerfect products make this card making so quick and easy. See my post on the ScraPerfect blog where I post tutorials twice a month as a part of their design team. [card making on ScraPerfect]

Suggested Materials:

Links are Affiliates AZ – Amazon, SSS – Simon Says Stamps

Scraperfect Best Glue Ever
Shop at:
AZ | SSS
Scraperfect Best Cleaner Ever
Shop at:
AZ | SSS
Scraperfect 32 Clog Writing Cap, Medium
Shop at:
AZ | SSS