Floral Circle Card

Make an elegant floral card with this free SVG file. Great for weddings and anniversaries or any special greeting.

with CutCardStock

final card

What a beautiful card that could be used for a wedding, an anniversary, or just a special greeting. You can add your own sentiment or leave it as is. I love how the neutral colors coordinate together. Three different papers were used to make this card.

cardstock

The links provided are for your use and may contain affiliate links.
They cost nothing for you to use.
Thank you in advance for supporting this site with its use.

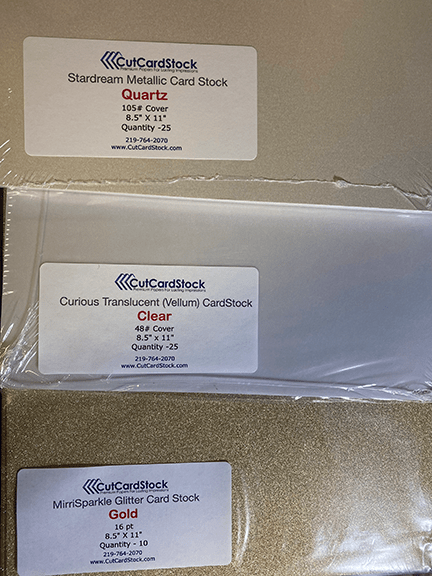
The papers used were Stardream Metallic in Quartz for the card. Stardream is my favorite cardstock because it has a shimmer to the surface. Cut the floral element from MirriSparkle Glitter in Gold, and the vellum insert from Curious Translucent in Clear.

cricut

I cut the file on a Cricut Maker. As a reminder, set the red lines to score and load your scoring tool before setting the file to cut. Similar weight cardstocks can be cut at the same time. Set your machine to 100lb cardstock for the Stardream and the Gold Glitter and run the cut twice. Just push the go button again without removing your mat.

parts

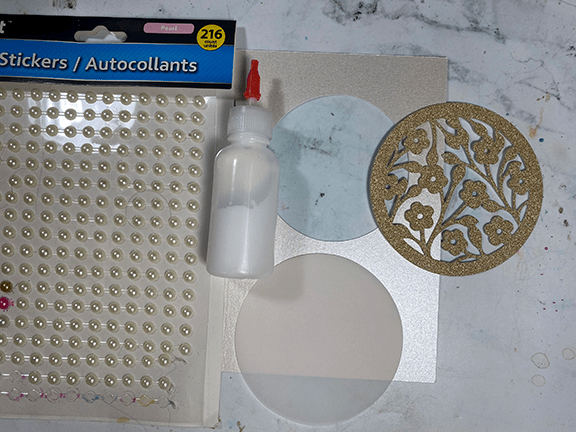
The cut file has three parts to glue together. Any adhesive will work, I am using Reptile Craft Adhesive. I’ve placed it into a smaller bottle (as seen in the photo above). You can purchase the pearl gems at the Dollar Tree.

circle box

If you would like a coordinating gift box, see the following link: Circular Box

Video Tutorial:

Please visit the store to download the free SVG file for the card. [Elegant Card SVG]

close-up of card

This view shows the detail of the decorative piece on the front of the card. I like the dimension gained from the addition of the pearl gems as well as the see-through element of the vellum.

card standing

The above view of the card shows off the see-through quality of the vellum.

Card Making

Follow along the creative process for making a card, staring without a plan.

and the Creative Process

I began making this card without a plan. I take you through the entire creative process from start to finish using minimal materials. The process begins with ink smooching to make a background for the card. And from there, choose colors that coordinate.

For the sentiment, I used a word from the Word Art file located in the store. You can access that file here: https://tryit-likeit.com/product/word-art/

Many of the items I use in posts are provided by the manufacturers to promote their products.
A special thanks to those brands who sponsor this site. Some links are affiliates, thank you for using them.

The sentiment is raised using foam tape and the bloom is tucked into the top. You also get a sense of the glitter splats from the Unicorn Spit paint.

Video Tutorial:

The image above shows the finished card and a peek to the inside. I like to take elements from the front of the card and carry them into the inside. You can also see the slight 3D effect of the bloom on the front of the card.

Suggested Materials:

Links are Affiliates
AZ – Amazon, SSS – Simon Says Stamps, SB – Scrapbook, C – Cricut, O – Other
Cricut Portable Trimmer
Shop at:
AZ | C
Gina K foam tape
Gina K foam tape
Shop at:
AZ | SSS | SB
Homeright Heat Gun
Homeright Heat Gun
Shop at:
AZ
Scraperfect 32 Clog Writing Cap, Medium
Shop at:
AZ | SSS | O
Scraperfect Best Glue Ever
Shop at:
AZ | SSS | O
Unicorn Spit
Unicorn Spit
Shop at:
AZ

Make Your Own Foiled Embellishments

Did you know you can make your own foiled embellishment dots?

with ScraPerfect

You might already know that the Best Glue Ever makes great dots of glue. Did you know you can use them to make them into foiled embellishments? It takes only one step and you have a variety of different colored foiled dots at the ready.

You can make a variety of different size dots. I made mine on recycled packaging but any non-stick surface will work. Let them dry overnight or until they appear clear.

Those same dots from above are now dry and can be used with foil. You can foil them ahead of time or as you use them.

the Best Glue Ever               ScraPerfect’s No-Clog Writing Cap™

transfer foils

ScraPerfect has great sets of transfer foils but any foil will work. If you keep your used scraps of foil this is a great way to use up those leftovers.

Video Tutorial:

A close-up of the dots shows the 3D quality of the foiled dots. Now you can make your own and coordinate the colors you need for crafting.

Making a Get-Well Card

Making a get-well card with Fairy Stamper stamp and stencil.

with Fairy Stamper

finished card

As a part of the Fairy Stamper’s Video Design Team, I have a new card tutorial for making a get-well greeting card. I could probably send this to myself as I am getting over a cold that lasted a long 2.5 weeks where I lost my voice. So I have a lot of catching up to do. Thankfully, no Covid, I was tested twice!

materials

Materials:

  • stencil
  • cardstock – blue, green, white
  • blending brush
  • Distress Oxide
  • Pixie spray
  • stamps
  • Works Board
  • white embossing powder
  • DIY shimmer spray
  • adhesive
  • heat gun
  • Rinea Foiled Paper – die-cut sentiment

I wanted to try something different with my stamping in that we typically stamp in black and I wanted to use white. I wasn’t sure about stamping a fairy in white so I chose to work with the florals. I also wanted to use a stencil to texturize the background and I really like how that turned out.

Video Tutorial:

The close-up image above caught the DIY shimmer mist really well on the card. If you would like to learn how I made it, you can follow this link. [shimmer mist]

Suggested Materials:

Links are Affiliates
AZ – Amazon, SSS – Simon Says Stamps, SB – Scrapbook, O – Other, C – Cricut
Cricut Portable Trimmer
Shop at:
AZ | C
Distress Ink Bundle
Distress Ink Bundle
Shop at:
AZ
Mini Maker
Mini Maker
Shop at:
O
Professional Makeup Brush Set
Shop at:
AZ
Rinea Foiled Paper - jade and gold
Rinea Foiled Paper – jade and gold
Shop at:
O
Scotch Tacky Glue
Scotch Tacky Glue
Shop at:
AZ | SSS
Versamark
Versamark
Shop at:
AZ | SSS | SB
We R Memory Keepers - All-In-One Tool - The Works
We R Memory Keepers – All-In-One Tool – The Works
Shop at:
AZ | SSS | SB

Ways to Stamp Texture

Learn fun stamping techniques with Fairy Stamper stamps.

with Fairy Stamper

I enjoy creating my own textured papers using a variety of different techniques. For my Fairy Stampers Video Design post this month, I used a bulrushes stamp in different ways to create the background paper for my card. Another Fairy Stampers stamp was used for the sentiment. This was a fun card to make.

Many of the items I use in posts are provided by the manufacturers to promote their products.
A special thanks to those brands who sponsor this site
. Some links are affiliates, thank you for using them.

stamping materials
s

The card came together in a two-step process. The first was creating the background, and the second was creating the sentiment strip.

stamping  sentiment

After embossing the cardstock, the sentiment was stamped on top. Since the embossed cardstock has texture, the stamp needed to be applied more than once.

Once the parts of the card were made, it was time to put it all together. A tape runner and foam tape were used.

card close-up

Here is a close-up shot of the card so you can see the texture and misting spray as well as the raised sentiment. You can really see how the colors work together in this image.

Video Tutorial:

Suggested Materials:

Links are Affiliates
AZ – Amazon, SSS – Simon Says Stamps, SB – Scrapbook
Distress Ink Bundle
Distress Ink Bundle
Shop at:
AZ
Gelli Plate
Gelli Plate
Shop at:
AZ | SSS
Gina K foam tape
Gina K foam tape
Shop at:
AZ | SSS | SB
StazOn
StazOn
Shop at:
AZ | SSS | SB
Tape Runner
Tape Runner
Shop at:
AZ | SSS | SB
Versamark
Versamark
Shop at:
AZ | SSS | SB
We R Memory Keepers - All-In-One Tool - The Works
We R Memory Keepers – All-In-One Tool – The Works
Shop at:
AZ | SSS | SB

Layered Butterfly SVG and Card

As a part of the CutCardStock design team, I made this layered butterfly card with a free SVG download file for you. @cutcardstock #affiliate

Today I have a tutorial post up on the CutCardStock blog as a part of their 2021 design team. I started making the layered butterfly and then decided to turn it into a greeting card. I really like how it turned out.

Materials Used:

  • Cut Card Stock
  • stamp
  • stamp block
  • tape runner
  • Cricut Maker
  • free SVG file
  • black ink
  • Distressed Ink
  • blending tool
  • Nuvo Shimmer powder
  • heat gun
  • adhesive
Cricut Maker

I used a Cricut Maker to cut the butterfly layers. I will list the free download file below.

finished – 3D angle

Suggested Material Links:

Links are Affiliates
AZ – Amazon, SSS – Simon Says Stamps, SB – Scrapbook, O – Other
Scraperfect Best Glue Ever
Shop at:
AZ | SSS | O
Scraperfect 32 Clog Writing Cap, Medium
Shop at:
AZ | SSS | O
Cricut Maker® Machine
Shop at:
AZ | O | C
Gina K foam tape
Gina K foam tape
Shop at:
AZ | SSS | SB
Nuvo Shimmer Powder
Nuvo Shimmer Powder
Shop at:
AZ | SB
Intense Black Ink Pad
Shop at:
SSS
Distress Ink Bundle
Distress Ink Bundle
Shop at:
AZ
Homeright Heat Gun
Homeright Heat Gun
Shop at:
AZ
Cut Cardstock
Cut Cardstock
Shop at:
O
Tape Runner
Tape Runner
Shop at:
AZ | SSS | SB

Making a Card with Mica Powder

Make a mini mica card using up materials you have on hand.

I like making cards that are alternative sizes. This is a good technique for using up scraps and materials you already have on hand. I am using a lot of materials to make this simple card but you don’t have to have them all to make a similar card. Follow along with the video tutorial to see how this simple card is done.

Materials:

  • cardstock
  • stamp
  • stamp block
  • Versamark ink pad
  • Mica power
  • Label maker
  • alcohol ink marker
  • Washi chomper
  • Glue Dots

Video Tutorial:

Here is a close-up of the finished mini card. The mica powder really shines in person. I like how the colors are enhanced by the black cardstock.

Let me know what you make cards in a variety of different sizes. I think mini or small are my favorite.

Suggested Material Links:

Links are Affiliates
AZ – Amazon, SSS – Simon Says Stamps, SB – Scrapbook
Spectrum Noir Markers
Shop at:
AZ | SSS | SB
Versamark
Versamark
Shop at:
AZ | SSS | SB
Glue Dots
Glue Dots
Shop at:
AZ | SSS | SB
Similar Brother Label Maker
Shop at:
AZ
Washi Chomper
Washi Chomper
Shop at:
AZ | SSS | SB
Pearl-Ex
Pearl-Ex
Shop at:
AZ

Lucky Card and SVG

Make a lucky card for St. Patrick’s Day.

Do you celebrate St. Patrick’s Day or know some one Irish? Make this lucky card to send them a greeting. It is a quick card to make with a personal cutting machine. I really like the 3D aspect of the shamrocks (clovers), and there is one lucking one hiding among the others.

Some products used in this post were provided by the following companies: Cricut, CutCardStock, Scrapbook Adhesives

You’ll want to grab the SVG file to make the card and cut it out on your personal cutting machine. I used a Cricut Maker.

Purchase file: St. Patricks Day SVG

Materials:

  • SVG file linked above
  • Personal cutting machine (Cricut Maker)
  • white cardstock
  • green cardstock (CutCardstock)
  • tape runner or Adhesive (Scrapbook Adhesives)

Video Tutorial:

up close detail of the lifting shamrocks

Suggested Materials:

Links are Affiliates
AZ – Amazon, SSS – Simon Says Stamps, SB – Scrapbook, O – Other, C – Cricut
Cricut Maker® Machine
Shop at:
AZ | O | C
Cut Cardstock
Cut Cardstock
Shop at:
O
Cricut Standard Grip Mat
Shop at:
AZ | C
Tape Runner
Tape Runner
Shop at:
AZ | SSS | SB

Hello :: Greeting Card

Making a simple greeting card to say hello. #sponsored @scraperfect

Today I have a post with a video tutorial up on the ScraPerfect blog. This greeting card was made with pieces cut on a Cricut Maker. Visit the link below to see the video tutorial.

hello card

As a design team member, I am provided with materials to work with.
Special thanks go to ScraPerfect and Cricut
for products used in this project.

Suggested ScraPerfect Materials:


AZ – Amazon, SSS – Simon Says Stamps

Scraperfect Best Glue Ever
Shop at:
AZ | SSS
Scraperfect Best Cleaner Ever
Shop at:
AZ | SSS
Scraperfect Embellie Gellie Tool
Shop at:
AZ | SSS
Scraperfect 32 Clog Writing Cap, Medium
Shop at:
AZ | SSS
Scraperfect Perfect Cleaning Cloth
Shop at:
AZ
Scraperfect Perfect Crafting Pouch
Shop at:
AZ | SSS